To add custom fields to WooCommerce checkout, register them with code. The Checkout block uses a registration function, while the classic shortcode checkout uses a filter. Neither route needs a plugin.
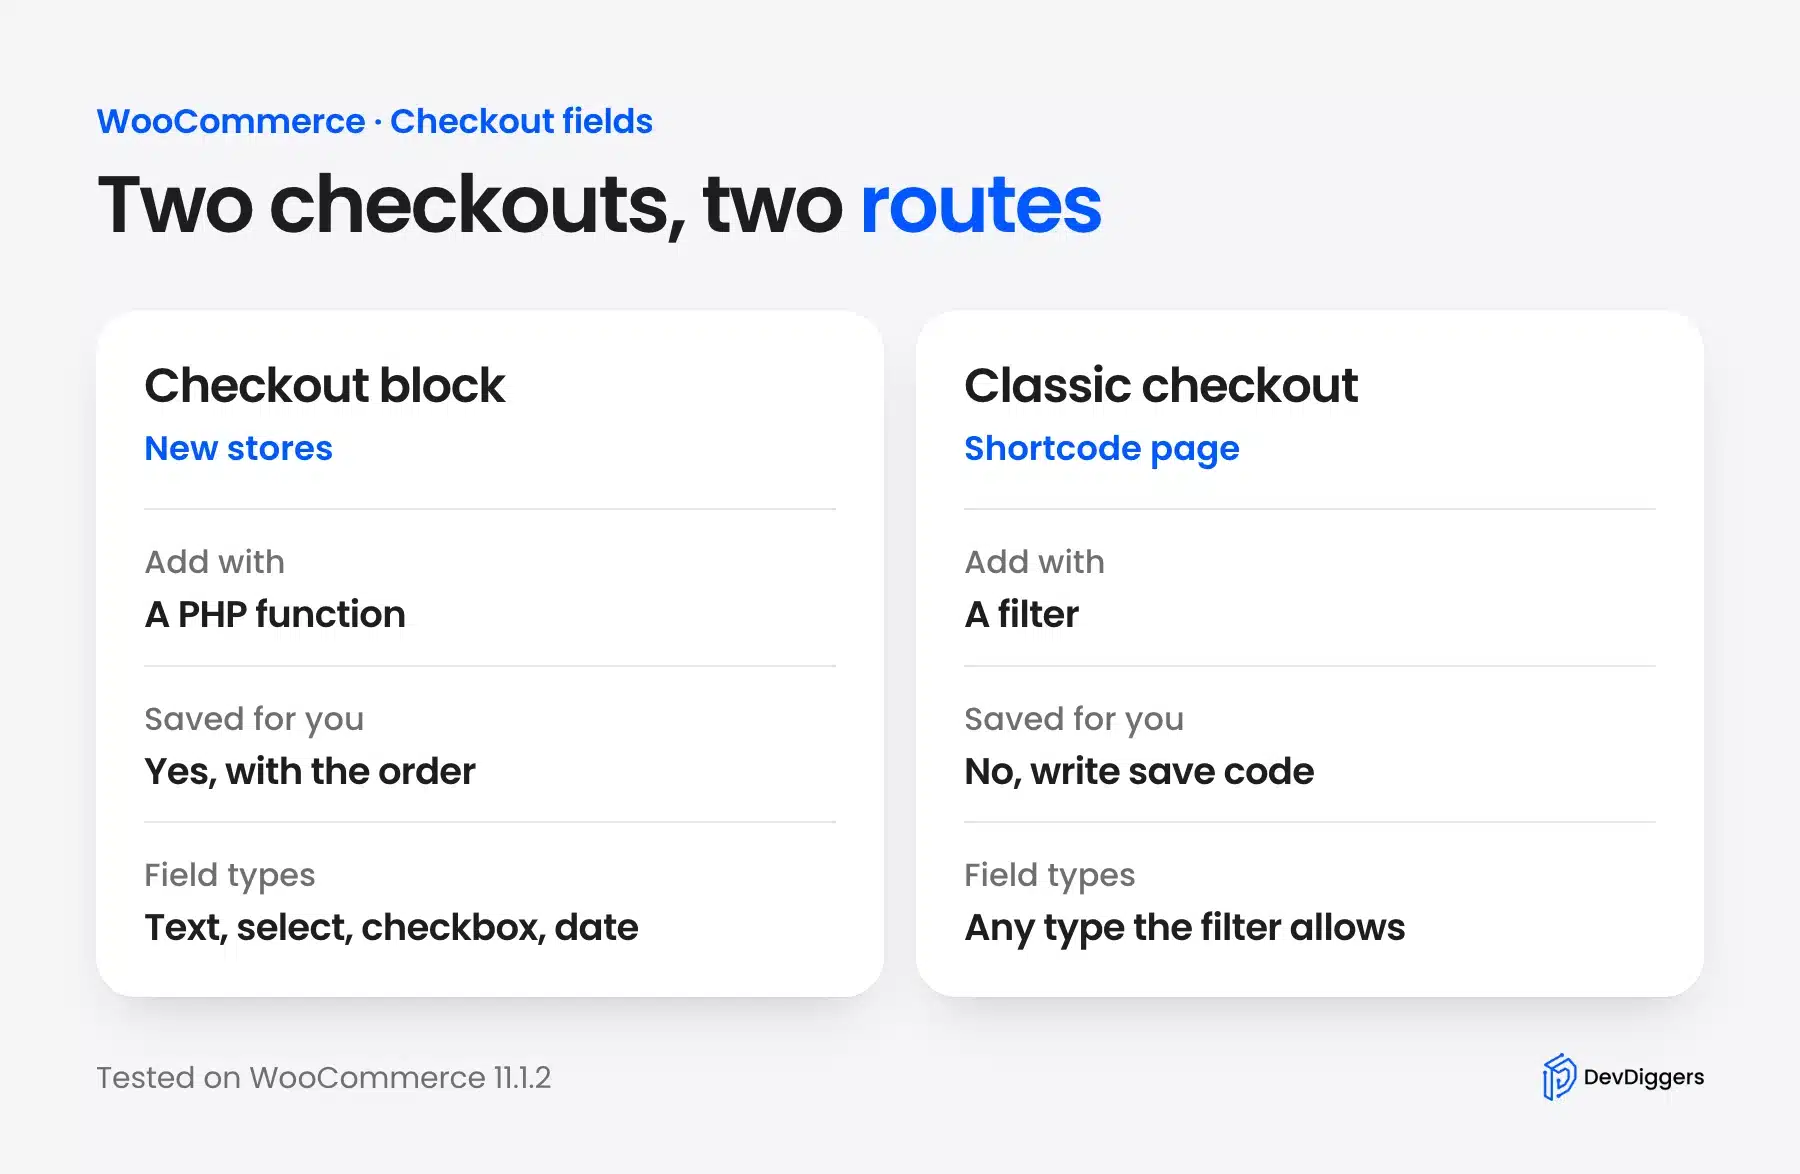
Which route you need depends on your checkout page. New stores use the Checkout block, and older stores often still use the classic shortcode. The two routes use different code, and a field built for one does not show on the other.
This guide gives working code for both, then places a real order to prove each field saves. Every result comes from a WooCommerce 11.1.2 test store with the Twenty Twenty-Five theme, checked in September 2026.
Which Checkout Do You Use: Block or Classic?
Open your Checkout page in the editor. If you see a Checkout block with inner blocks such as Contact information and Payment options, you use the Checkout block. If you see only a shortcode reading [woocommerce_checkout], you use the classic checkout.
New WooCommerce stores use the Checkout block by default. Older stores that upgraded may still run the shortcode. Our test store had both pages, so we could test each route on the same products.
The WooCommerce Checkout block documentation describes the block and its inner blocks. The developer docs say the block fields API works with the Checkout block only, so classic checkout needs the older filter.
Add Custom Fields to WooCommerce Checkout Block
You can add custom fields to WooCommerce checkout in the block by registering each one with a function. Call woocommerce_register_additional_checkout_field inside a woocommerce_init hook. Give it an ID, a label, a location and a type, and WooCommerce draws the field and saves the value.
The official developer documentation lists three locations. The contact location shows the field with the email address, and the address location adds it to the address forms.
The order location adds it to a separate section for other information. The ID must use a namespace/field-name format.
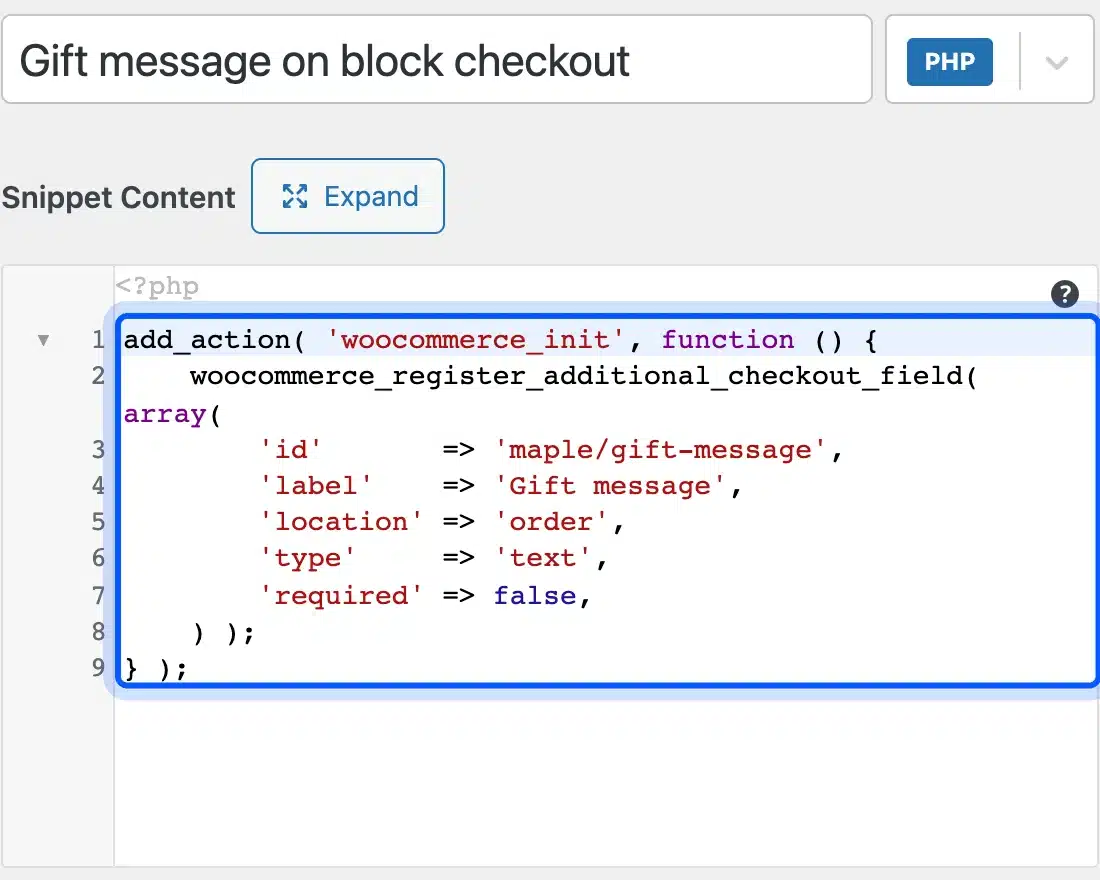
We used the order location. Here is the code we added to our test store.
add_action( 'woocommerce_init', function () {
	woocommerce_register_additional_checkout_field( array(
		'id'       => 'maple/gift-message',
		'label'    => 'Gift message',
		'location' => 'order',
		'type'     => 'text',
		'required' => false,
	) );
} );
Change maple to your own short name. It works as a namespace, so keep it unique to your store or plugin.
Where to Put the Code
Use a small plugin, a child theme or a snippet plugin. Do not edit the parent theme. We used the Code Snippets plugin, saved the snippet, and clicked Save and Activate.
A theme’s functions.php also works, but a theme change can erase the code. A child theme keeps it safe. Our guide to a WordPress child theme explains the setup.
What the Field Looks Like at Checkout
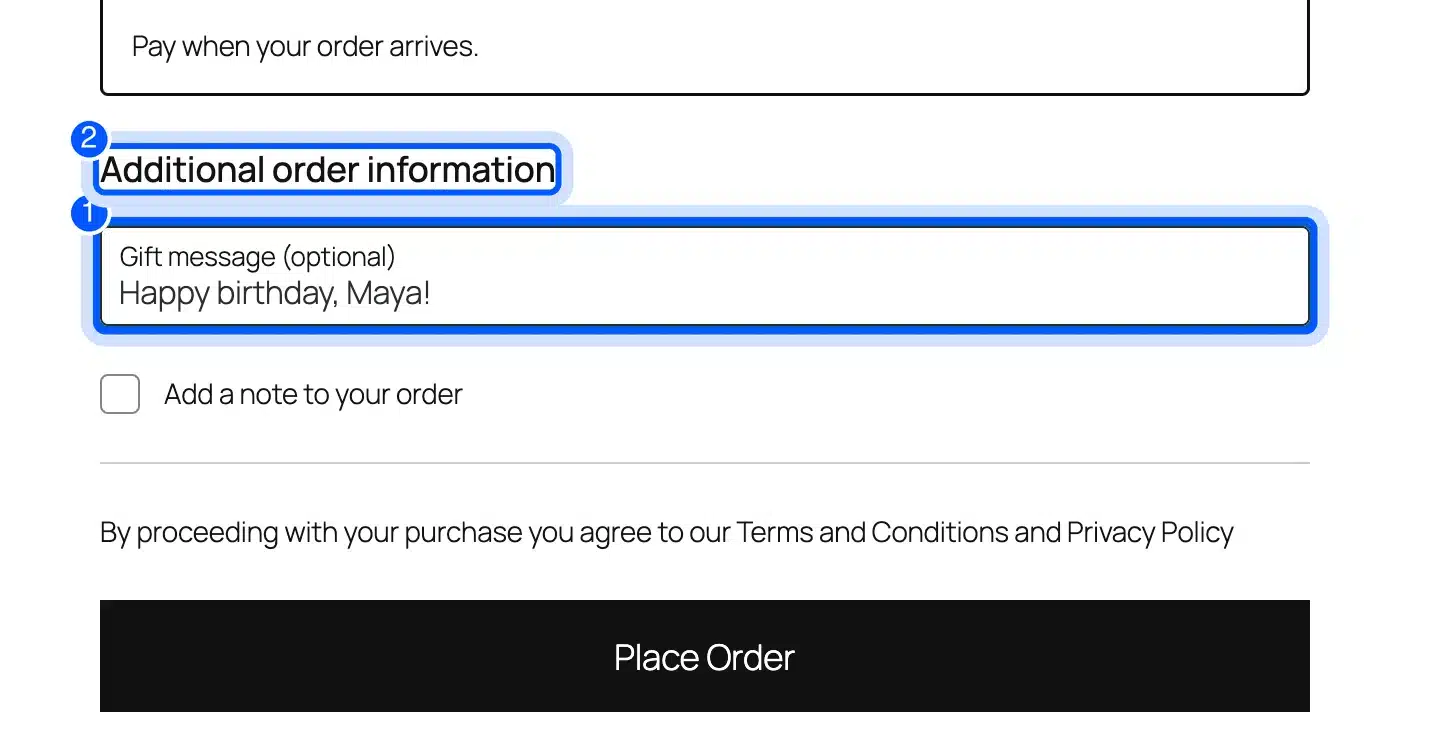
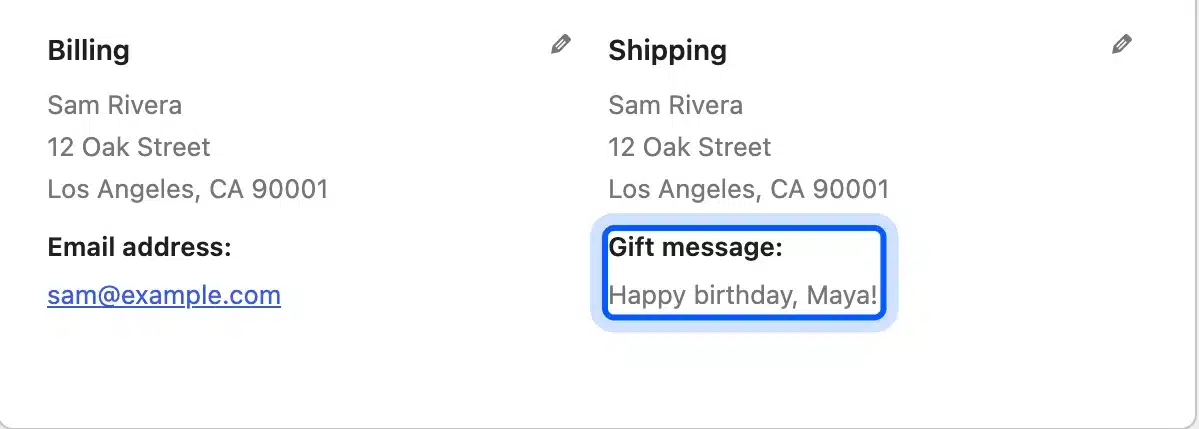
After we activated the snippet, the block checkout showed a new section called Additional order information, as the screenshot shows. Inside it sat a text box labeled Gift message (optional). The word optional appeared because we set required to false.
We typed a message, placed a test order and opened it in the admin. The order screen listed the field as Gift message with our text. It appeared in the Shipping column of the order screen.
Choose the Location and Type of Your WooCommerce Checkout Fields
The location decides where the field sits and where the value is saved. Contact and order fields save to the order, and address fields save with the billing or shipping address. The type can be text, select, checkbox or date.
Here is how the three locations compare.
| Location | Shows in | Best for |
|---|---|---|
contact | The Contact information section | A marketing opt-in checkbox |
address | The shipping and billing address forms | A tax or delivery ID |
order | The order information section | A gift message or a source question |
The docs give short examples for each type, and a select field takes an options list. Keep each ID unique, because it becomes part of the meta key that stores the value.
The docs also describe the saved keys. Address fields use keys such as _wc_billing/namespace/field, while contact and order fields use _wc_other/namespace/field. Read a saved value with $order->get_meta() and that key.
Add Custom Fields to WooCommerce Classic Checkout
For classic checkout, filter woocommerce_checkout_fields to add WooCommerce checkout fields of your own. Add your field to the order group, then save it yourself with the woocommerce_checkout_create_order action. Classic checkout draws the field but does not store it without your save code.
This is the code we used. It adds a Gift message field, saves it as order meta and prints it on the admin order screen.
add_filter( 'woocommerce_checkout_fields', function ( $fields ) {
	$fields['order']['gift_message'] = array(
		'type'     => 'text',
		'label'    => 'Gift message',
		'required' => false,
		'priority' => 25,
	);
	return $fields;
} );

add_action( 'woocommerce_checkout_create_order', function ( $order ) {
	if ( ! empty( $_POST['gift_message'] ) ) {
		$order->update_meta_data( '_gift_message', sanitize_text_field( wp_unslash( $_POST['gift_message'] ) ) );
	}
} );

add_action( 'woocommerce_admin_order_data_after_billing_address', function ( $order ) {
	$msg = $order->get_meta( '_gift_message' );
	if ( $msg ) {
		echo '<p><strong>Gift message:</strong> ' . esc_html( $msg ) . '</p>';
	}
} );
The WooCommerce developer docs on checkout fields explain the field groups. The groups are billing, shipping, account and order.
On the classic page, our field appeared in the right column, under the Order notes box. It carried the label Gift message (optional).
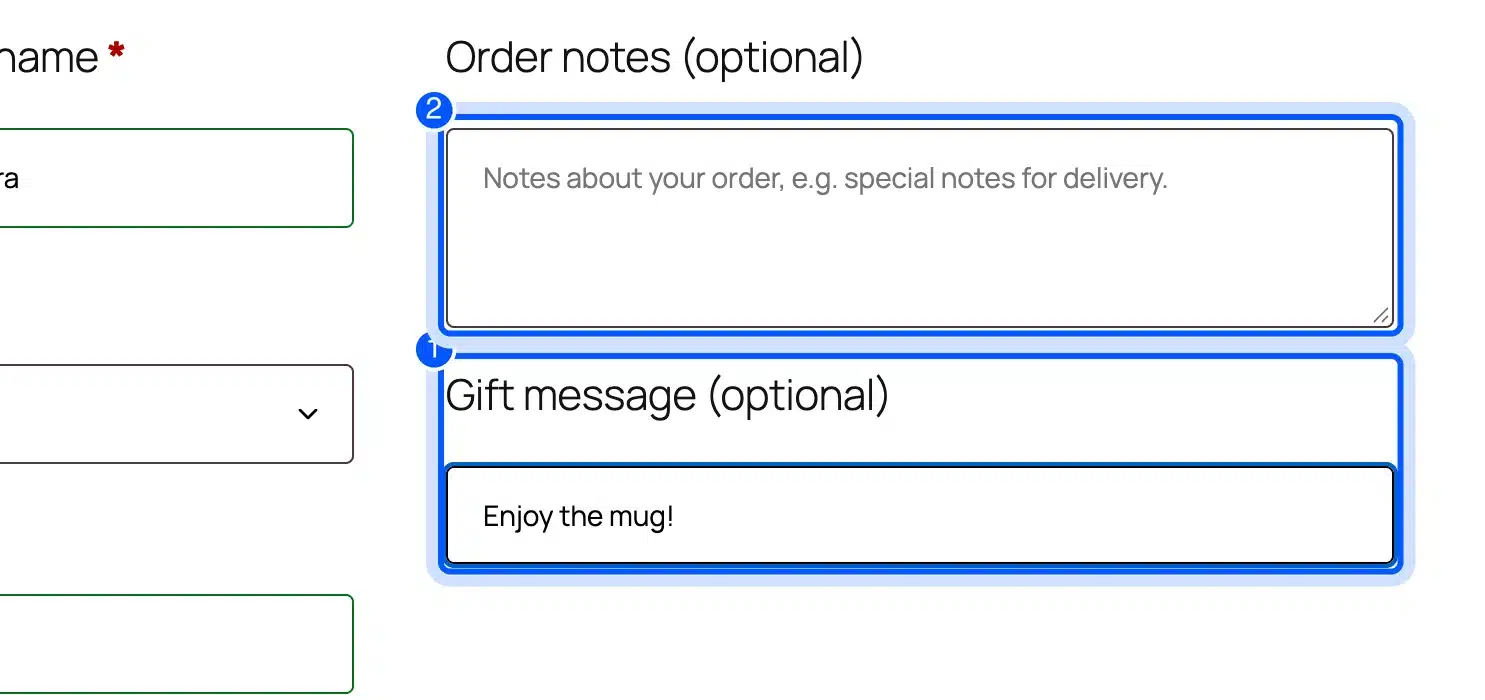
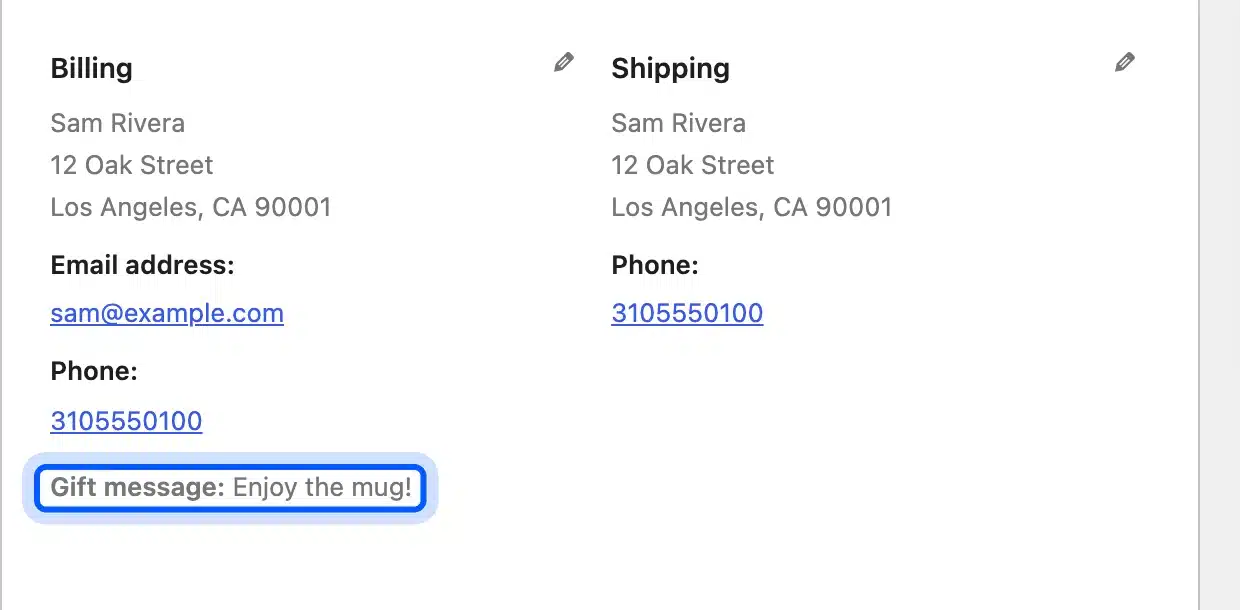
We placed an order with the message Enjoy the mug! The admin order screen printed it under the billing details, because our third hook prints it there.
The code cleans the value with sanitize_text_field and prints it with esc_html. Keep both, because checkout input comes from strangers.
Validate, Require and Show Fields Only Sometimes
Set required to true to force an answer. The block API also accepts JSON Schema rules for the required, hidden and validation properties, so a field can depend on another field. Classic checkout needs its own PHP checks in a validation hook.
The developer docs say those schema properties give you rules that change with other fields. WooCommerce has a separate guide to conditional fields that walks through examples. Read it before you write complex rules.
We did not test conditional rules on our store. We only tested a plain optional text field on each checkout.
Say you sell gifts and only want the gift message field when a shopper ticks a gift box. That is a conditional field, and it needs the schema rules or extra code. Start with one plain field, confirm it saves, and add the rule after that.
Privacy also matters here. A field that collects personal data needs a clear reason and a place in your privacy policy.
Examples are a date of birth or a tax ID. Collect only what you need for the order.
Keep the form short. Every extra field gives shoppers another reason to leave. Add a field only if you will use the answer, such as a gift message, a delivery note or a tax ID.
On the classic checkout, users see fields in the order set by priority. Lower numbers come first, so a field with priority 25 lands after most defaults. Test the position on a phone as well as a desktop.
How to Test Your WooCommerce Checkout Fields
Place a real test order for every field you add, on every checkout type you use. Use a cheap product and a payment method such as cash on delivery. Then open the order in the admin and confirm that the saved value matches what you typed.
We followed this checklist for both checkouts:
- Add a product: Put one item in the cart and open the checkout.
- Fill the field: Type a short message with a punctuation mark.
- Place the order: Use a test payment method.
- Open the order: Confirm the message appears on the order screen.
- Try a blank field: Repeat the order with the field empty.
The blank test matters. An optional field should let the order through, and the admin screen should simply show nothing.
Do You Need a Plugin Instead?
A plugin saves time if you want a screen to manage many fields, and code is enough for one or two fields. The Checkout Field Editor documentation describes the WooCommerce extension. Check its current version and price before you buy.
Code has one advantage: it adds nothing to your site except the field. Plugins bring their own settings, updates and support. For one gift message, a ten-line snippet is the lighter choice.
We wrote the code above ourselves, so we can vouch only for it. We did not test any checkout field plugin for this guide.
If you need a complex checkout flow, our WooCommerce development services team builds custom checkout features for stores.
Troubleshoot Custom Checkout Fields That Do Not Show
Most failures come from mixing the two checkout types. A field registered for the block does not appear on the classic shortcode page, and a classic filter does not change the Checkout block. Check which checkout your store uses first.
Then work through these checks:
- Wrong hook: Register block fields on the woocommerce_init action and not before it.
- Bad ID: The block API needs the
namespace/field-nameformat. - Cache: Clear your cache plugin and reload the checkout in a private window.
- No save code: Classic fields need a hook that stores the value.
- Snippet inactive: Confirm the snippet says Active.
Also check the PHP error log if the checkout page turns blank. A typo in a snippet can break the page. Code Snippets deactivates a snippet that causes a fatal error, which helps you recover.
If a stock warning blocks your test order, check the product’s stock settings. Our first test order failed with a message that there were not enough units in stock. We fixed it by turning off stock management for the test product.
Conclusion
You now know how to add custom fields to WooCommerce checkout for both the Checkout block and the classic shortcode. Use the registration function for the block and the checkout fields filter for the classic page.
Test every field with a real order, and open the order in the admin to confirm the value saved. Keep the form short, and add only the fields you will use. For protection on the same page, see our guide to adding reCAPTCHA to WooCommerce checkout.
Frequently Asked Questions (FAQs)
Q1. How do I add a custom field to the WooCommerce checkout page?
Check whether your store uses the Checkout block or the classic shortcode. For the block, register the field with a PHP function. For classic checkout, add it with a filter and save it with an order hook.
Q2. Does the block checkout fields API work with classic checkout?
No. The developer documentation says the API works with the Checkout block. Classic checkout needs the checkout fields filter and your own code to save the value.
Q3. Where does WooCommerce save custom checkout field values?
Block fields save as order or address meta with keys such as _wc_other/namespace/field. Classic fields save wherever your code puts them. In our example, the classic value went to the _gift_message order meta key.
Q4. Which field types can I add to the Checkout block?
The developer docs list text, select, checkbox and date. Select fields need an options list. Keep each field ID unique.
Q5. Can I make a custom checkout field required?
Yes, by setting required to true in the field settings. The block also accepts JSON Schema rules, so a field can depend on another field. Classic checkout needs PHP validation.
Q6. Can I add a custom field without a plugin?
Yes. A short snippet in a child theme or a snippet plugin is enough. We added a working Gift message field to each checkout type with only the code in this guide.
Q7. Why does my custom field not show at checkout?
The usual cause is a mismatch between the code and the checkout type. Block code does nothing on the classic page, and the classic filter does nothing on the Checkout block. Also check the snippet is active and the cache is clear.
Q8. How do I show a custom checkout field in the order email?
Read the saved value from the order and print it with an email hook. Read block fields with $order->get_meta() and the saved key. We tested the admin order screen only, so test your emails before you go live.