
How to Name Images for SEO is simple once you know the pattern. You can fix your entire image library in an afternoon if you know where to start.
Most guides stop at new uploads. Store owners and bloggers with years of scattered file names face a bigger, messier problem.
Their images are already live and already indexed. Get the rename wrong, and you can break links across your site.
Google Images now sends real shopping and research traffic, not just curious clicks. A few renamed files and filled-in alt tags can shift what search results show within weeks.
This guide covers both: the naming process, the WordPress-safe rename method, and the mistakes to avoid.
No lost traffic. No broken pages. Just images that work for your SEO.
Why Image File Names Matter for SEO
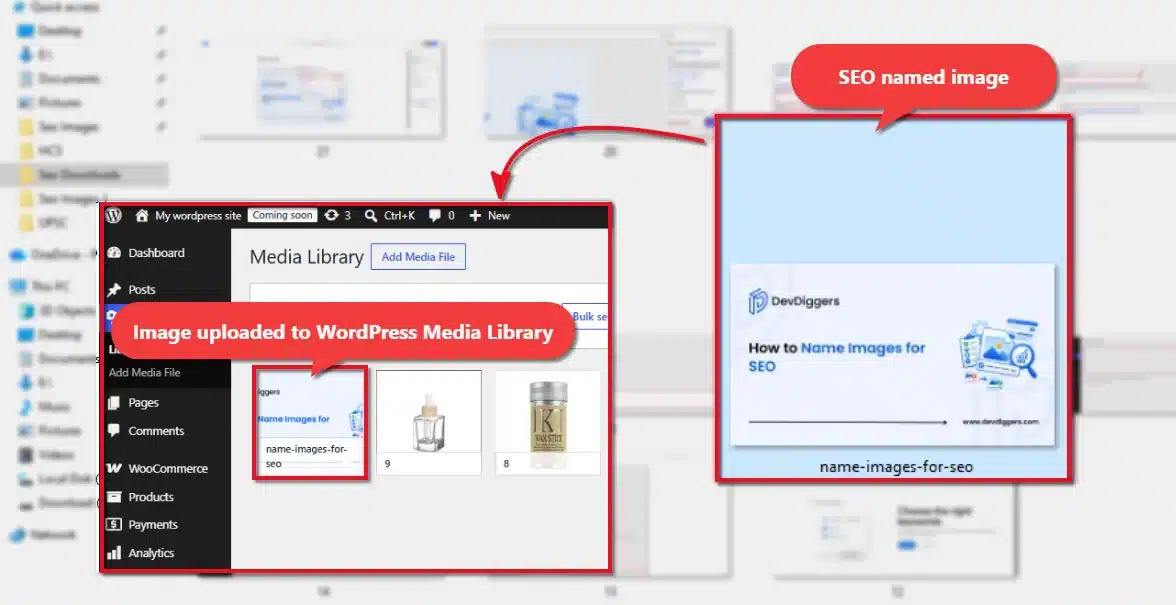
Google cannot see your images. It reads text instead, and your file name is one of the first signals it reads. Google’s own documentation confirms that descriptive file names help search engines understand an image faster than a generic camera name ever could.
Agencies use exactly this approach to grow client traffic:
- A documented image SEO case study tracked three small stores that replaced generic camera file names with descriptive ones and filled in empty alt text. All three saw new Google Images traffic within weeks that hadn’t existed before.
- Google Images accounts for roughly 22.6% of all Google searches, more than YouTube and Google Maps combined. A clear file name is one of the cheapest ways to claim a slice of that traffic.
A cleaner image library also helps your own team, since you can find last month’s product photo in seconds instead of scrolling for minutes.
How to Name Images for SEO: 9 Easy Steps
- Open the image file on your computer and identify the exact keyword phrase it should target. Check Google Keyword Planner if you’re unsure.
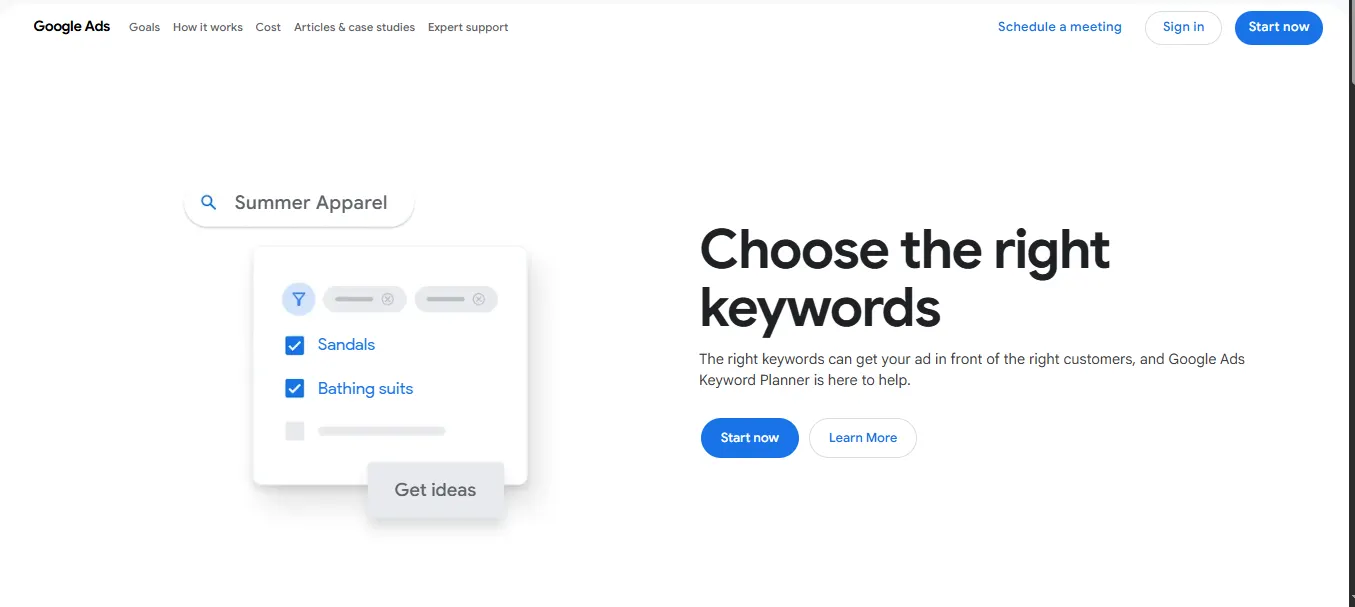
- Rename the file using that keyword, separated by hyphens, in lowercase (e.g.,
blue-ceramic-coffee-mug.jpg).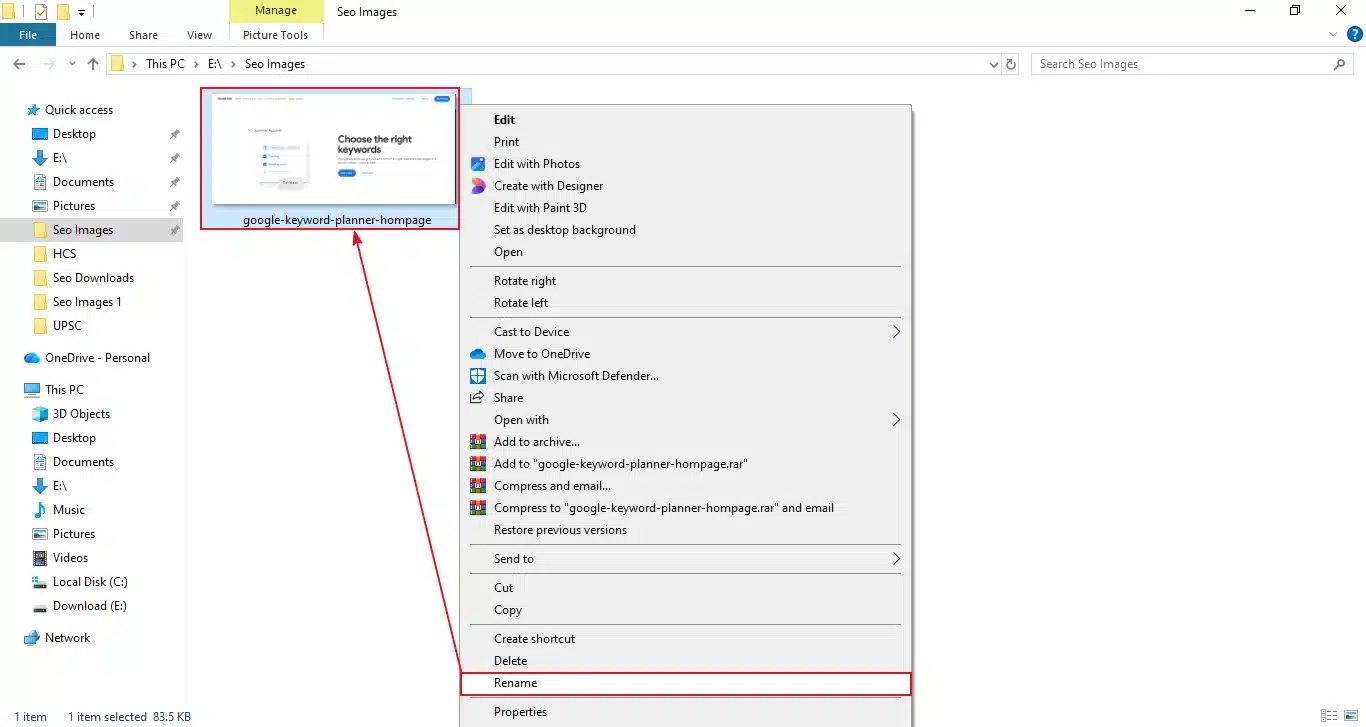
- Go to Media → Add Media File in your WordPress dashboard.
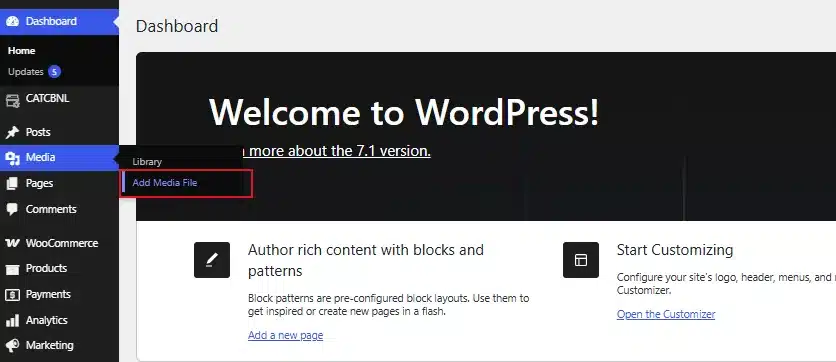
- Drag and drop the renamed file into the uploader.
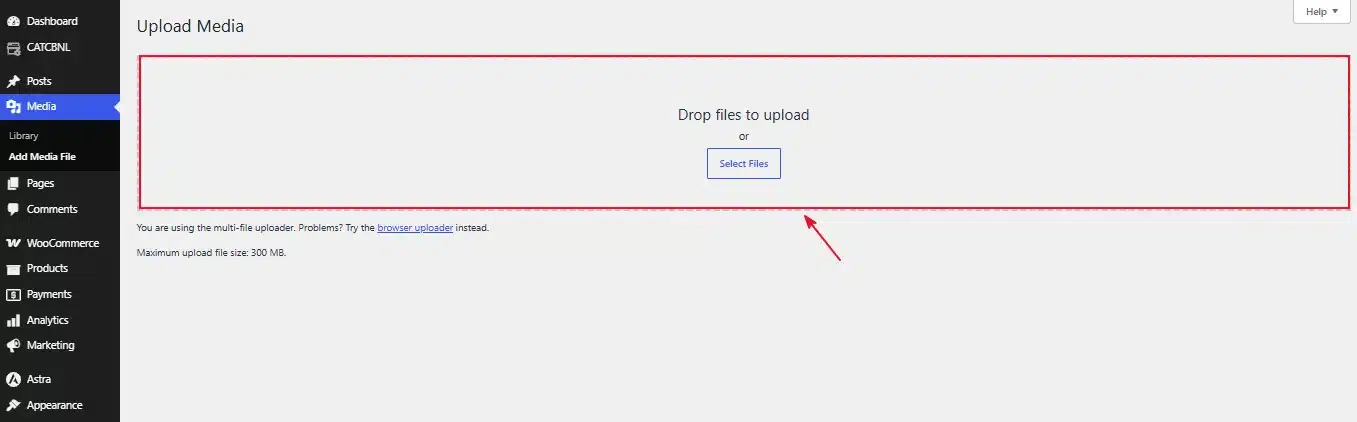
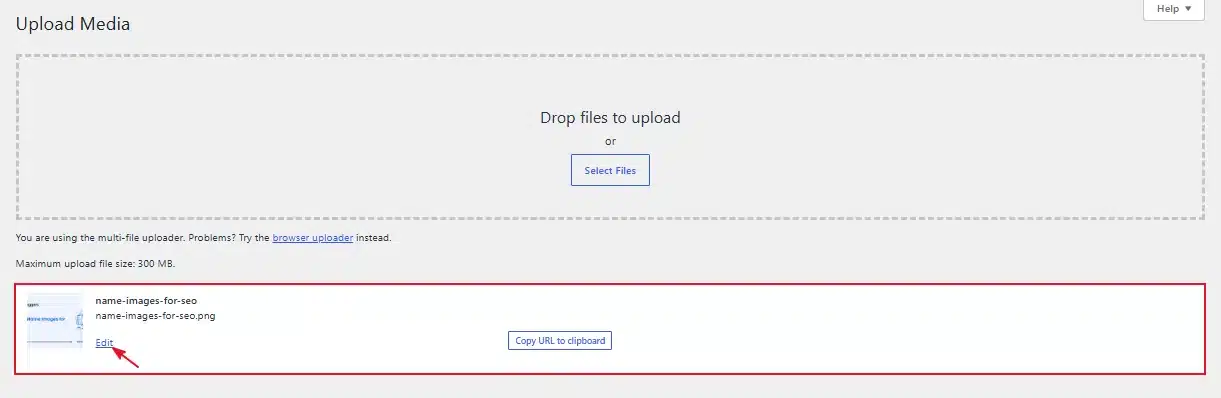
- Click Edit under the thumbnail to open Attachment Details.
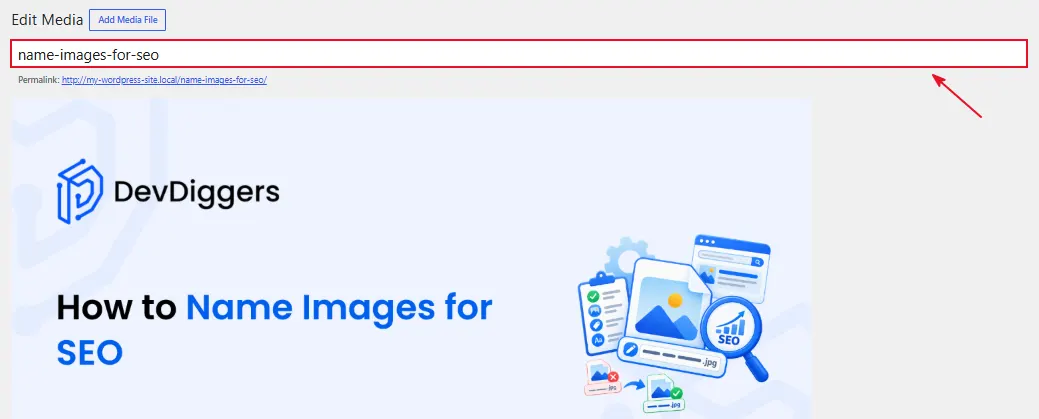
- Add a Title for the image.
- Type a full, descriptive sentence into the Alt Text field.
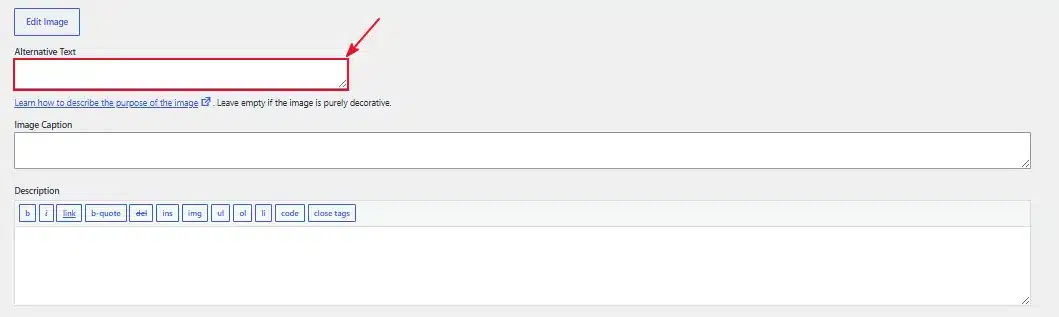
- Add a Caption and Description if you want to add real context.
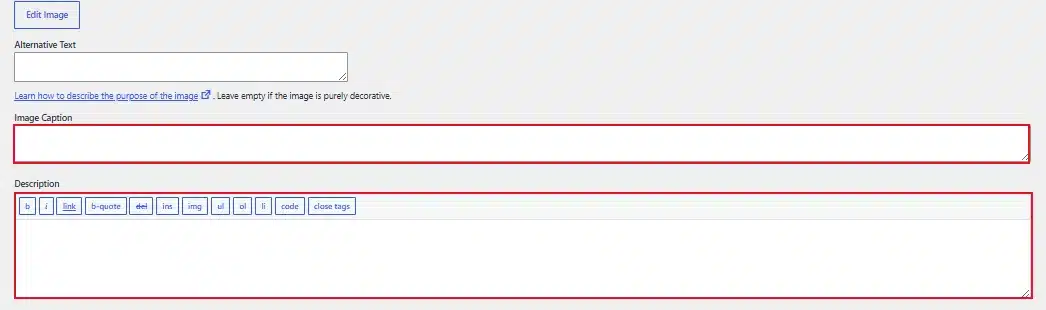
- At Last, click the Update button to save the changes.
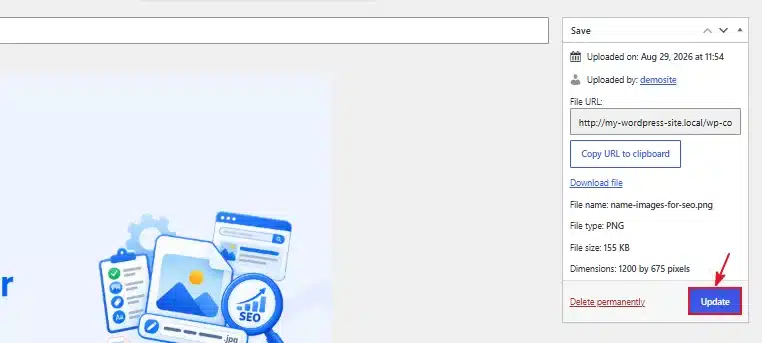
Most tutorials skip the alt text field entirely, or assume the file name alone is enough. It isn’t. Fill in alt text every time, even when the file name already looks perfect.
How to Rename Images That Are Already Live: Without Breaking Anything
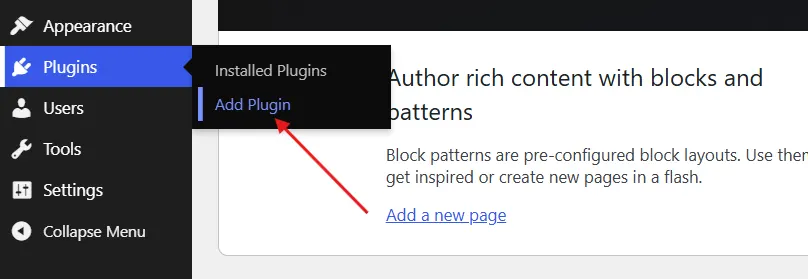
- Go to Plugins → Add Plugin in your WordPress dashboard.
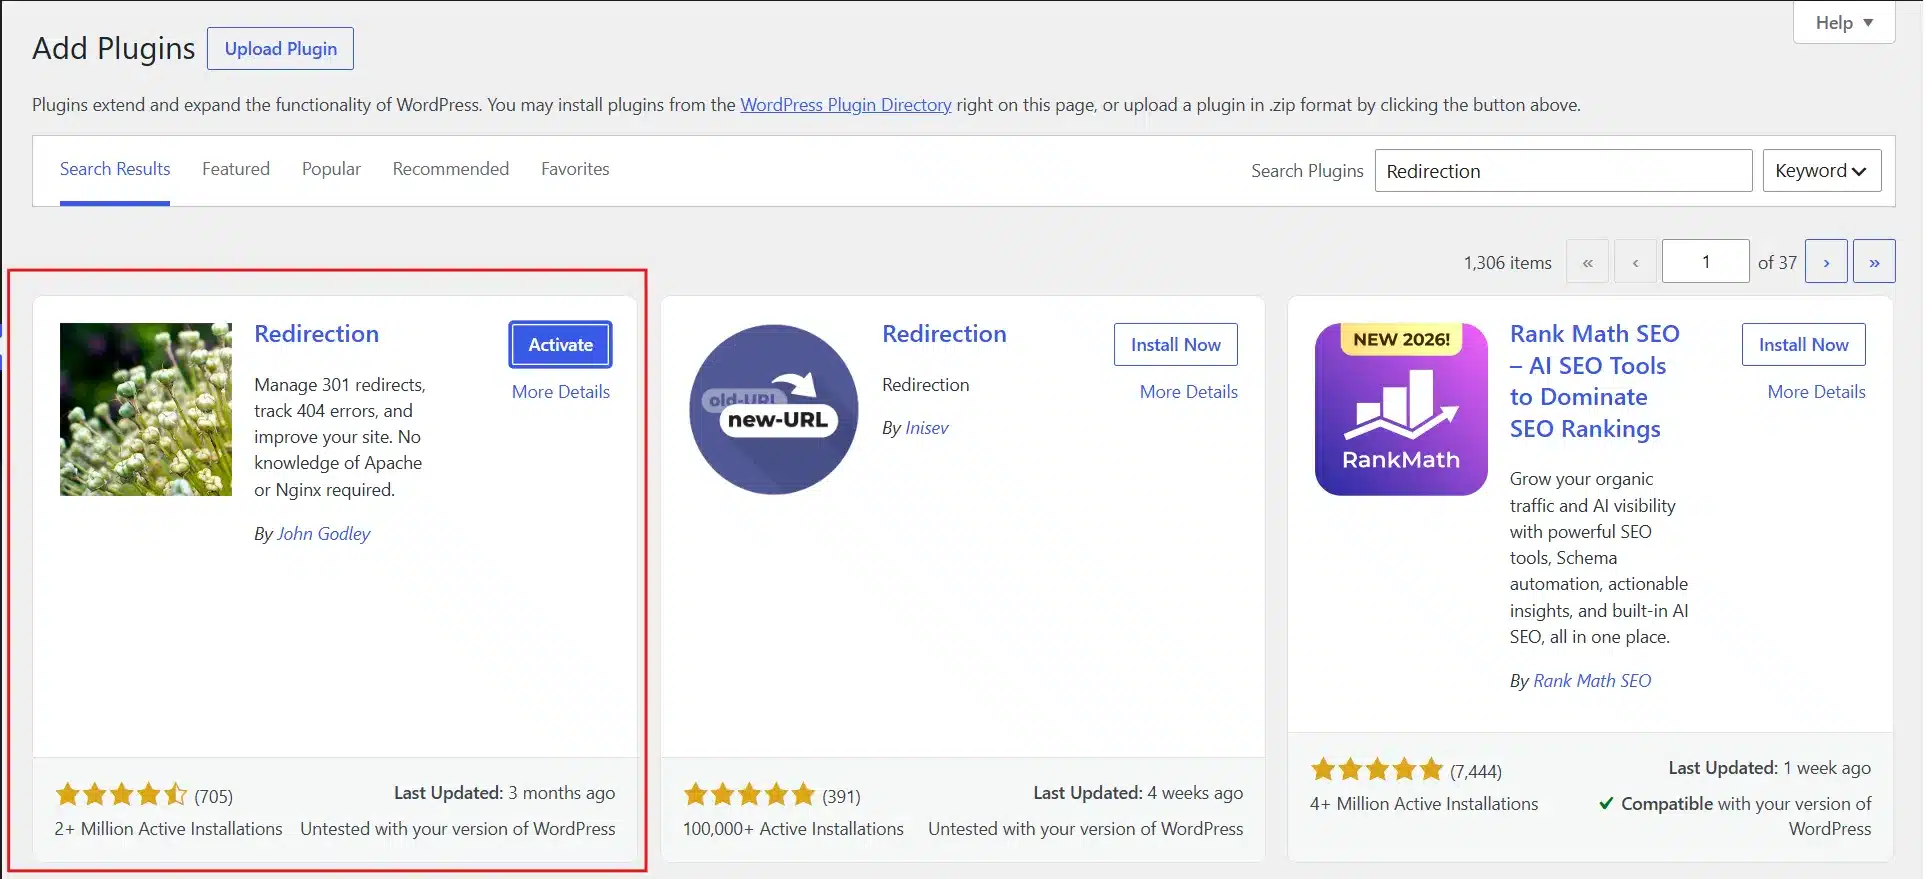
- Install and activate Redirection from the WordPress plugin directory.
- Rename the image file on your computer using your naming pattern, then upload it through Media → Add Media File.
- Open the post or page using the old image and swap in the newly uploaded file.
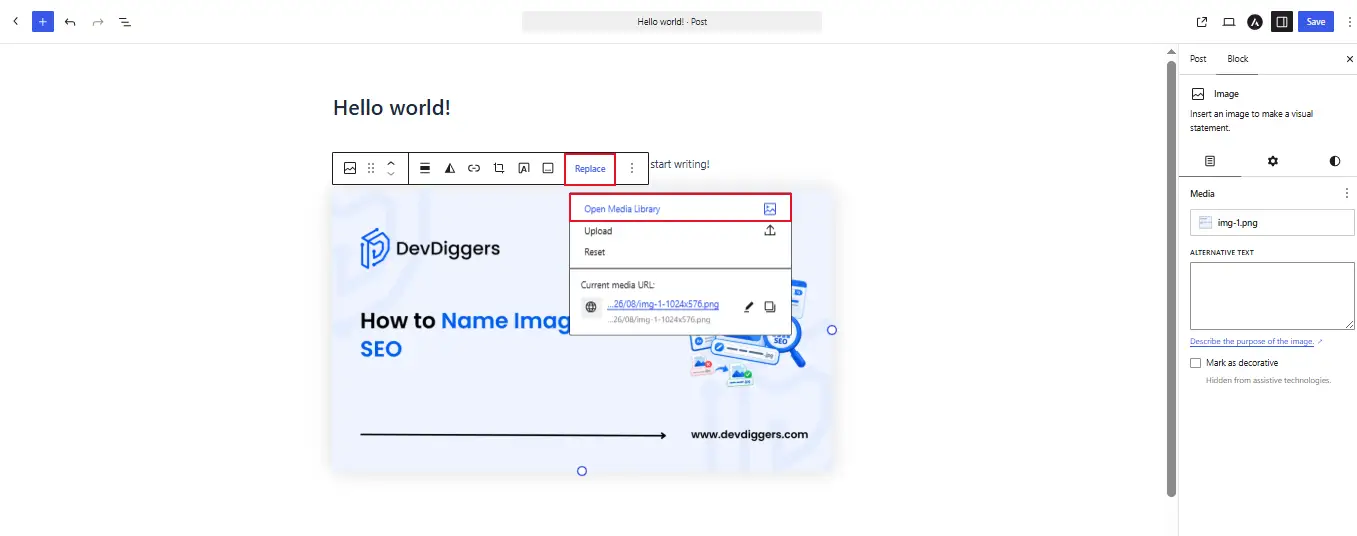
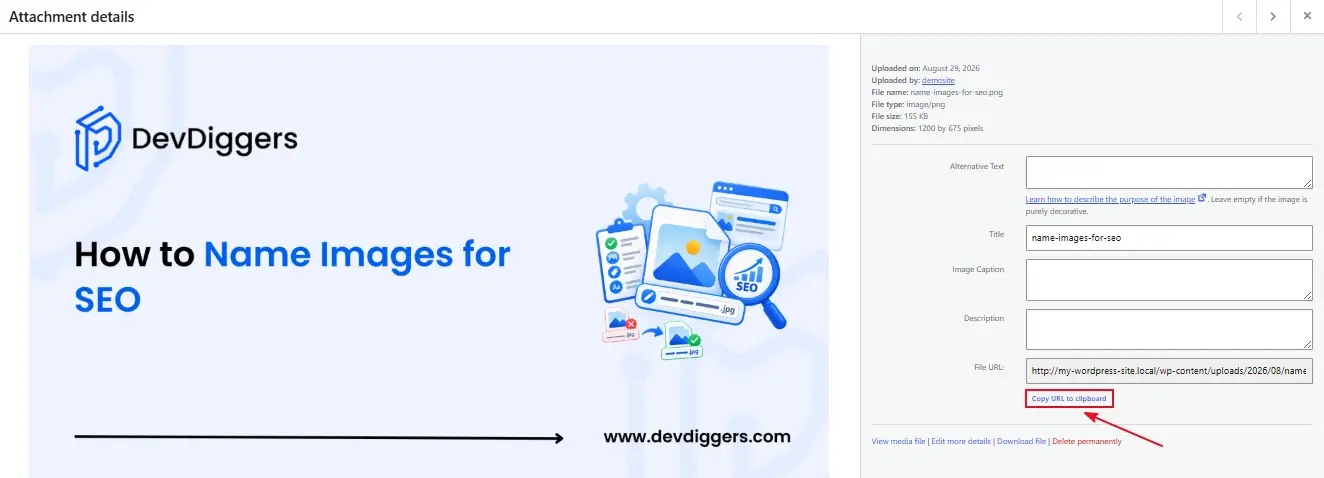
- Copy the links of the old image and the new seo named image.
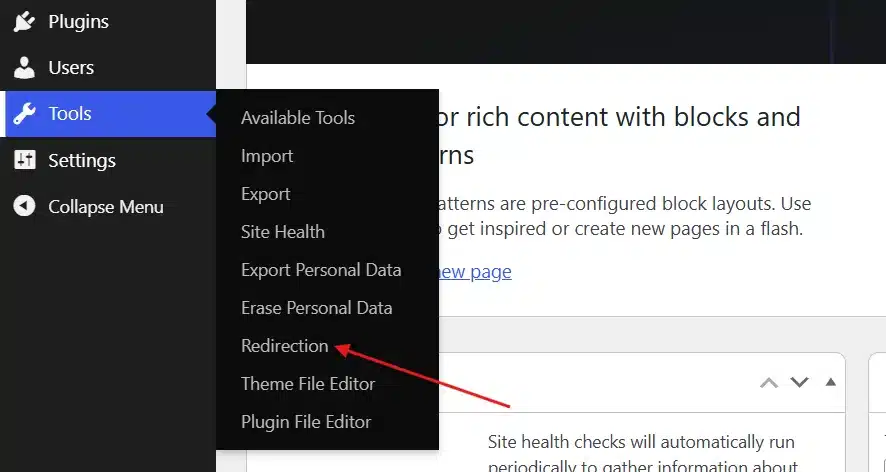
- Go to Tools → Redirection to set redirection of images.
- Click the Add Redirection button to create a new redirection.
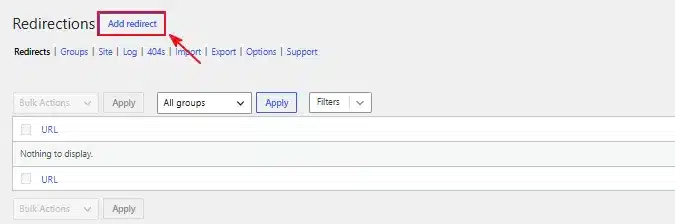
- Enter the old image name in the Source URL Section and the new seo named image in the Target URL Section.
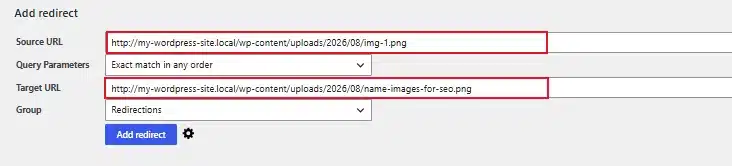
- Lastly, go to Media Library → Old image → Delete Permanently to delete the old attachment.
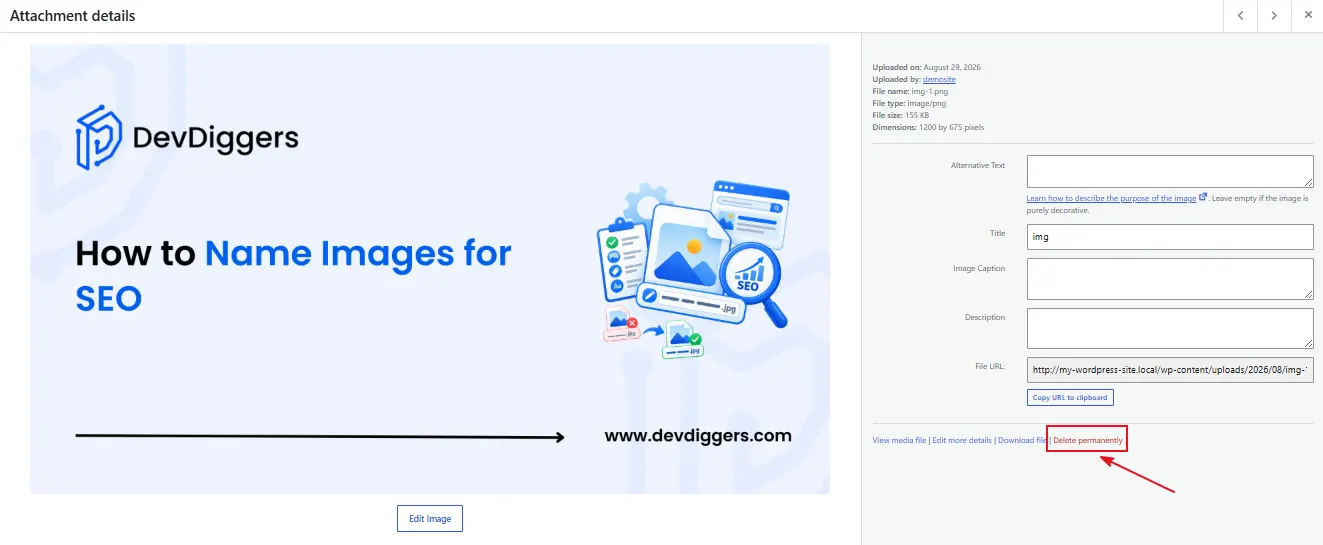
Note: Renaming old, already-ranking images risks more than it gains, so prioritize new uploads first. WordPress also appends “-1” to files with duplicate names, which can quietly break your naming pattern. Check your Media Library for duplicates before renaming in bulk.
Naming Images at Scale for a WooCommerce Store
Naming images for SEO gets harder once you’re managing hundreds of product photos instead of a handful of blog images. Renaming five images takes five minutes. Renaming five hundred, one at a time, is not realistic for most teams.
A simple pattern solves most of this: product-name-color-angle.jpg, canvas-tote-navy-front.jpgand canvas-tote-navy-side.jpg. Keep every variant organized, both for Google and for your team.
For hundreds of SKUs, a bulk file renamer or an AI-assisted tool saves real hours. Consistency matters more than Smartness. A boring, predictable naming system beats a Smart one only you understand.
A WooCommerce image search plugin works best when your product images are already clean and properly tagged.
Common Image Naming Mistakes to Avoid
A fA few habits quietly undo good file naming. Here’s what to watch for, how to fix it, and why each one costs you visibility.
| Mistake | Solution | Why It Hurts |
|---|---|---|
| Keyword stuffing | Use one clear description, not ten forced keywords | Looks spammy to Google and confuses users |
Generic labels like image1.jpg | Rename with a specific, descriptive term before upload | Google can’t guess what the image shows |
| Leaving stock photo names untouched | Rename stock images the same as any other upload | Wastes a chance to add real keyword context |
| Skipping alt text | Fill in alt text every time, even with a great file name | Screen readers and Google both lose context |
| Uploading oversized files | Compress and resize before uploading, not after | Slows load time and image indexing |
Fix these five habits and your image library works harder for search engines and for your own team.
Beyond File Names: Other Image SEO Signals Worth Knowing
File names and alt text carry most of the weight, but a few other signals round out a strong setup:
- WebP format: Compresses smaller than JPEG without losing much quality, and it’s now the default choice for most web images.
- Structured data: A basic ImageObject schema tells Google the image’s URL, caption, and license directly, which can help it qualify for richer results.
- Lazy loading: Defers off-screen images until the user scrolls to them, which speeds up initial page load.
- Image sitemaps: Help Google discover images your regular sitemap might miss, especially on large WooCommerce catalogs.
Conclusion
Naming images for SEO isn’t complicated. Descriptive file names, hyphens instead of underscores, honest alt text, and a safe plan for images already published cover everything that matters.
The step most sites skip is the live rename. If you have years of “IMG_” files on your site, don’t rename everything at once. Start small, redirect the old URLs, and check Search Console before the next batch.
For a WooCommerce store, consistency beats perfection. Pick a pattern, apply it to every new product photo, and clean the backlog over time.
If your product images are already in good shape, pair them with a WooCommerce product search by image plugin so shoppers can find what they need just by uploading a photo.
Frequently Asked Questions (FAQs)
Q1. Does image file name affect SEO?
Yes. Google reads the words in your file name as one signal about what the image shows. It carries less weight than alt text or page content, but it adds up alongside everything else on the page. A generic name like IMG_4521.jpg gives Google nothing useful to work with.
Q2. What is the difference between a file name and alt text?
The file name is part of the image’s URL and rarely changes. Alt text sits in your page’s HTML, describes the image in a full sentence, and you can update it anytime without breaking a link. Rewriting alt text takes seconds, but a bad file name usually needs a redirect to fix safely.
Q3. How many words should an image file name have?
Three to five words is the sweet spot. Enough to describe what’s in the image, short enough to stay readable and avoid looking like keyword stuffing. A file like blue-ceramic-coffee-mug.jpg hits that mark. Going longer, with a string of ten keywords, reads as spam to both Google and shoppers scanning your gallery.
Q4. Is it safe to rename images that are already live on my site?
It can be, if you set up a 301 redirect from the old file URL to the new one. Skipping the redirect risks broken images and lost image search rankings you have already earned. Redirection, a free WordPress plugin, handles this step cleanly and takes about five minutes to set up correctly.
Q5. Why does WordPress add “-1” to some of my image file names?
WordPress automatically appends a number when you upload a file with the same name as one already in your Media Library. Check for duplicates before you upload in bulk, or your naming pattern will quietly break. Search your Media Library for the exact keyword first, so you catch a duplicate before WordPress renames it for you.
Q6. Should I put my target keyword in every single image on a page?
No. Use your primary keyword in one or two of the most important images on the page, and describe the rest in plain, accurate language. Repeating the same keyword on every image looks like stuffing to Google. Pick the hero image or the one nearest your main heading, and let the rest describe what’s really shown.
Q7. Should I use hyphens or underscores in image file names?
Use hyphens. Google treats a hyphen as a space between words, so blue-ceramic-mug.jpg reads as three separate words. An underscore joins words together into one long string, like “bluceramicmug,” which search engines cannot break apart the same way. Stick with lowercase letters and hyphens for every image you upload.
Q8. Does the image file name need to match my page URL slug?
No, but keeping them related helps. If your page targets “ceramic coffee mugs,” an image named ceramic-coffee-mug-set.jpg reinforces the same topic without copying the slug word for word. Matching them exactly isn’t required and can look repetitive if you have several images on one page.
Q9. Which image format is best for SEO, JPEG, PNG, or WebP?
WebP, in most cases. It compresses smaller than JPEG or PNG at a similar quality level, which helps page speed, a confirmed Google ranking factor. Use PNG only when you need a transparent background, and save JPEG for photos where WebP support isn’t available.
Q10. Can renaming too many images at once hurt my SEO?
It can, if you rename live, indexed images without setting up redirects first. Google may show broken thumbnails in search results until it recrawls the page, and any external site linking to the old file URL will break too. Keep bulk renames to images that already have redirects ready.