
Here is how to clone a website on WordPress: package the files and database and unpack them at the new address. The last step swaps the old URL for the new one. With a plugin like Duplicator the whole job takes under an hour on a small site, and most of that is waiting for uploads.
We tested both methods in October 2026 on our WordPress 7.1.3 test store with WooCommerce 11.2.0, Duplicator 5.0.5 and WP-CLI. Our first Duplicator build failed with “Communication to AJAX is blocked”, and the problems section explains the fix. Every screenshot comes from that test store and its two clones.
You will learn what a clone is, how it differs from a move and which of three methods suits your site. Then come the full steps for Duplicator and for a manual copy with WP-CLI. After that we turn the clone into a safe staging site, cover a new domain, and fix the problems we hit.
What Cloning a WordPress Site Means
Cloning a WordPress site means making a second working copy of the same site at another address while the original stays live. The copy carries every post, page, product, setting, theme and plugin. Only the URL changes. The clone can run side by side with the real site.
That last part is what separates a clone from a move. When you move a site, the old address shuts down or redirects. We cover that in our guide on moving a WordPress site to a new domain.
A clone keeps both copies running. That is what you want for a staging site, a test bed or a new store built on an old one.
It is also bigger than copying one page. If you only need a second version of a single landing page, duplicating a page in WordPress takes one click and touches nothing else. A full duplicate WordPress site needs two things copied together: the files in the site folder and the MySQL database that holds the content.
People clone WordPress sites for a few common reasons:
- Staging copy: Test a plugin update or a redesign without risking live orders.
- New domain launch: Start a sister brand from a finished site instead of a blank install.
- Local development: Pull the live site onto your laptop to build features offline.
- Client handover: Hand a client a working copy on their own hosting account.
Can You Clone Someone Else’s Website?
You can clone your own WordPress site freely, but cloning someone else’s site and publishing it is a copyright problem. The written content, photos and artwork on a site belong to whoever made them. A plugin like Duplicator also needs admin access. It only works on sites you control.
The U.S. Copyright Office says the original authorship appearing on a website may be protected, including writing, artwork and photographs. Copying those files onto your own domain is not cloning in the sense this guide means.
What you can do is study a design you like and rebuild the layout with your own content. Our guide on copying a WordPress website design shows how to find the theme and plugins a site uses. Then you can build something similar the honest way.
How to Clone a Website: Pick Your Method
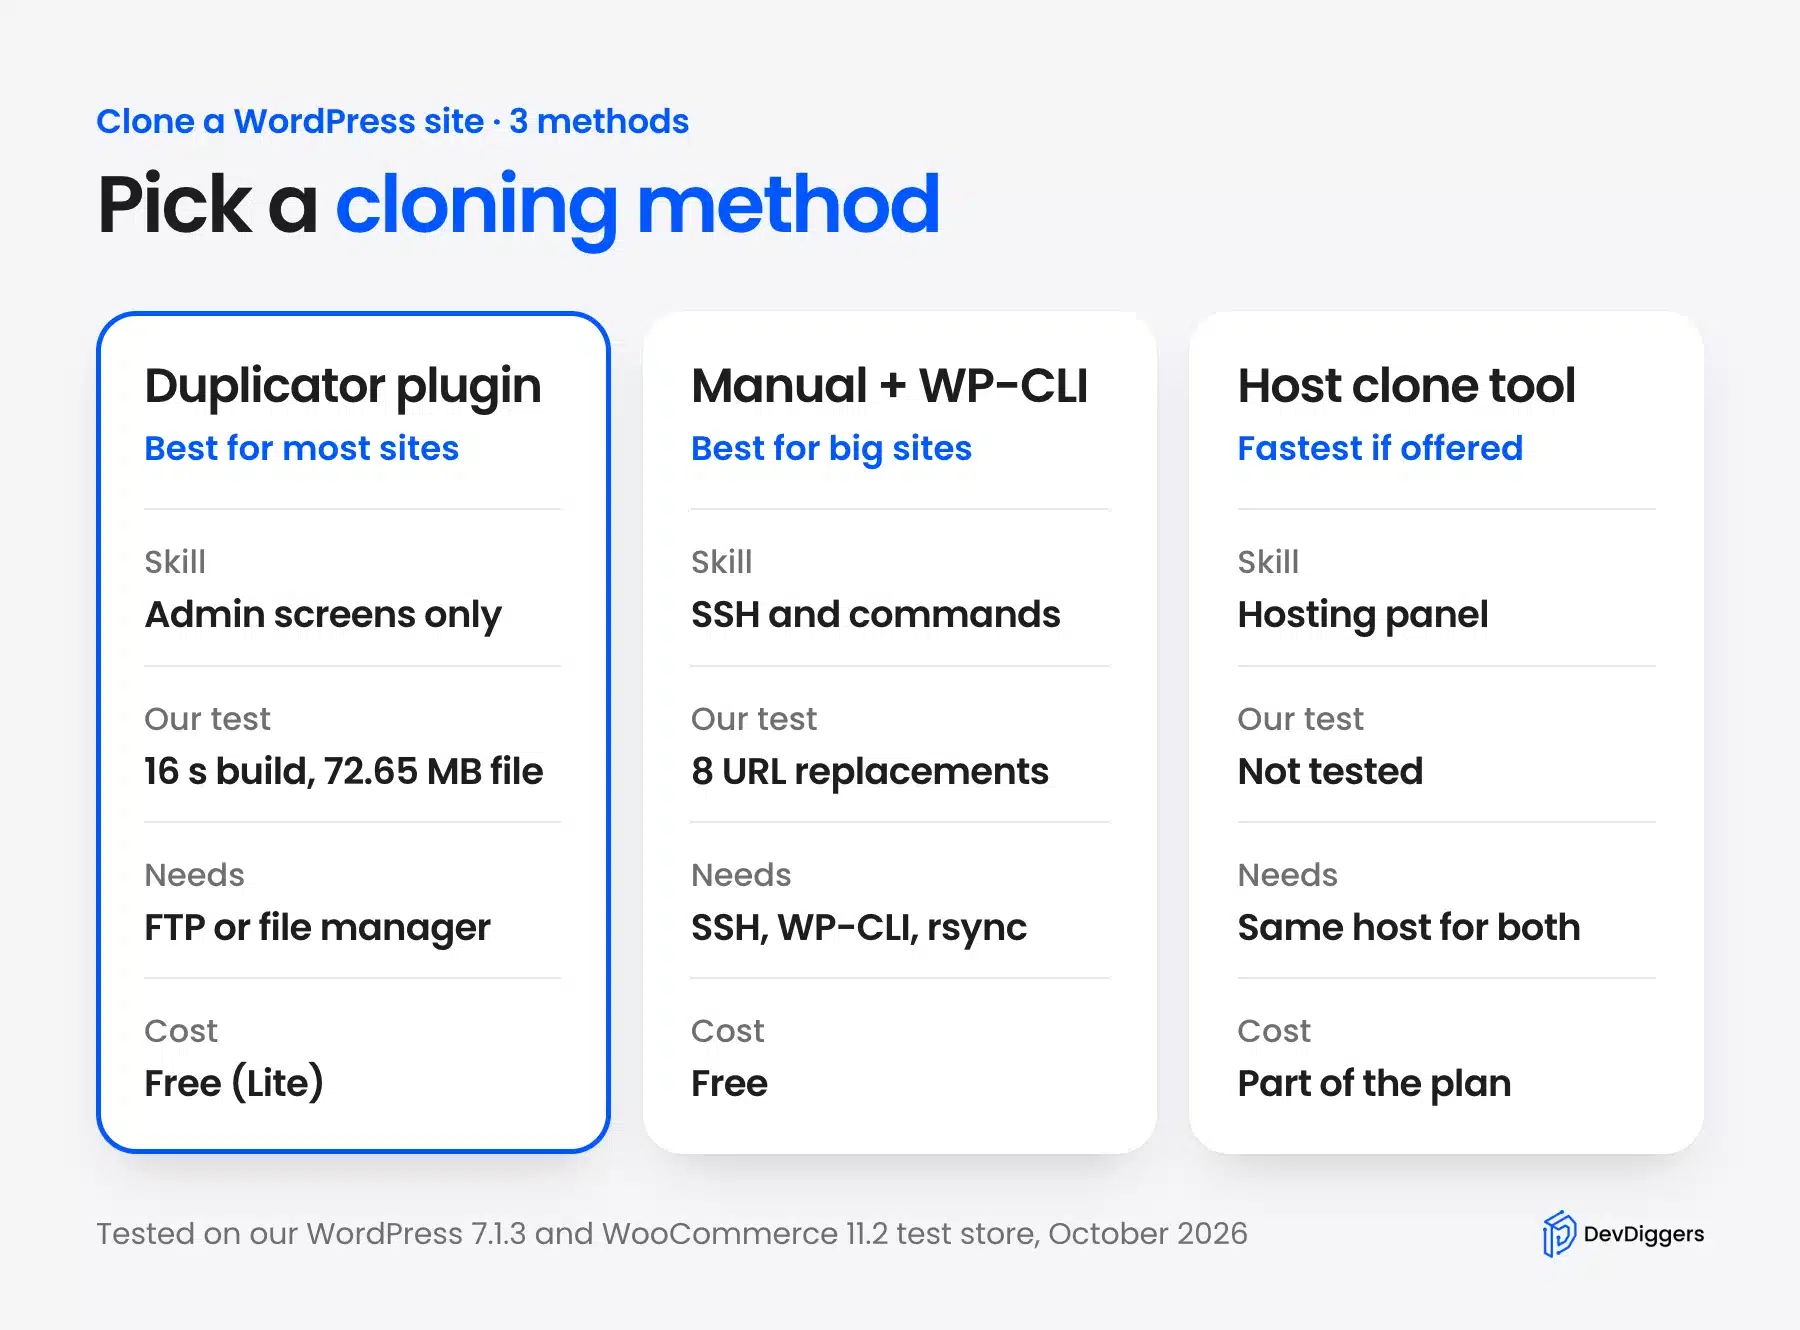
How to clone a website on WordPress depends on your access. Use the Duplicator plugin from the admin when the site is under a few gigabytes. Use WP-CLI with SSH access or a big site, and your host’s clone button when both copies share one account.
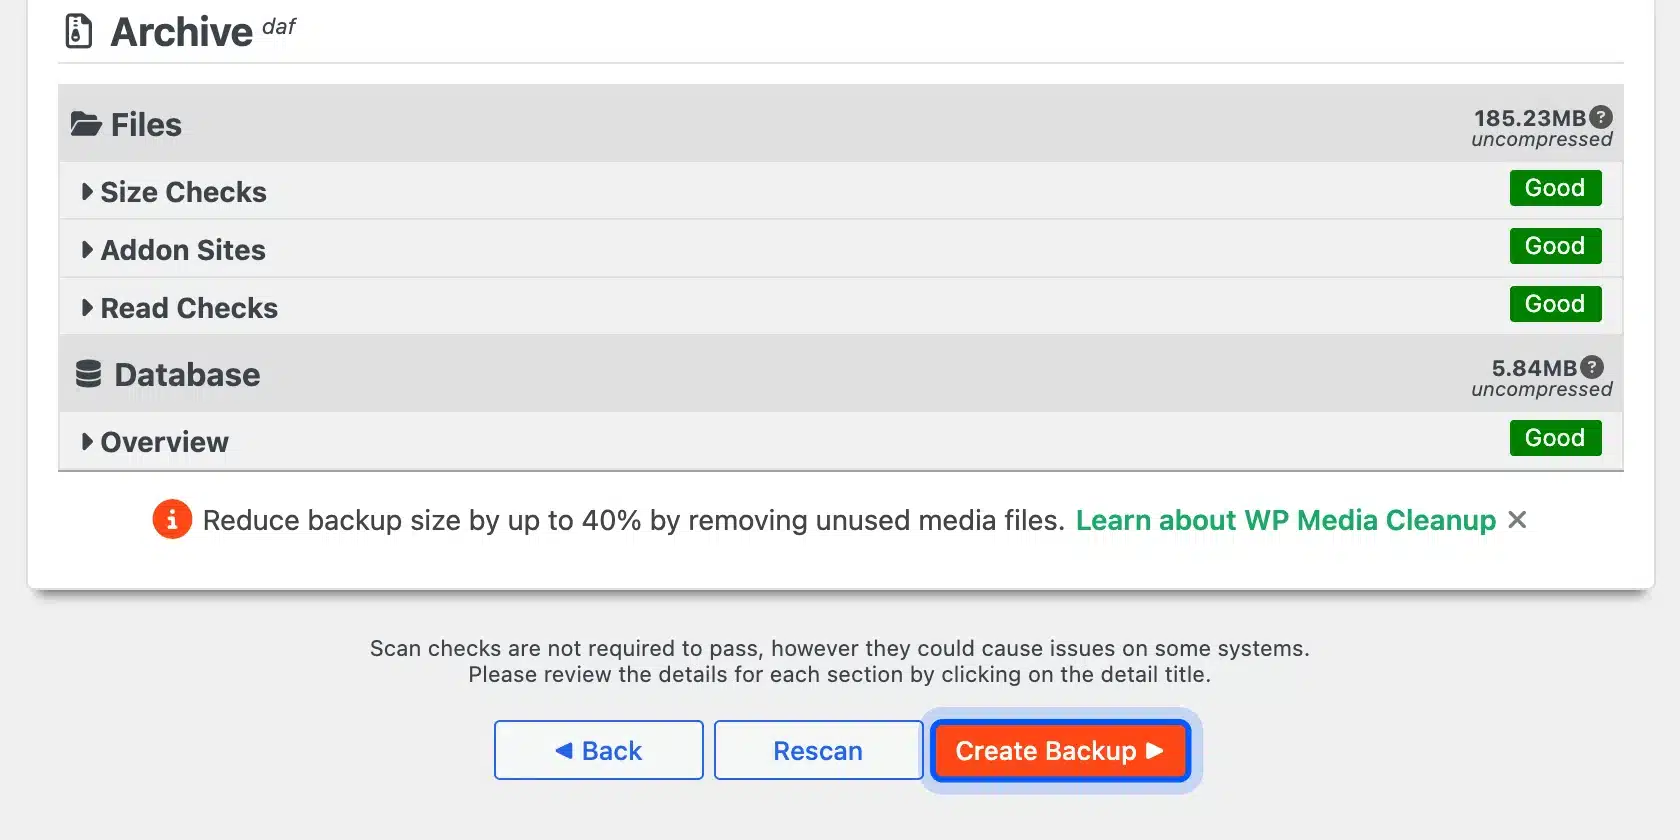
The plugin route suits most people because it handles the hard part for you. It rewrites every old URL in the database, including the ones stored inside serialized PHP arrays. On our test store it packed 185.23 MB of files and a 5.84 MB database into one 72.65 MB archive in 16 seconds.
The manual route gives you full control and has no size limit beyond your disk. It is also the method to know when a plugin build keeps failing on a strict host. The host tool is the quickest when it exists, but every panel names it differently. Check your host’s docs first.
Tip: Take a normal backup before you start any method. Cloning reads from the live site, and a backup means a slip in the next steps costs you nothing. Our guide on backing up the WooCommerce database covers the store data.
Method 1: Clone a WordPress Site With Duplicator
This is how to clone a WordPress site with the free Duplicator plugin: build a backup and download its two files. Upload both to the new location. Then run the installer. The full run below took us about ten minutes.
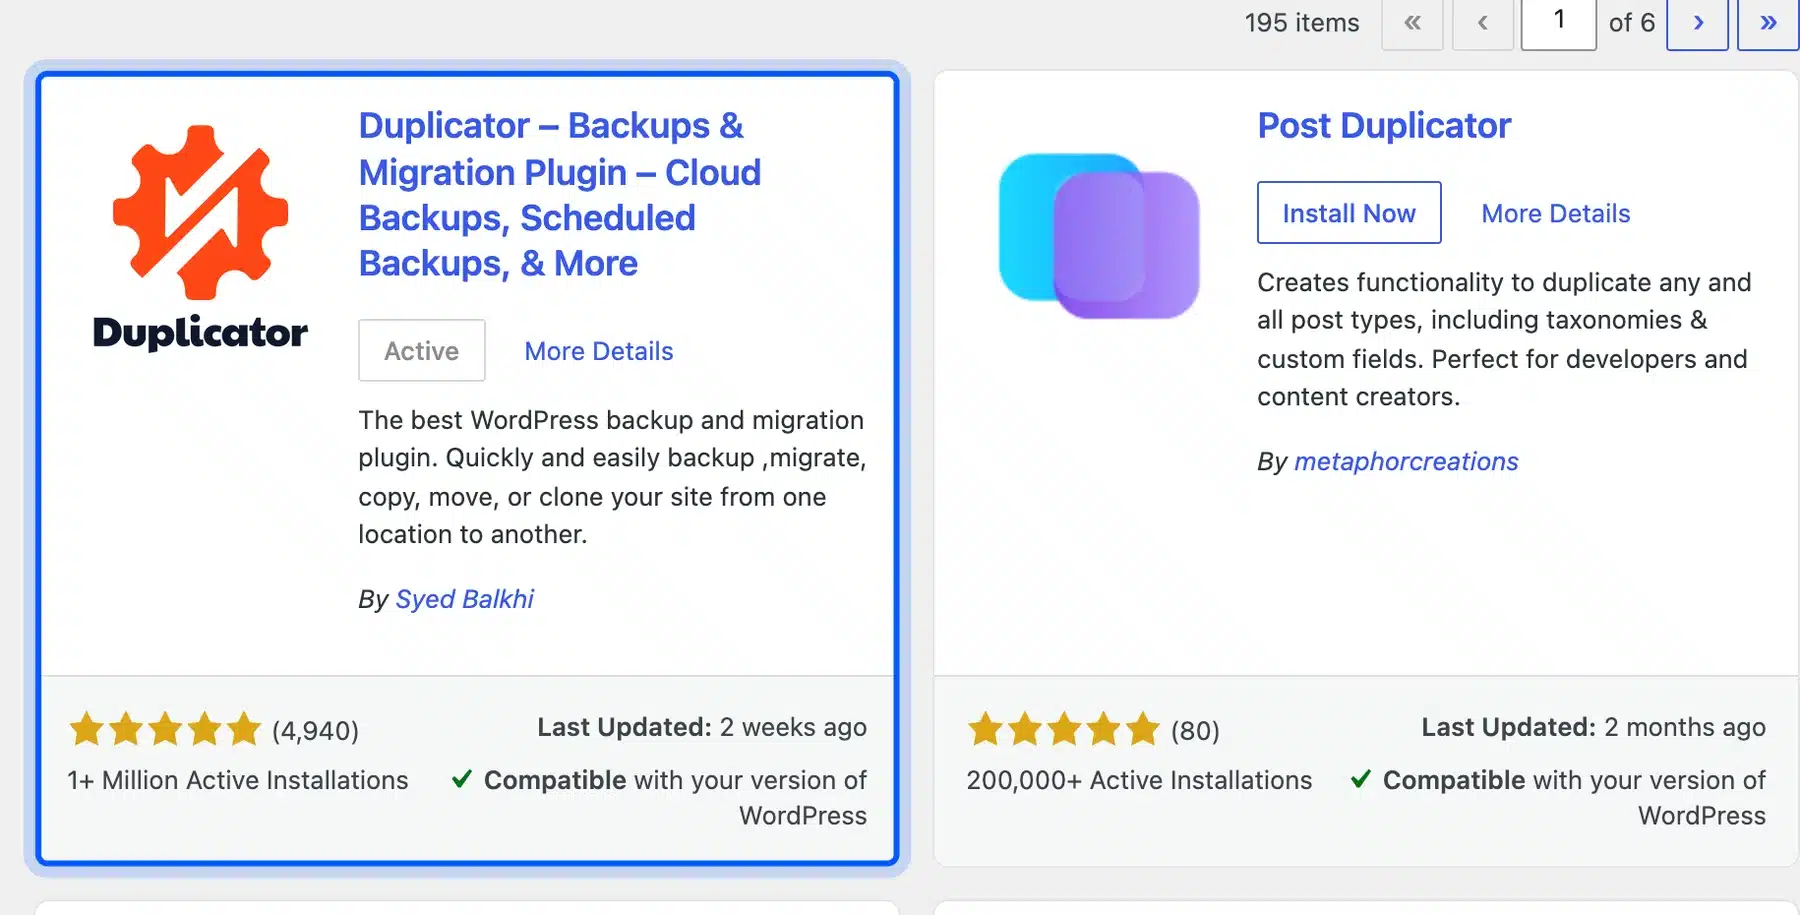
Duplicator showed 1+ million active installations and 4,940 ratings in our plugin search in October 2026. Version 5.0.5 calls a package a “Backup”. Older tutorials that say “Create Package” point at the same button. Here are the steps as we ran them:
- Install the plugin: Go to Plugins > Add Plugin and search for Duplicator. Click Install Now and then Activate.
- Start a new backup: Open Duplicator > Backups and click Add New. Keep the default name and storage. Then click Next.
- Read the scan and build: Duplicator checks the server, files and database. Our scan passed every check. We clicked Create Backup.
- Download both files: On the Backups list, open the Download menu and choose Both Files. You get an installer and an archive ending in .daf.
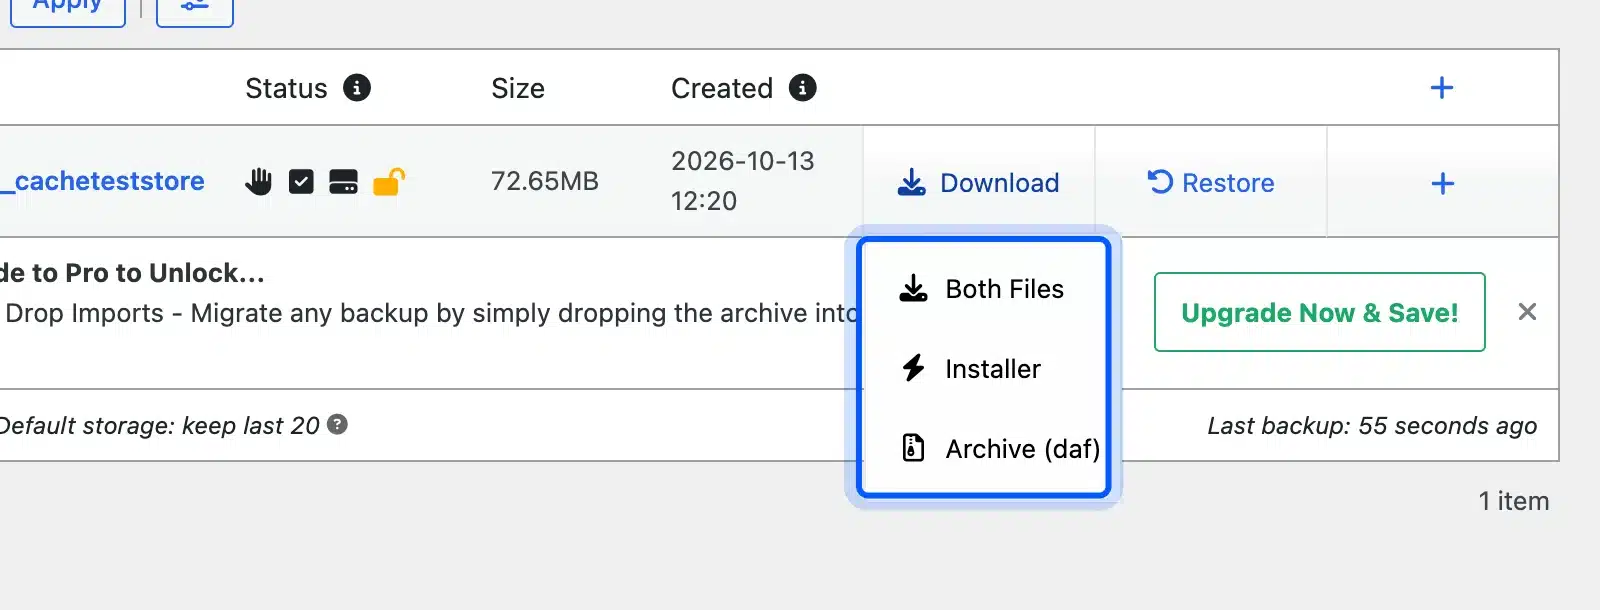
- Upload them to the new location: Create an empty database at the new host. Then upload both files to an empty folder with SFTP or the file manager.
- Run the installer: Open the new address followed by /installer.php. Enter the new database name, user and password and check the site title. Then click Validate.
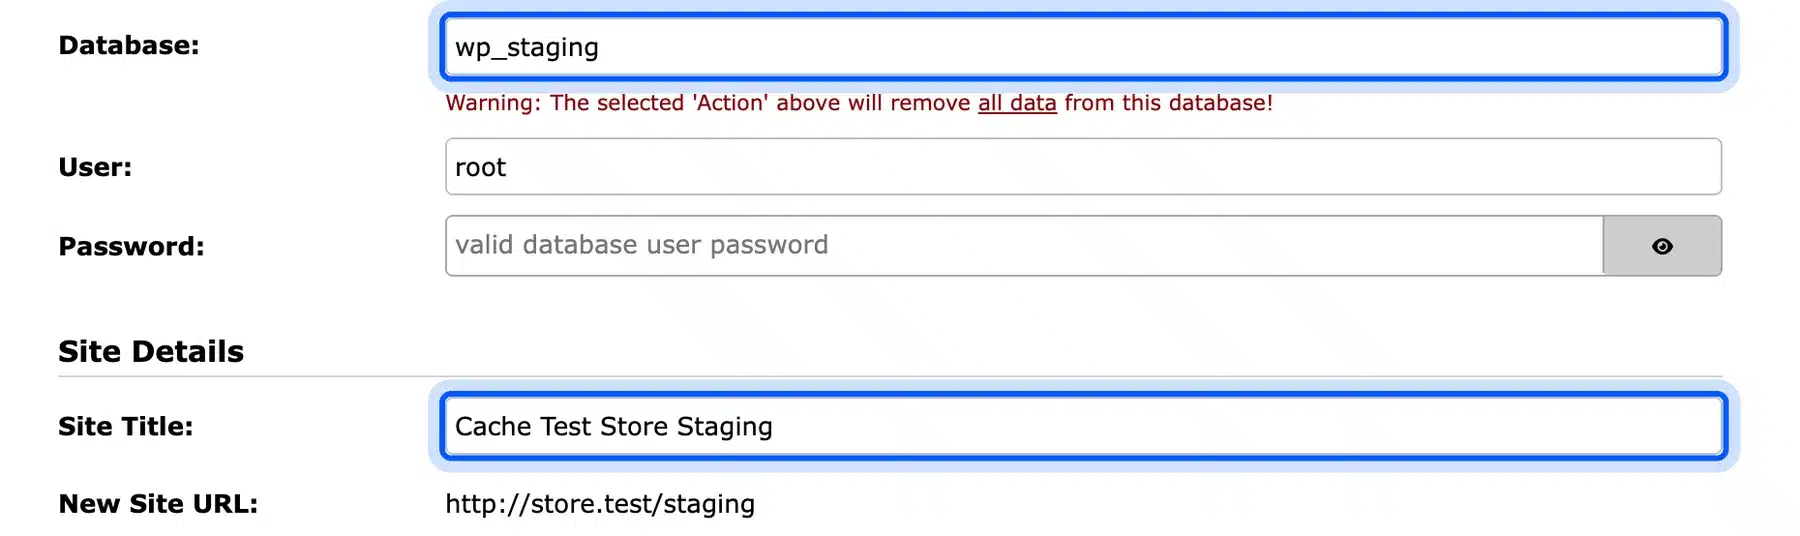
- Accept and install: Tick the terms box and click Next. Step 2 of 2 shows the install result and a database report.
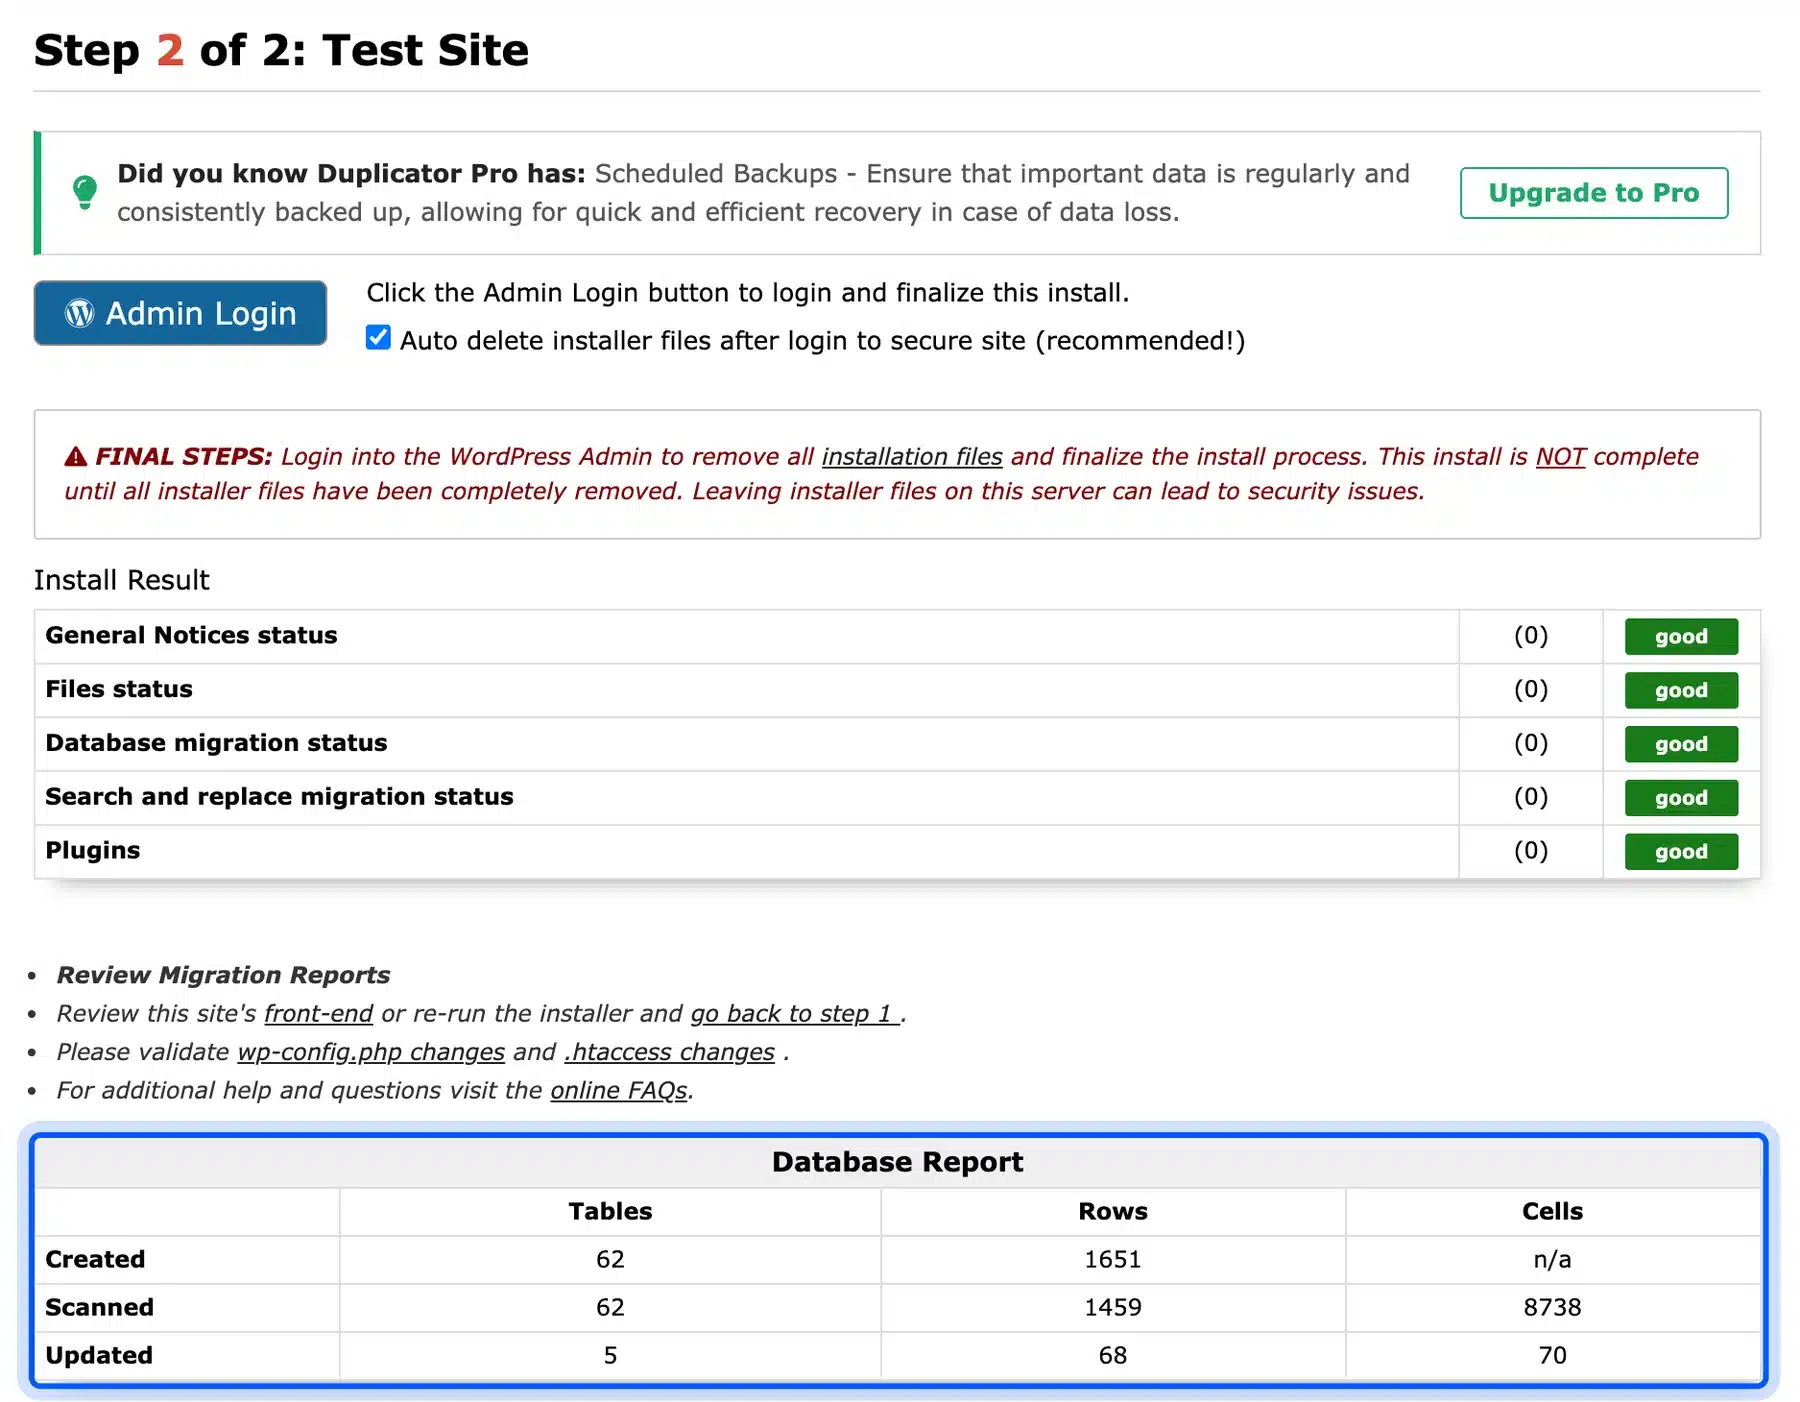
- Log in and clean up: Click Admin Login and keep the auto delete box ticked. Then open the front end to check the clone.
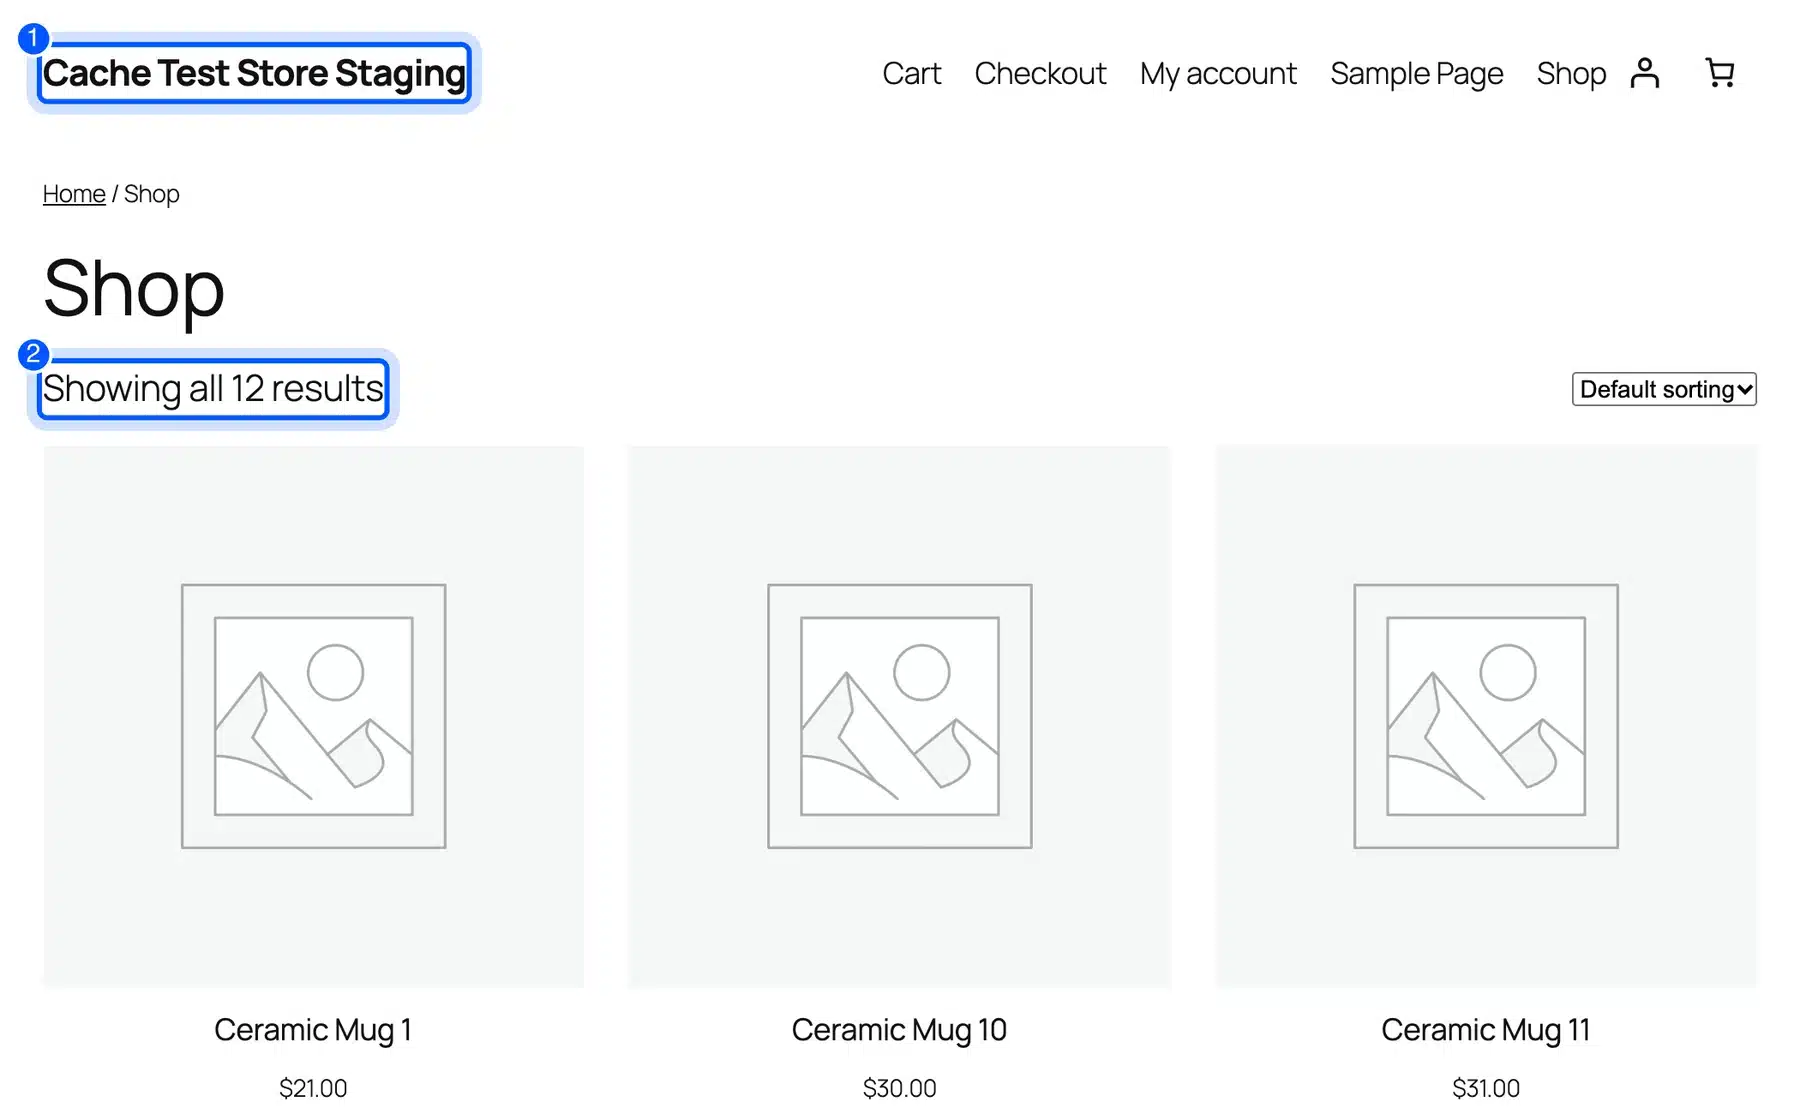
On our run the database report showed 62 tables created and 70 cells updated across 5 tables. Those updates are the URL swap: the installer replaced the old address everywhere it appeared. The shop on the clone listed all 12 products under the new title “Cache Test Store Staging”.
One detail surprised us when we checked the database afterward. The installer also rewrote the GUID column on all 30 rows in the posts table.
WordPress’s own migration guide says never to change GUIDs, mostly because feed readers use them to spot new posts. On a private staging copy this does no harm, but it is worth knowing before you clone a site with a busy RSS feed.
Warning: Delete installer.php and the archive from the new folder as soon as the clone works. Anyone who finds those files can rerun the installer or download a full copy of your site.
Method 2: Clone a WordPress Site Manually With WP-CLI
The manual way to clone a WordPress site is to export the database, copy the files and point wp-config.php at a new database. Then you import and run a safe URL search and replace. With WP-CLI each step is one command.
The rule that makes or breaks this method is the URL swap. WordPress’s migration guide warns that some themes and widgets store values “with the length of your URL marked”. That stored length is serialized data, and a plain find and replace in a text editor breaks it.
The WP-CLI search-replace command “intelligently handles PHP serialized data”. Use it instead.
You need SSH access to the server and WP-CLI installed, which most managed WordPress hosts include. Here are the steps:
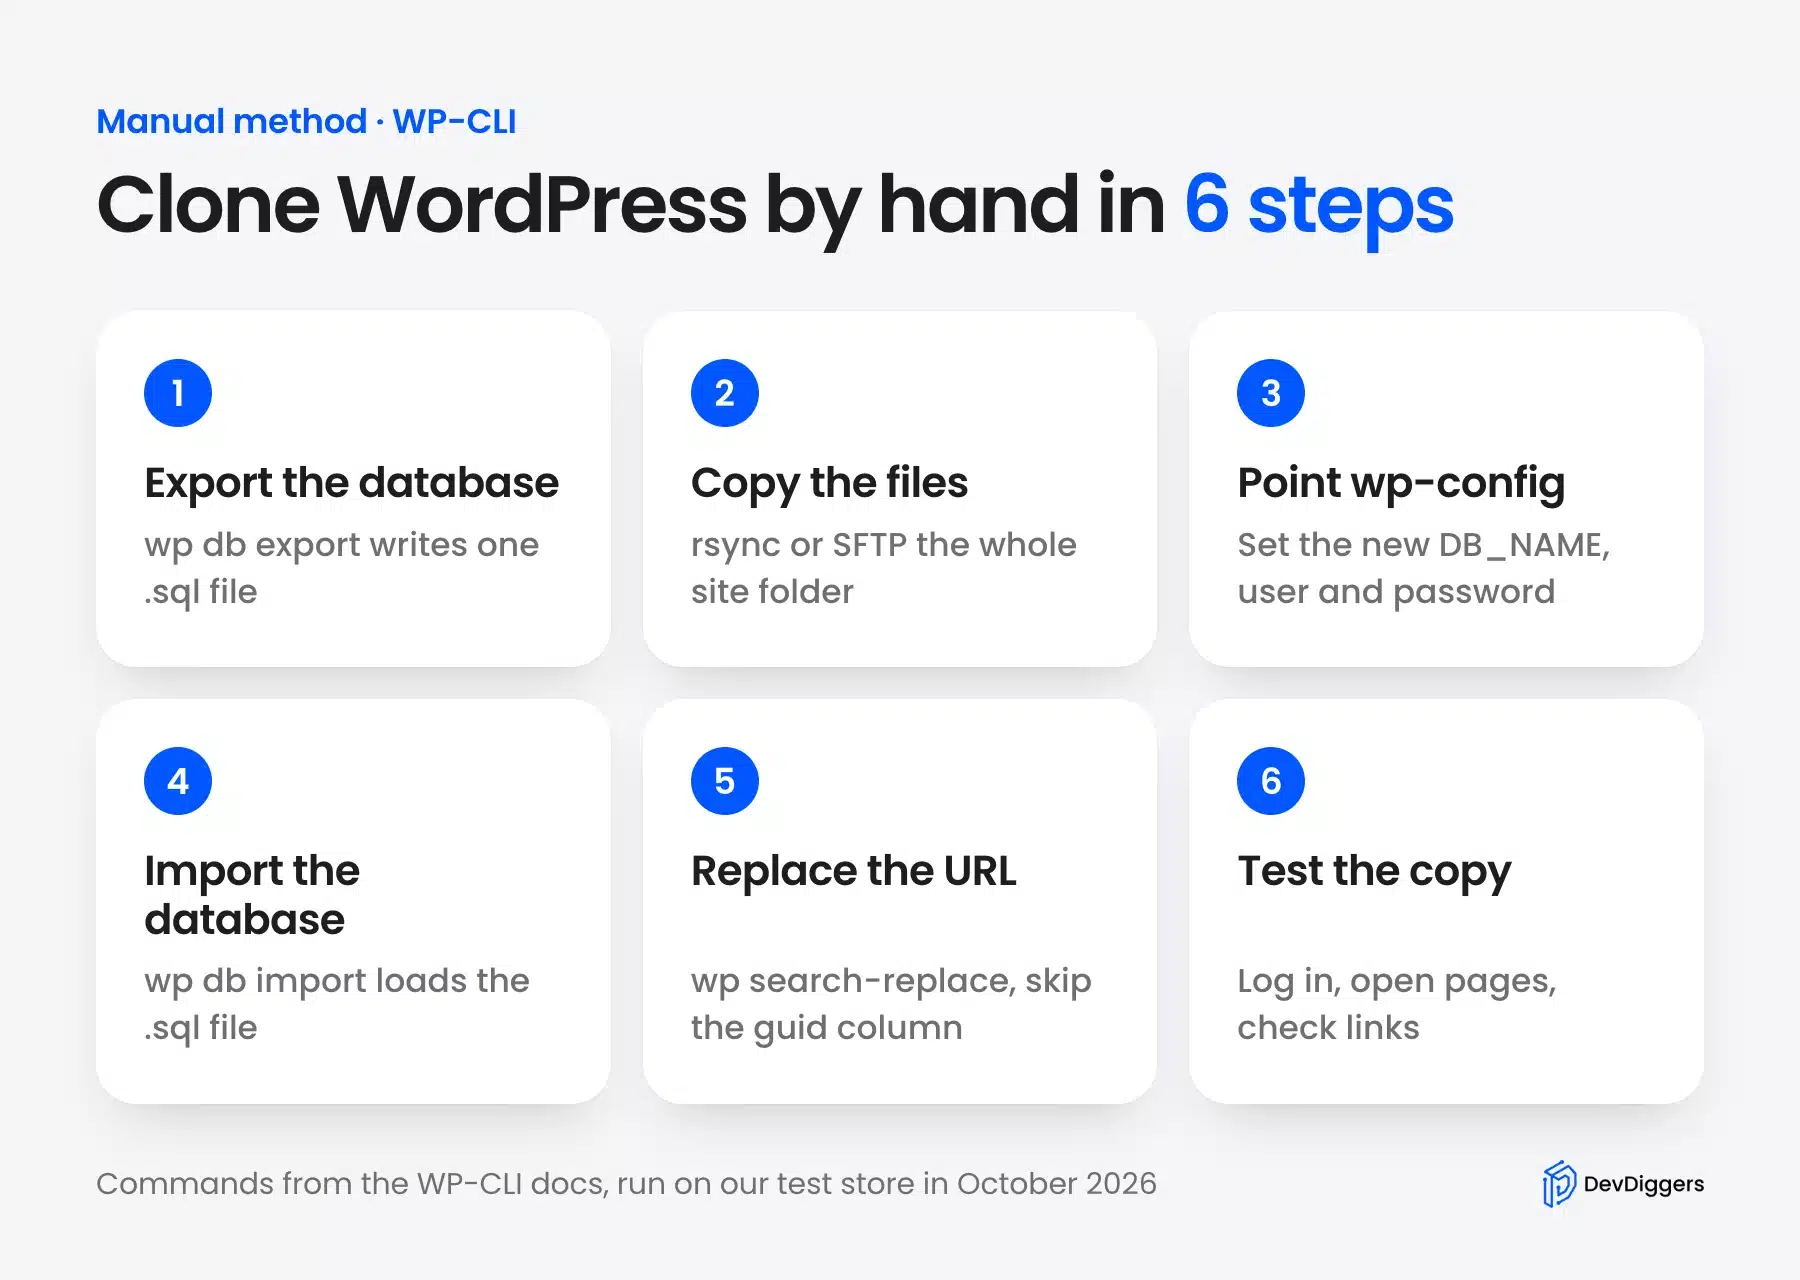
- Export the database: In the source site folder, run
wp db export staging-db.sqlto write the whole database to one file. - Copy the files: Copy the full site folder to the new location with rsync, SFTP or your host’s file manager.
- Point wp-config.php at the new database: Create the new database and run
wp config set DB_NAME wp_copy2in the new folder. Set the user and password the same way if they differ. - Import the database: Move the .sql file into the new folder and run
wp db import staging-db.sql.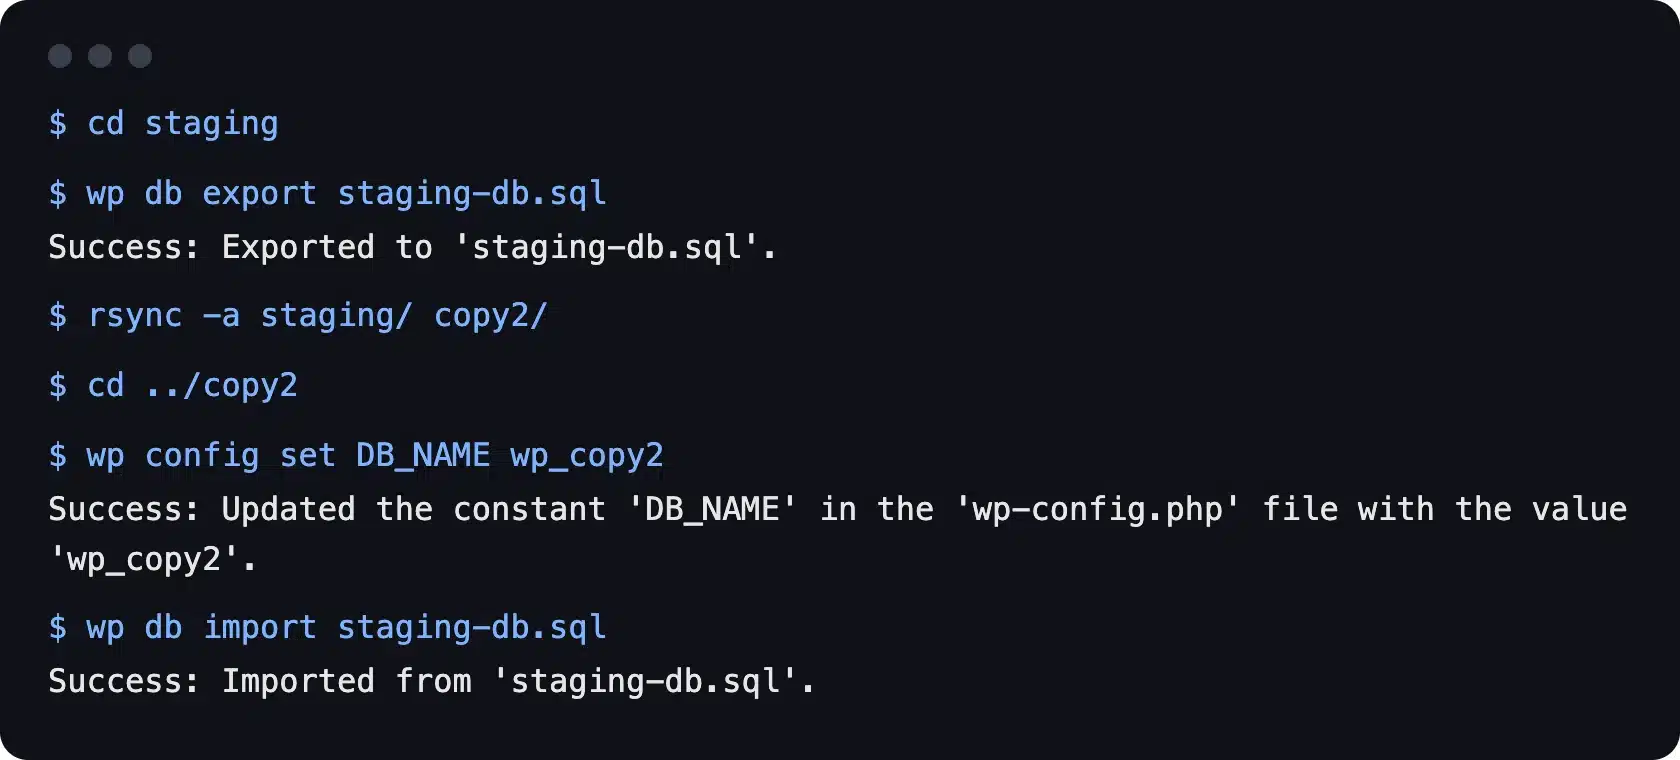
- Preview the URL swap: Run search-replace with
--dry-runfirst. It reports every change and saves nothing. - Run the swap for real: Run the same command without
--dry-runand check the result withwp option get home.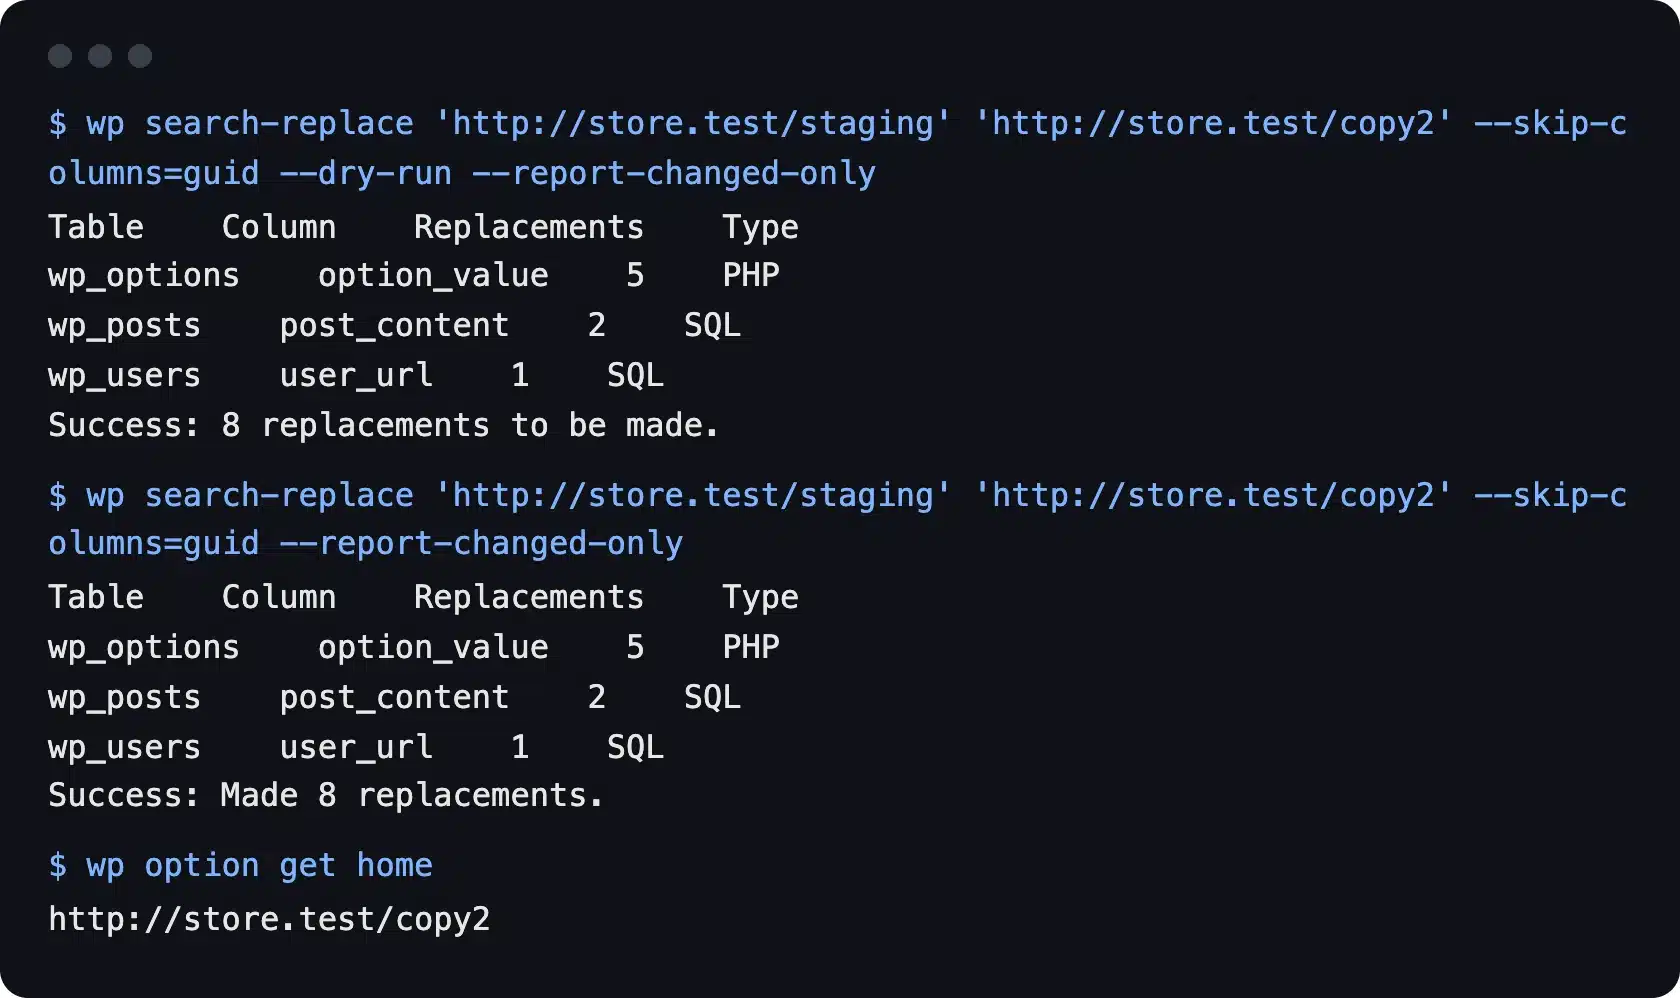
- Check the new address: Log in at the new URL and open Settings > General. Both address fields should show the clone’s URL.
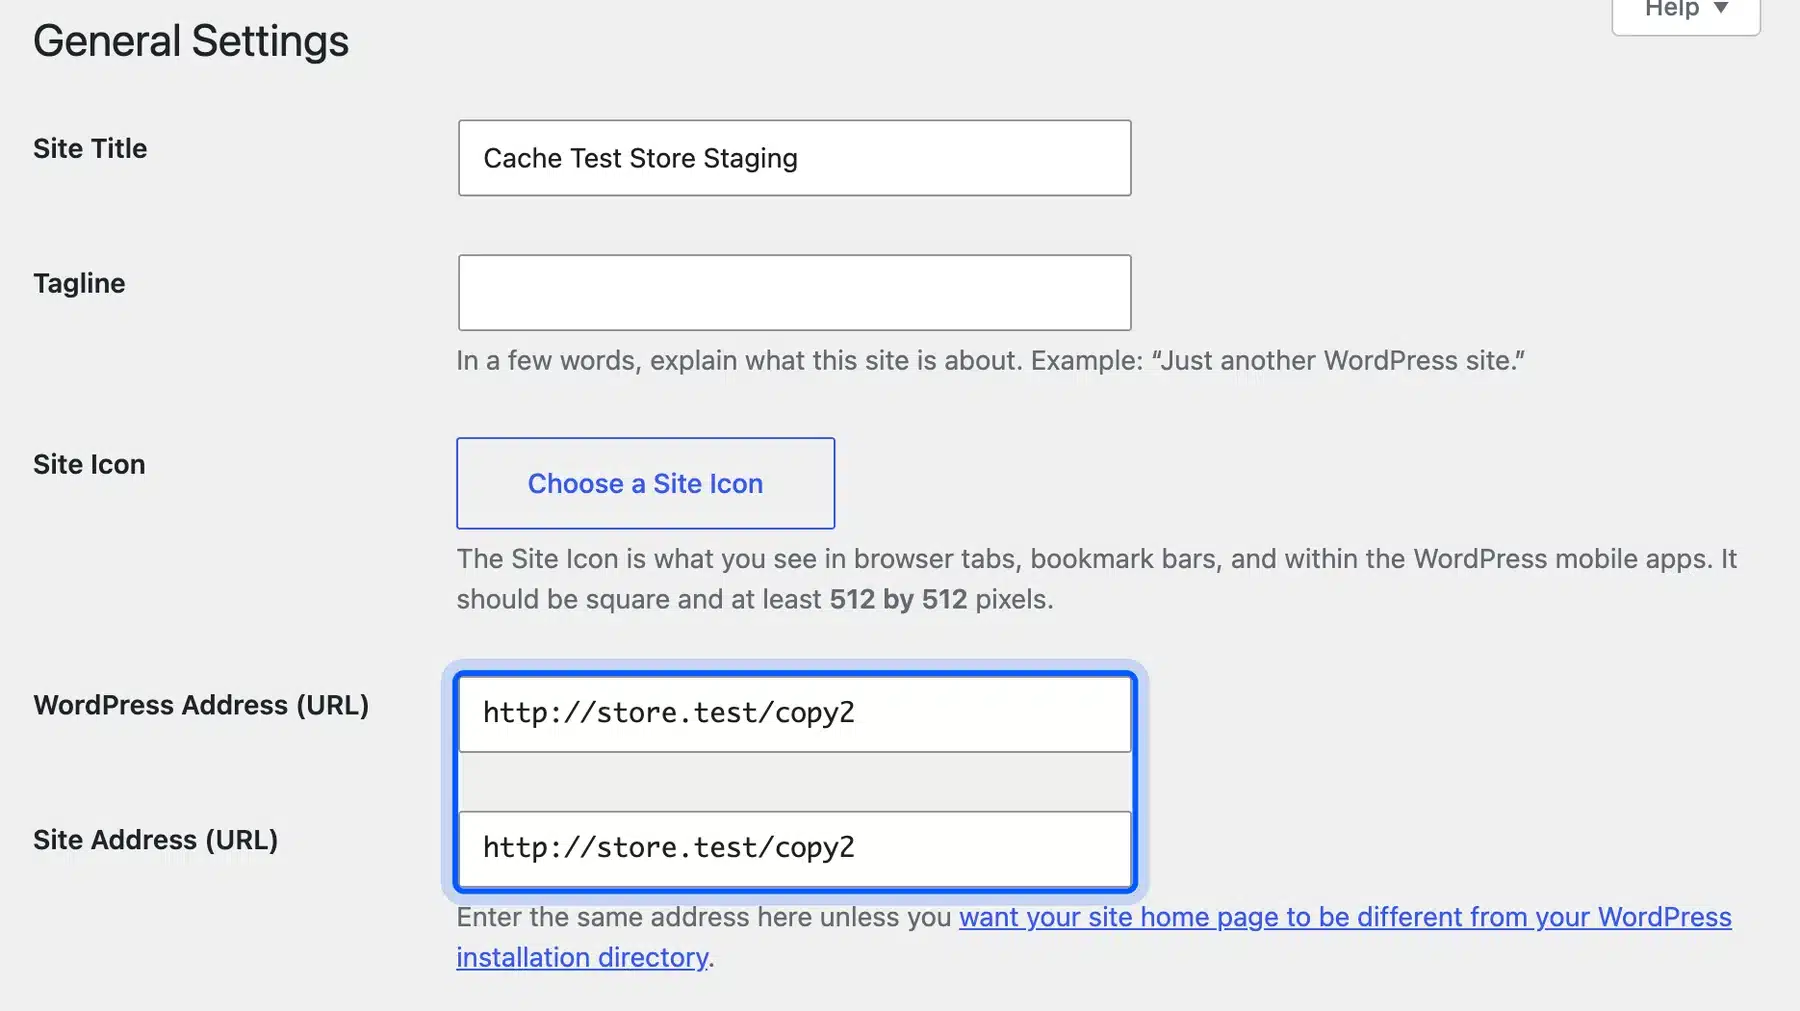
This is the exact command we ran for steps 5 and 6, minus the dry run flag on the second pass:
wp search-replace 'http://store.test/staging' 'http://store.test/copy2' --skip-columns=guid --dry-run --report-changed-only
Our dry run reported 8 replacements: 5 in wp_options, 2 in post content and 1 in a user profile URL. The 5 option rows were the PHP serialized type, which is exactly where a text editor swap would have broken the data. The live run made the same 8 changes, and the --skip-columns=guid flag left every GUID alone.
Note: Without SSH, you can do steps 1 and 4 in phpMyAdmin with its Export and Import tabs. Do not swap the URL inside the .sql file, though. Run a serialization-safe search and replace tool on the imported database instead.
Turn the Clone Into a WordPress Staging Site
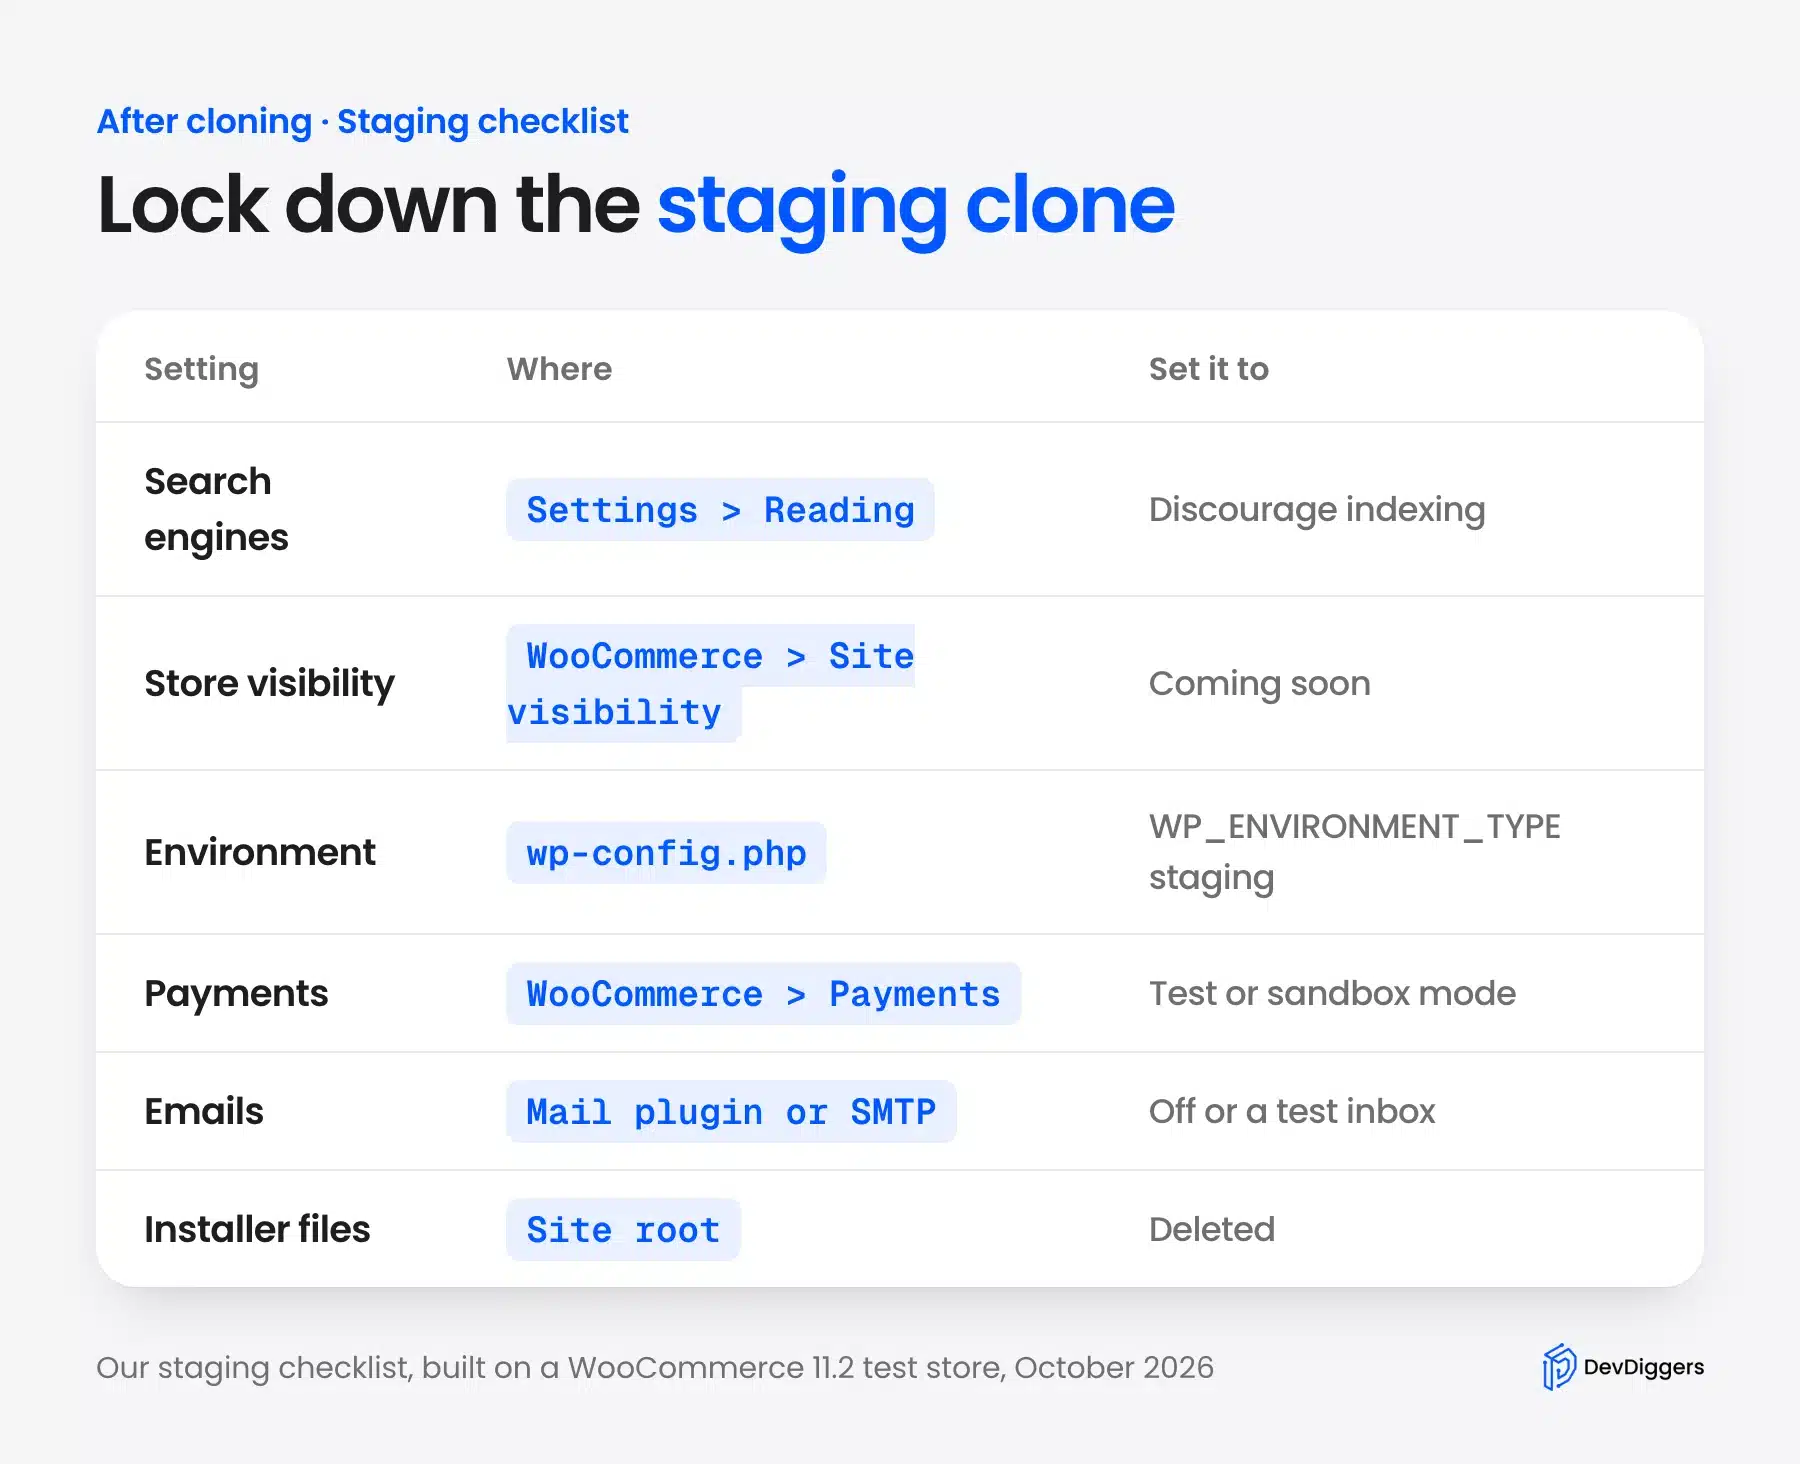
A WordPress staging site is a private clone where you test changes before they reach the live site. After cloning, block search engines, hide the store from visitors, mark the environment as staging, and switch payments and emails to test mode. Each takes under a minute.
We made each of these changes on our staging clone and checked the result. Here is the order we used:
- Block search engines: Go to Settings > Reading and tick “Discourage search engines from indexing this site”. Our clone then printed a
noindex, nofollowrobots meta tag on every page.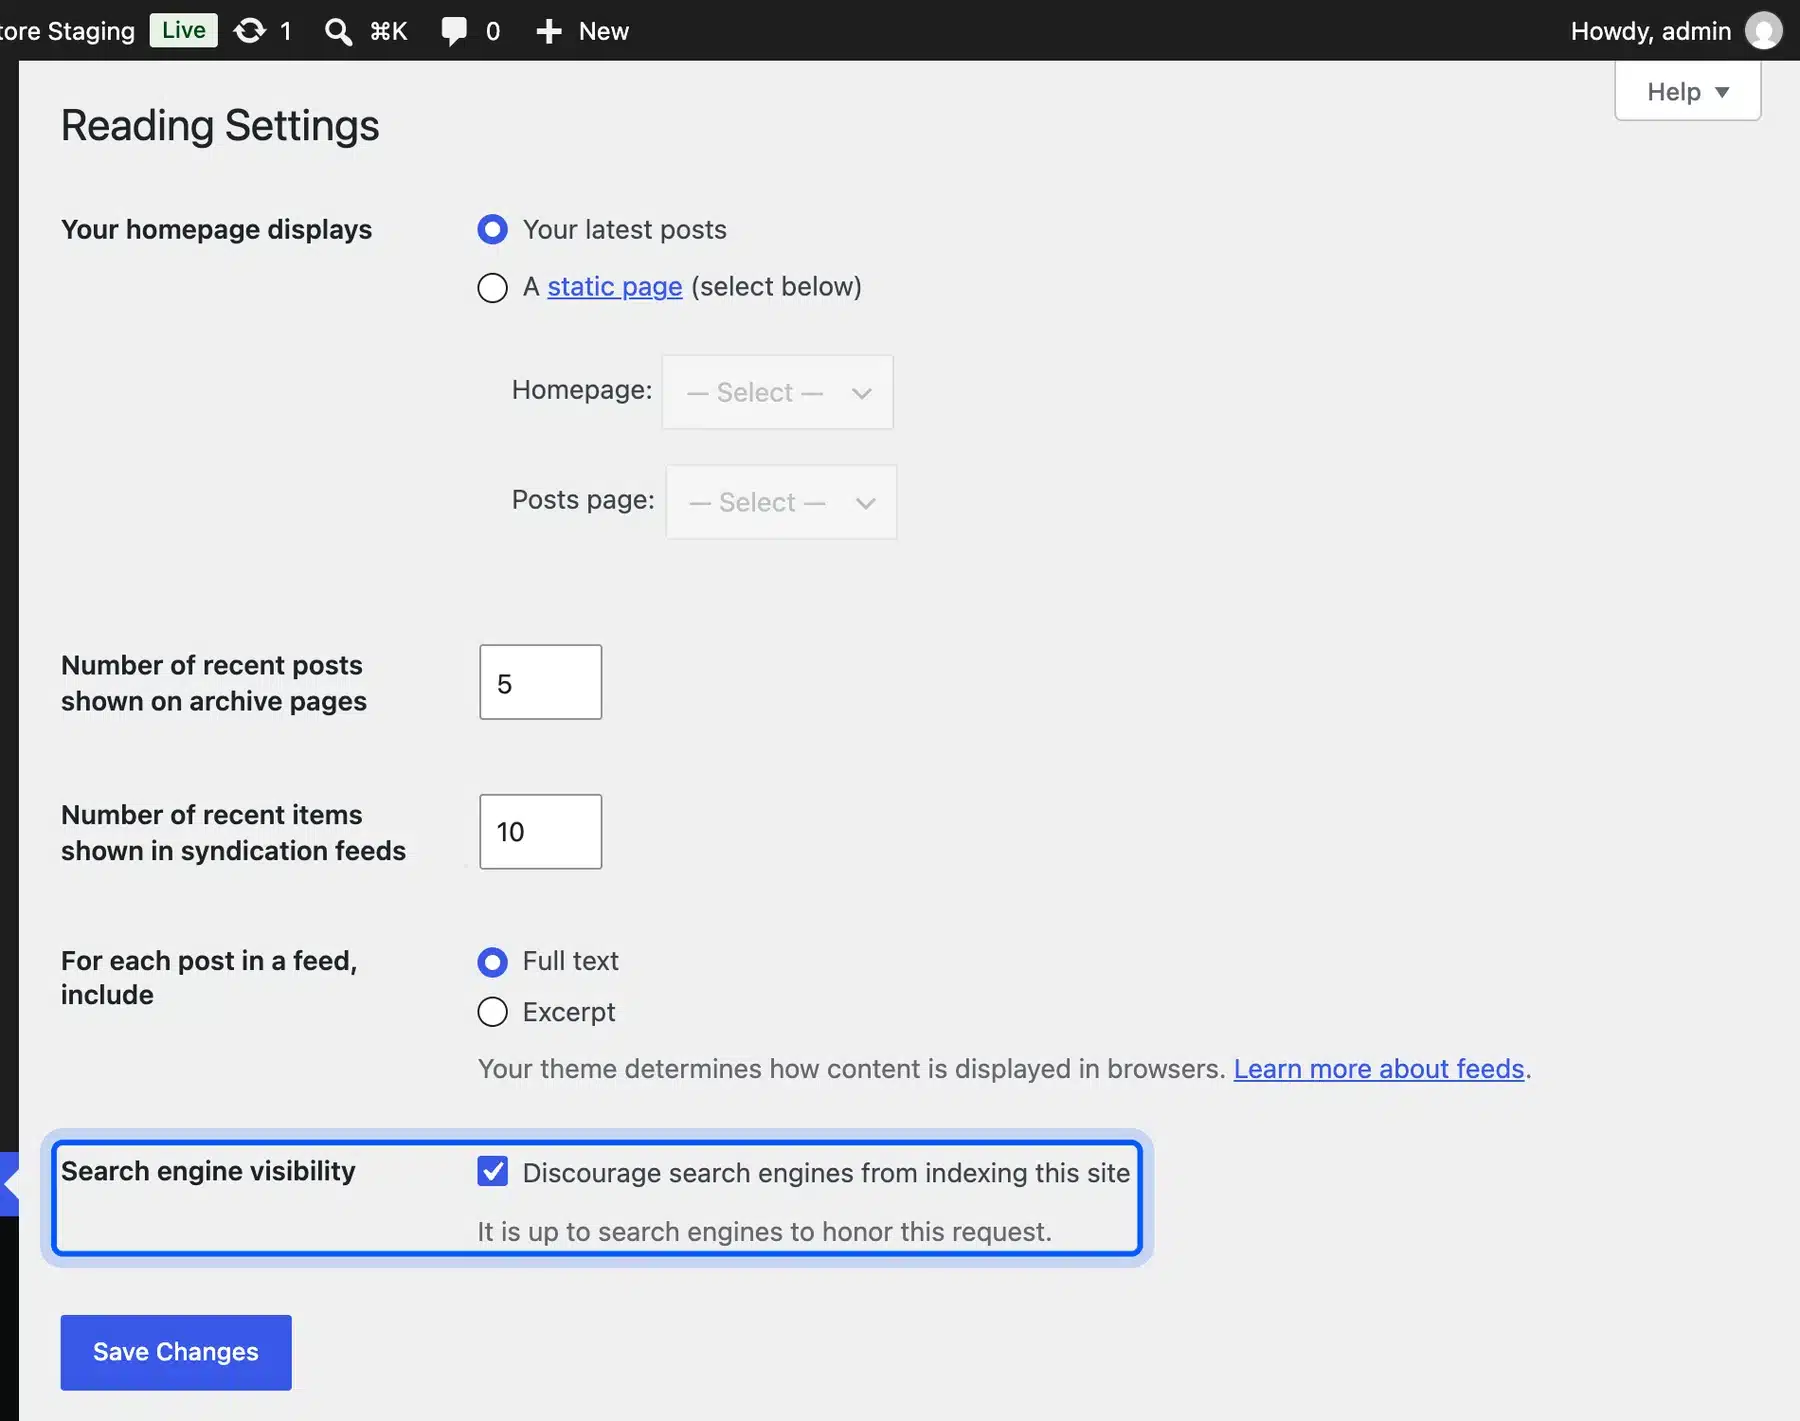
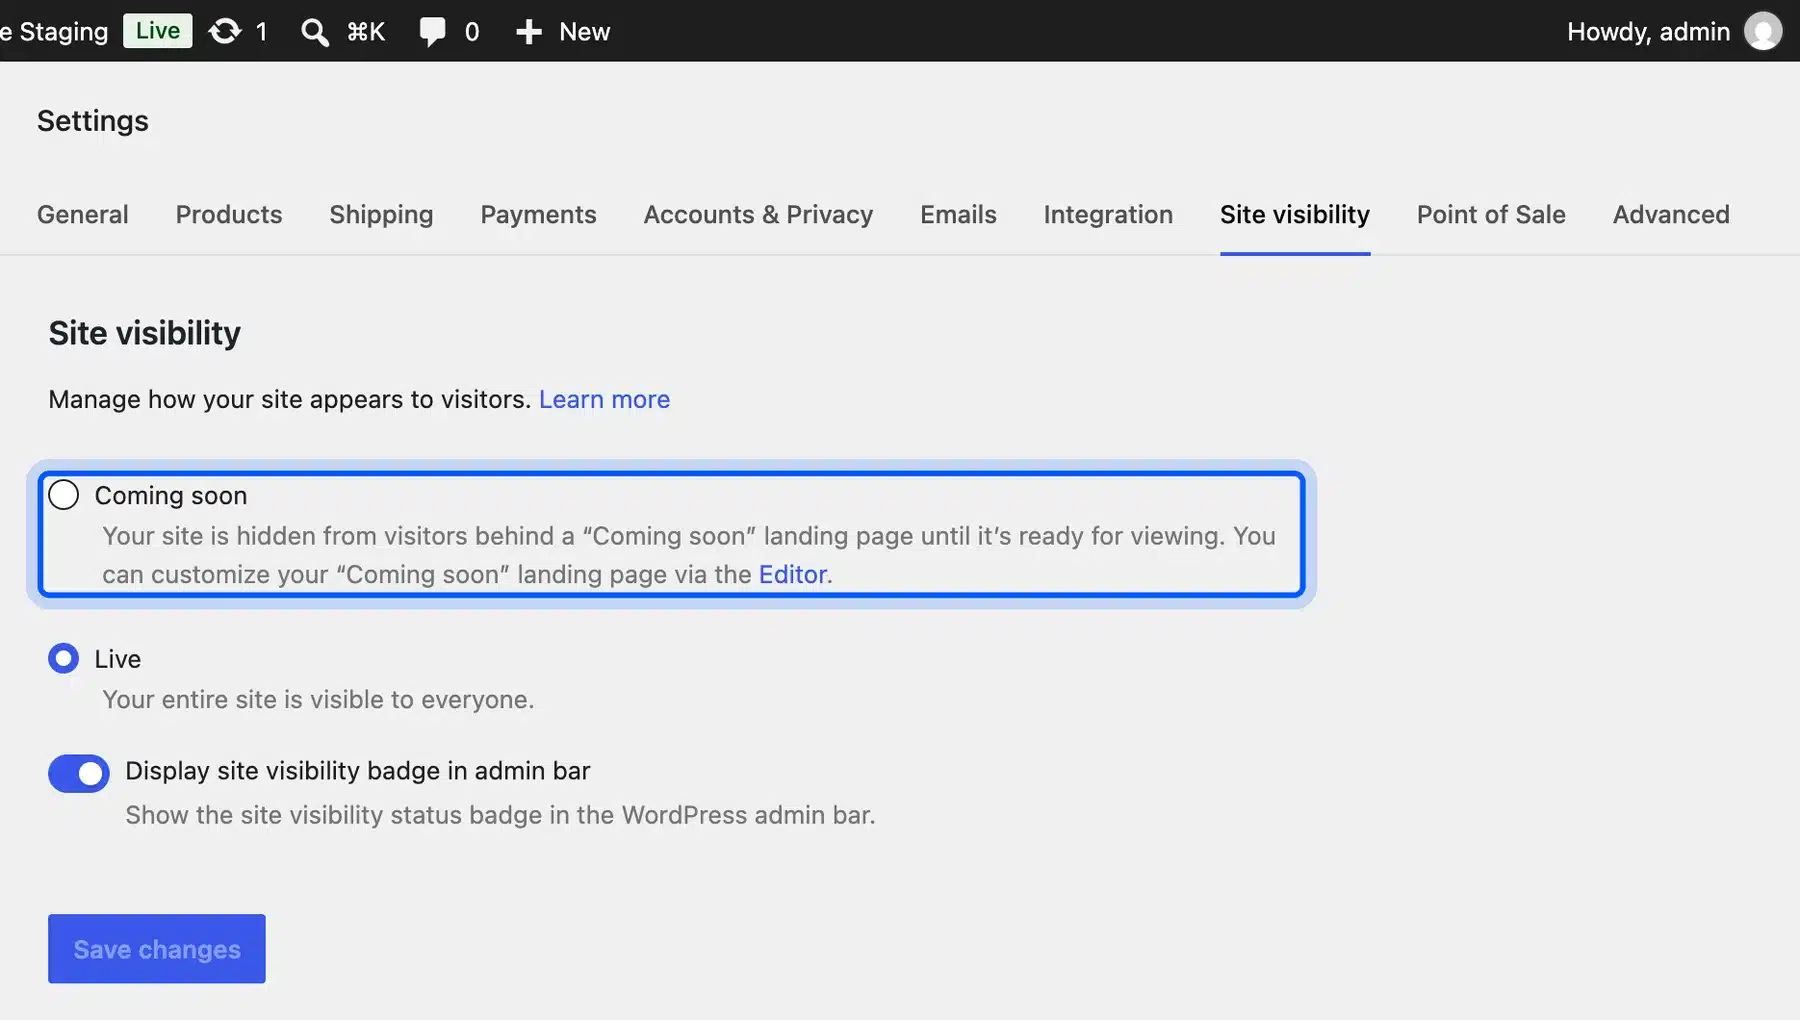
- Hide the store: In WooCommerce, open Settings > Site visibility and choose Coming soon. The clone kept the live site’s “Live” setting. This one is easy to miss.
- Mark the environment: Add
WP_ENVIRONMENT_TYPEset to staging in wp-config.php. After that, wp_get_environment_type() returned “staging” on our clone, and plugins that read it can switch off live features. - Stop real payments and emails: Put every payment gateway in test or sandbox mode, and route outgoing mail to a test inbox.
The last step matters most on a store.
A clone carries the live gateway keys and every customer email address. A test order on it can charge a real card or mail a real customer. WP-CLI can add the environment line for you:
wp config set WP_ENVIRONMENT_TYPE staging --type=constant
The Reading setting only asks search engines to stay away. The Reading screen itself says it is up to search engines to honor the request. Google’s guide to blocking indexing with noindex explains how crawlers read that tag.
For a staging site that must stay private, add password protection at the host level as well.
Copy a WordPress Site to a New Domain
To copy a WordPress site to a new domain, run either method above with the new domain as the target URL. Point the domain’s DNS at the new server first and install an SSL certificate. Then the search and replace swaps the old https address for the new one in a single pass.
Three things change compared with a staging clone. The new site should be public. Leave search engines on and keep the store live.
Swap the full address including the protocol (for example https://oldstore.com to https://newbrand.com) to avoid leaving mixed http links behind. Both sites now show the same text. Rewrite the copy on the new one before it gets indexed.
If the new domain replaces the old one instead of running beside it, that job is a move. That job adds 301 redirects and a Search Console change of address, which our guide to moving a WordPress site covers in full. The same planning applies when you switch platforms, as in our Squarespace to WordPress migration guide.
For a copy on your own computer, the steps are the same with a local address as the target. A tool like Local makes the empty site and database for you, which our guide on setting up WordPress with Local walks through.
Common Cloning Problems and How to Fix Them
When a clone fails, check five causes first, listed below with the fix for each. The usual ones are a build that cannot call its own site and an upload that is too large. Bad URL swaps, folder permissions and old caches cover the rest.
These are the ones we hit or checked on our test store:
- Build stuck or “Communication to AJAX is blocked”: Our first Duplicator build stopped at this error after about six minutes. The server could not reach its own site address, which Duplicator needs to keep the build running. Once the server could load its own URL, the next build finished in 16 seconds.
- Archive too large to upload: Hosts often cap uploads. Upload the archive with SFTP instead of the browser, or exclude old backups and cache folders before you build.
- Broken widgets or theme settings: This is the serialized data problem from a text editor swap. Restore the database and redo the URL change with WP-CLI search-replace or the Duplicator installer.
- Installer cannot write files: The new folder needs write permission for the web server user. Fix the folder owner. Then rerun the installer.
- Old URLs still showing: A page cache or CDN is serving copies saved before the swap. Clear every cache layer. Then reload the page in a private window.
Some clones keep failing on a host, and some stores are too large to risk breaking. In those cases our WordPress migration services team handles the copy, the URL swap and the checks for you. That is the shortcut when the steps above stop working.
Conclusion
Knowing how to clone a website on WordPress comes down to three moves: copy the files, copy the database and swap the URL safely. Duplicator does all three from the admin and suits most sites. WP-CLI gives you full control and handles sites a plugin cannot.
Whichever method you use, do the URL swap with a tool that understands serialized data, and delete the installer files when you finish. On a staging clone, block search engines and put payments in test mode before anyone places an order. If you would rather not run the copy yourself, our WordPress migration services can do it for you.
Frequently Asked Questions (FAQs)
Q1. How long does it take to clone a WordPress site?
A small site takes under an hour with a plugin, and most of that time is uploading the archive. On our test store the Duplicator build took 16 seconds and the install a few minutes. Large stores with many gigabytes of media take longer, mainly because of transfer speed.
Q2. Is Duplicator free for cloning a WordPress site?
Duplicator Lite on WordPress.org is free and handled our whole clone, including the URL swap. Pro features such as staging sites and drag and drop imports cost extra. You do not need them for a basic clone.
Q3. Will a cloned WordPress site hurt my SEO?
A public clone with the same content can compete with your live site in search results. Keep staging clones out of search with the Discourage search engines setting and a password. For a new domain, rewrite the content before the copy gets indexed.
Q4. Can I clone a live WordPress site to localhost?
Create an empty local site and database with a tool like Local. Then run the Duplicator installer or the WP-CLI steps with the local address as the new URL. Pull a fresh copy whenever you need the latest content.
Q5. What does not copy over when you clone a WordPress site?
The domain name, DNS records, SSL certificate and email accounts stay with your hosting and domain registrar. Set those up again. Server cron jobs and host-level caching rules also stay behind. Everything stored in the site folder and the database comes along.
Q6. Can I clone a website just to practice web design?
You can practice by rebuilding a site’s layout yourself in a local WordPress install with your own text and images. Copying another site’s actual content and files is not allowed without permission, because its writing and images are protected by copyright.
Q7. Should I clone or migrate when I change web hosts?
Changing hosts is a migration since the old copy shuts down after the switch. The steps match a clone with the same domain. Then you point DNS at the new server. Keep the old host running for a few days until the new site checks out.