
To disable automatic updates in WordPress, add one line to wp-config.php or turn off auto-updates for each plugin on the Plugins screen. Both take under five minutes. The free Easy Updates Manager plugin gives the same control without code.
We checked every method against the WordPress developer docs and the WordPress.org plugin directory in October 2026, when WordPress 7.1.3 was the current release. Automatic updates fix bugs and close security holes. They can also break custom code or a plugin that is not ready for a new version.
This guide covers three ways to turn updates off and the pros and cons of each. It ends with how to prevent update failures in WordPress, from backups to the rollback WordPress now runs on its own.
What Are Automatic Updates In WordPress?
Automatic updates are background updates WordPress installs without a click from you. The feature arrived in version 3.7 to get security fixes onto sites fast. By default WordPress installs minor core releases and translations on its own, and plugins or themes only when someone opts in.
Here is what WordPress updates by itself on a default install:
- Minor core releases: Maintenance and security releases such as 7.1.2 to 7.1.3.
- Translation files: Language packs for core, plugins and themes.
- Plugins and themes: Only the ones switched to auto-update by you or your host. That option arrived in WordPress 5.5.
For a basic site this saves time. On a complex or customized site an update can arrive before you have checked that your code still works with it.
That is why many developers want to learn how to disable automatic updates in WordPress to avoid surprise conflicts and broken features.
Why Disable Automatic WordPress Updates?
Site owners disable automatic WordPress updates to decide when changes land. An update can clash with custom code, a premium plugin or a heavily customized theme. Turning updates off lets you test each one on a staging copy first and apply it at a quiet time.
Updates still matter for security and speed. Turning them off only makes sense when someone checks and installs them by hand.
Here are the most common reasons that site owners take the manual approach:
1. Avoid Site Breakage
Automatic updates don’t always play nicely with existing code. A change to a core function can make a theme or plugin fail or take the whole site down. If you have disabled automatic updates, you can first test everything in your staging environment.
2. Maintain Full Control
Many developers prefer the manual route with updates so they can:
- Read changelogs
- Test for compatibility
- Deploy all changes on their terms
This level of control can help avoid nasty surprises during peak traffic or sales periods.
3. Avoid Plugin Conflicts
Not all plugins are updated at the same pace. If one plugin updates while others do not, it can lead to broken features and unexpected errors. In the worst case the whole site goes down.
4. Maintain Custom Code
A lot of websites will include custom changes made directly into the theme or the plugin. Automatic updates will usually overwrite those changes unless they are safely saved in child themes or custom plugins. With updates disabled, you decide when and how those changes are made.
How to Disable Automatic Updates in WordPress: 3 Methods
You can disable automatic updates in WordPress three ways. Turn off plugin and theme auto-updates on their admin screens, add a constant to wp-config.php or install Easy Updates Manager. The screens suit a few plugins, the code gives full control and the plugin gives one settings page.
Method 1: Turn Off Plugin and Theme Auto-Updates in the Dashboard
Since WordPress 5.5 the Plugins and Themes screens have their own auto-update switches. This is the quickest method when you only want to stop updates for some plugins. It does not touch core updates, which Method 2 controls. The steps follow the WordPress.org auto-updates guide:
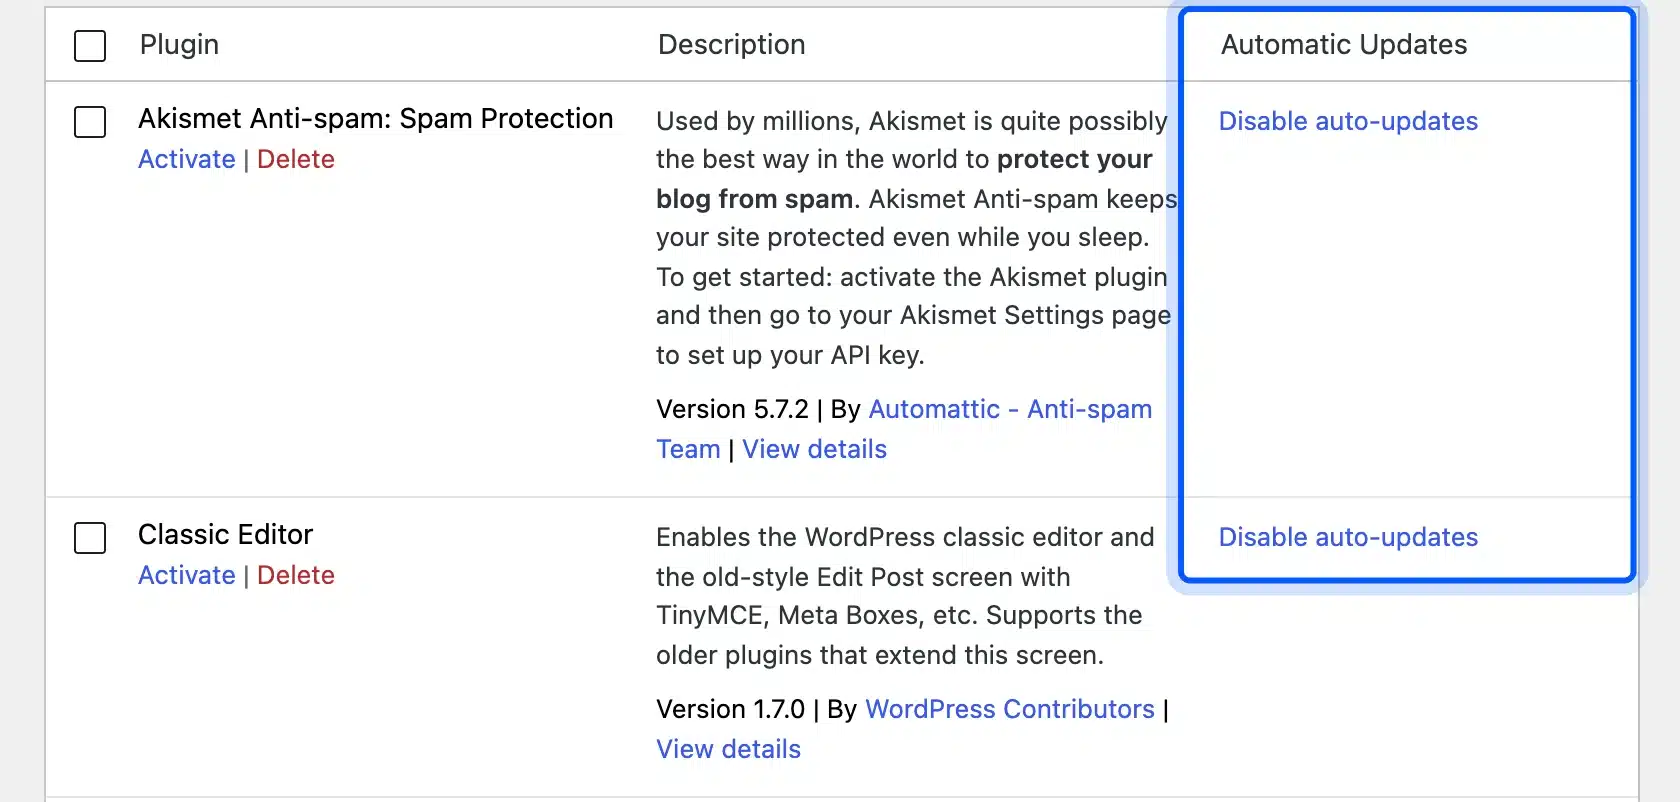
- Go to Plugins > Installed Plugins and find the Automatic Updates column.
- Click Disable auto-updates next to each plugin you want to update by hand.
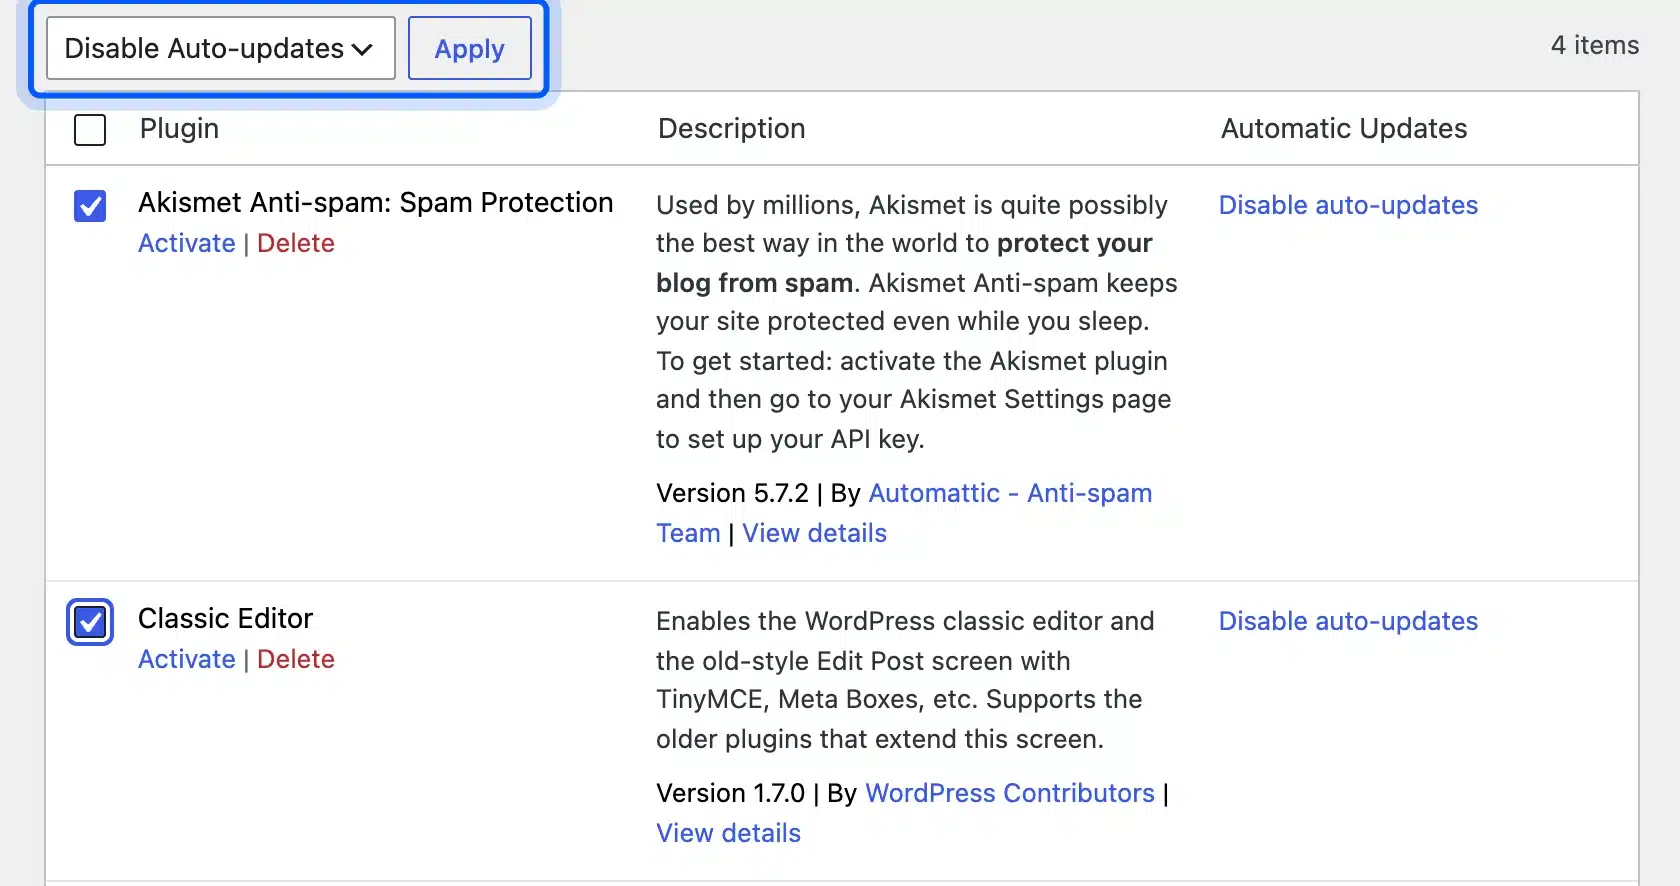
- To change many plugins at once, tick their checkboxes and pick Disable Auto-updates from the Bulk actions menu. Click Apply.
- For a theme, go to Appearance > Themes, click the theme and use the Disable auto-updates link under the author name.
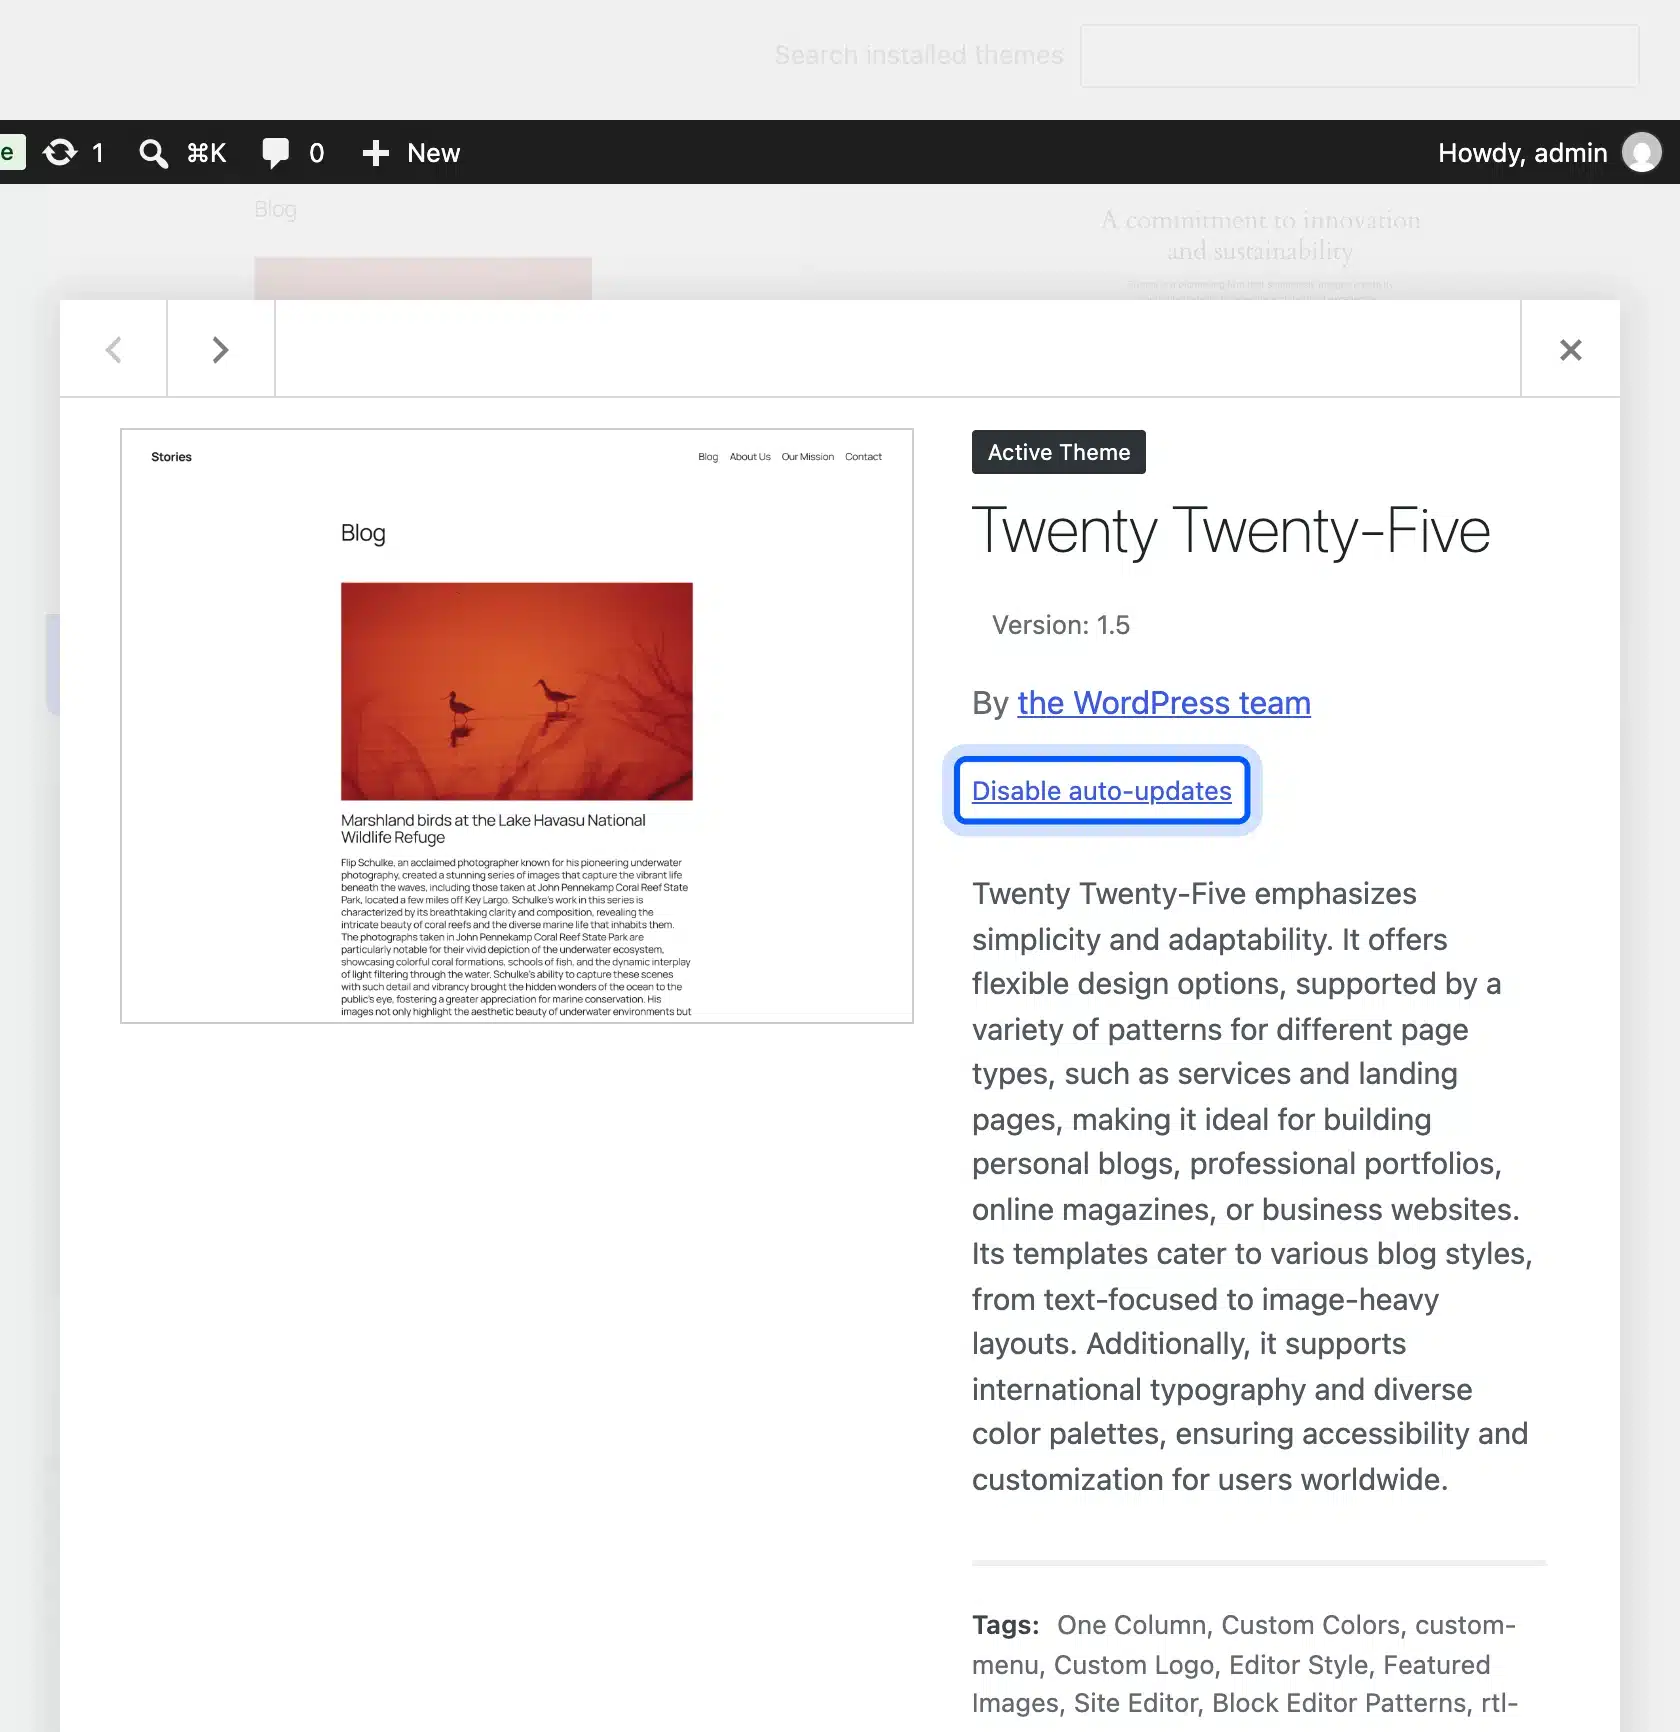
If these links are missing, your host or a plugin has switched the feature off. The WordPress.org guide names both as the usual cause.
Method 2: How to Disable Automatic Updates in WordPress Through Code
This is the cleanest way to disable automatic updates in WordPress, and it needs no extra plugin. You edit the wp-config.php file. Follow the steps below:
Step 1: Open wp-config.php

In cPanel File Manager or FTP using FileZilla, access the root directory of your WordPress site, locate the wp-config.php file, and open it.
Step 2: Add the following line of code
Paste this line above the comment that starts with /* That's all, stop editing:
define( 'AUTOMATIC_UPDATER_DISABLED', true );
This deactivates all types of automatic updates, including minor core releases, translations and plugin and theme auto-updates. The wp-config.php docs list it as the switch for sites with custom code or host-managed updates.
Optional: Disable Only Core Updates
If you’d like more control and only want to disable automatic updates of the WordPress core, use this code instead:
define( 'WP_AUTO_UPDATE_CORE', false );
The constant accepts three values, written exactly like this:
'minor': Install minor releases only. This is the default.truewith no quotes: Install all core updates, major and minor.falsewith no quotes: Block all core updates.
Before You Edit wp-config.php
Before making any changes, you must:
- Back up your site
- Test updates in a staging environment
- Document any changes you make in the file
This method is best for developers or those who want to avoid plugin clutter.
Optional: Turn Off Plugin and Theme Updates With Filters
The auto_update_{$type} filters stop plugin and theme auto-updates while core and translations keep updating. Save this as wp-content/mu-plugins/disable-auto-updates.php so a theme switch never removes it:
<?php
/**
 * Plugin Name: Disable Plugin and Theme Auto-Updates
 */
add_filter( 'auto_update_plugin', '__return_false' );
add_filter( 'auto_update_theme', '__return_false' );
Swap __return_false for __return_true to force auto-updates on instead. The same pattern works with auto_update_core and auto_update_translation.
Method 3: Using a Plugin to Disable Automatic Updates
If you are not comfortable with file editing, a plugin is the easiest option.
This guide uses the free Easy Updates Manager plugin. As of October 2026 it shows more than 300,000 active installations on WordPress.org and is tested up to WordPress 7.1.3. Here is how to set it up:
Step 1: Install the Plugin
- In your WordPress Dashboard, go to Plugins > Add Plugin.

- In the search bar, search for Easy Updates Manager.

- Click Install Now and then Activate.

Step 2: Set Up the Update Settings
- After activating, go to Dashboard > Updates Options.

- You will see the Updates options. From here, you can manage updates for:

- Core WordPress
- Plugins
- Themes
- Translation files
- Developer logs and email notifications
Step 3: Disable Any Automatic Updates
- Scroll to the General Settings section.

- Toggle to Disable all updates or select different settings.

You can mix the settings. For example, keep core updates on and turn plugin updates off.
Why Use This Plugin?
- No coding required
- Separate switches for core, plugins, themes and translations
- Useful logs and optional email notifications
- Works on multisite networks
As of October 2026 Easy Updates Manager shows 300,000+ active installations on WordPress.org, and its last update shipped in August 2026.
Pros and Cons of Disabling Automatic Updates in WordPress
Disabling automatic updates in WordPress trades convenience for control. You decide when each change lands and can test it on staging first. The cost is that security fixes now wait until you install them yourself.
Pros of Disabling Automatic Updates
- You control your website: With updates disabled, nothing changes until you decide it should. You can take your time to test each update.
- Avoid broken sites: Some updates clash with existing plugins, themes or custom code. Disabling automatic updates could avoid some unexpected downtime and broken things.
- Compatibility testing: You can always test your updates in a staging environment before you apply them and make sure everything works properly with your existing stack.
- Custom Work: You may have or may want to make custom modifications to your themes or plugins. Automatic updates can erase those modifications. Disabling those updates keeps your tweaks safe.
Cons of Disabling Automatic Updates
- Security Risks: Automatic updates often patch known vulnerabilities. If you miss or forget to update, your site could remain susceptible.
- Manual Maintenance: Control comes with work. With automatic updates off, you check for updates and install them yourself. A WordPress maintenance plan can take that routine over, including testing each update on staging.
- Missed Improvements: Updates also bring speed improvements, new features and compatibility fixes. If you are not looking for them, you could miss out on those.
- Larger Learning Curve: Managing updates by hand is hard for beginners. It gets harder with many plugins or several websites.
When Is It Smart to Disable Automatic Updates?
Disabling automatic updates makes sense when a site runs custom code that an update could break. It also needs someone who checks and installs updates every week. A simple blog with no custom code is safer with automatic updates left on.
Turning off updates fits best if:
- You are operating a heavily modified WordPress website.
- You run a busy store or business site where downtime costs sales.
- You have a staging environment to test updates.
- You or the developer can monitor updates manually.
If none of these apply, leave automatic updates on and add the safety steps below.
How to Prevent Update Failures in WordPress
To prevent update failures in WordPress, back up first and test big updates on a staging copy. Update one plugin at a time and read its changelog. WordPress 6.6 and later also rolls back a plugin auto-update that crashes your home page. If a WooCommerce update breaks the store, you can downgrade the WooCommerce plugin without losing data.
That rollback is new enough that many guides skip it. WordPress added it in two steps:
- Manual updates: Since WordPress 6.3, a failed manual plugin or theme update restores the version you had before.
- Automatic updates: Since WordPress 6.6, core loads your home page after a plugin auto-update. On a fatal error it restores the old version and emails the admin, as the rollback merge proposal describes.
- Recovery mode: Since WordPress 5.2, a fatal error sends the admin an email link that opens the dashboard with the broken plugin paused.
Rollback only catches errors that crash the page. A plugin that breaks checkout without a fatal error still needs your own checks. So keep these habits as well:
- Back up first: Take a full files and database backup before every manual update.
- Use staging: Test major WordPress and WooCommerce versions on a copy of the site.
- Update one at a time: A single change makes the cause of a problem easy to find.
- Check Site Health: Auto-updates rely on WP-Cron, and Tools > Site Health flags it when cron fails.
Some managed hosts run their own update system and lock these settings. The WordPress.org guide says missing auto-update links usually mean a host or plugin turned the feature off. Ask your host before you fight its settings. If updates keep timing out, our guide on how to fix WordPress update timeouts walks through the common causes.
Auto-updates depend on WP Cron, and you can set up a real server cron job to run them on time.
Conclusion
You can disable automatic updates in WordPress with the Plugins screen switches, one wp-config.php constant or the Easy Updates Manager plugin. The switches suit a few plugins. The constant and the filters give full control.
Disabling updates does not remove the work. Set a weekly reminder to install updates by hand, keep backups and test big releases on staging. A regular routine is part of any WordPress security checklist.
Frequently Asked Questions (FAQs)
Q1. Is it safe to disable automatic updates in WordPress?
It can be safe if you choose to do manual updates. The risk related to disabled updates only happens when you procrastinate or forget to do your updates for important components like WordPress core, themes, or plugins. So, remembering to develop a solid maintenance plan or testing using a staging area before transferring to your live site is important.
Q2. Will disabling automatic updates put my site at risk of a threat?
It may put your site at risk, especially if you are missing out on key security patches. So you need to remember to keep an eye on plugin and theme updates manually, subscribe to exploit/security announcements and alerts on the internet or your host website, or use a security plugin like Wordfence to ensure you don’t miss anything for critically vulnerable updates.
Q3. Can I disable updates for plugins only or themes only?
Yes. The Plugins screen has a Disable auto-updates link for each plugin, and each theme has the same link in Appearance > Themes. Easy Updates Manager also has separate switches for core, plugins, themes and translations.
Q4. Will managed WordPress hosting providers override update settings?
Some do. Many managed hosts run their own update schedule and can switch off the WordPress auto-update controls. Ask your host how its updates work before you change settings that it may override.
Q5. Can I get notified of available updates if I disable updates?
Yes. The Dashboard > Updates screen still lists every available update when automatic updates are off. Easy Updates Manager can also send email notifications.