You can reduce HTTP requests in WordPress in under an hour by optimizing images, combining files, and turning off features you don’t use. Most tutorials skip a first step: checking your current request count, so you have no way to measure whether your changes worked. This guide fixes that.
It walks through nine specific changes, in the order that gives you the biggest speed win first. Each step includes the exact clicks inside your WordPress dashboard. No coding required, and no guessing what “optimize your assets” means in practice. By the end, you’ll know exactly where your requests come from and how to bring the number down.
What Are HTTP Requests?
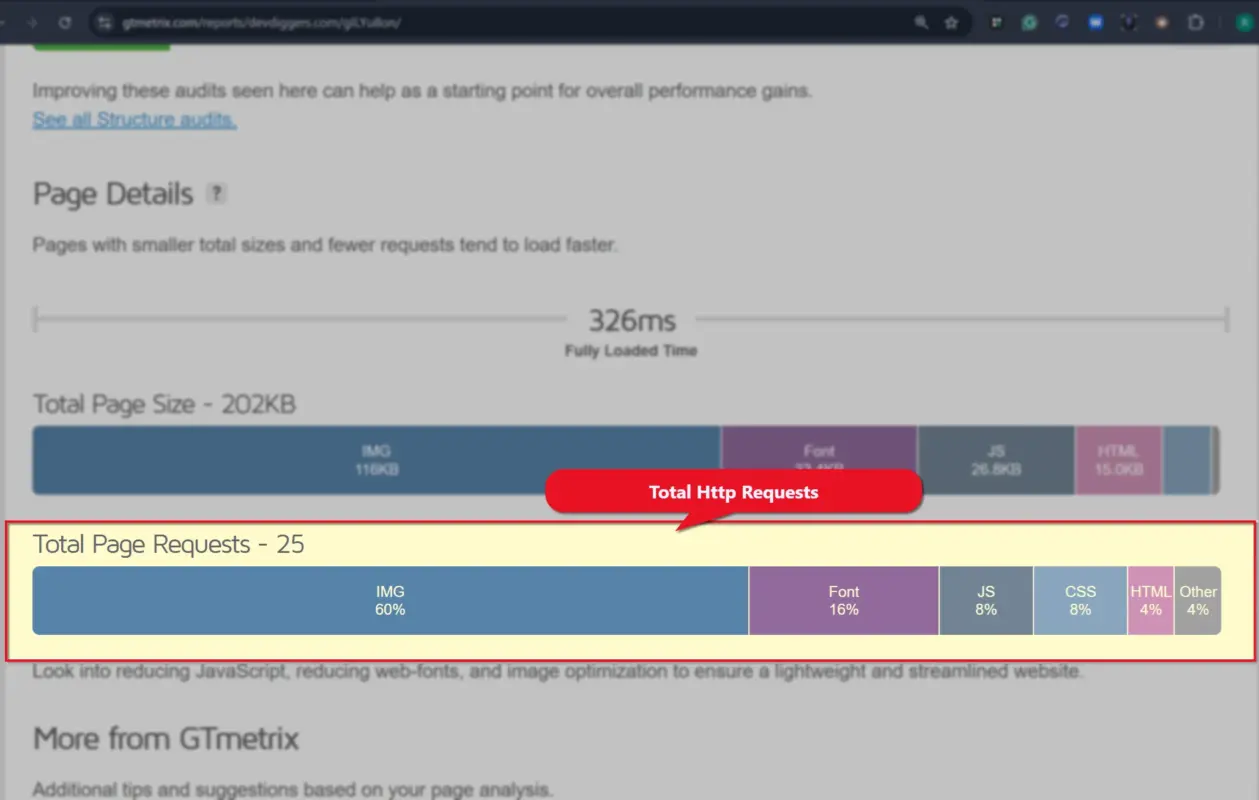
Every time someone opens a page on your site, their browser sends out a small request for each file it needs to build that page. An image is one request. A stylesheet is another. A script, a font, even your favicon each count separately.
The typical website makes around 70 requests just to finish loading, according to HTTP Archive’s Web Almanac. A page stacked with plugins, sliders, and tracking scripts can climb well past that.
Each request adds a small delay before the browser can move on. Stack 70 of those small delays together, and a page that should load in one second stretches into three or four.
Why Reducing HTTP Requests Matters
Fewer requests means less waiting, for both your visitors and Google’s search engine bots. Here’s what changes when you cut them down.
- Faster page loads. Fewer files to fetch means your pages appear sooner, especially on mobile connections where every back-and-forth connection costs more time. A visitor on an unstable 4G connection feels the difference between 30 requests and 90 far more than someone on fiber at a desk.
- Better SEO. Page speed is a ranking factor, and Google’s Core Web Vitals documentation confirms loading speed is part of that measurement.
- Lower bounce rates. Bounce probability rises by roughly 32% as load time stretches from one second to three, based on Google’s research on mobile page speed.
- More conversions. Visitors who leave before a slow page finishes loading never see your offer, your form, or your product.
HTTP requests aren’t the only speed main slowdown, either. If your server itself responds slowly before it even starts sending files, that’s a separate problem covered in our guide to reducing TTFB in WordPress.
Check Your Current HTTP Request Count
You need a starting point before you touch anything. Otherwise you won’t know if your changes made a real difference.
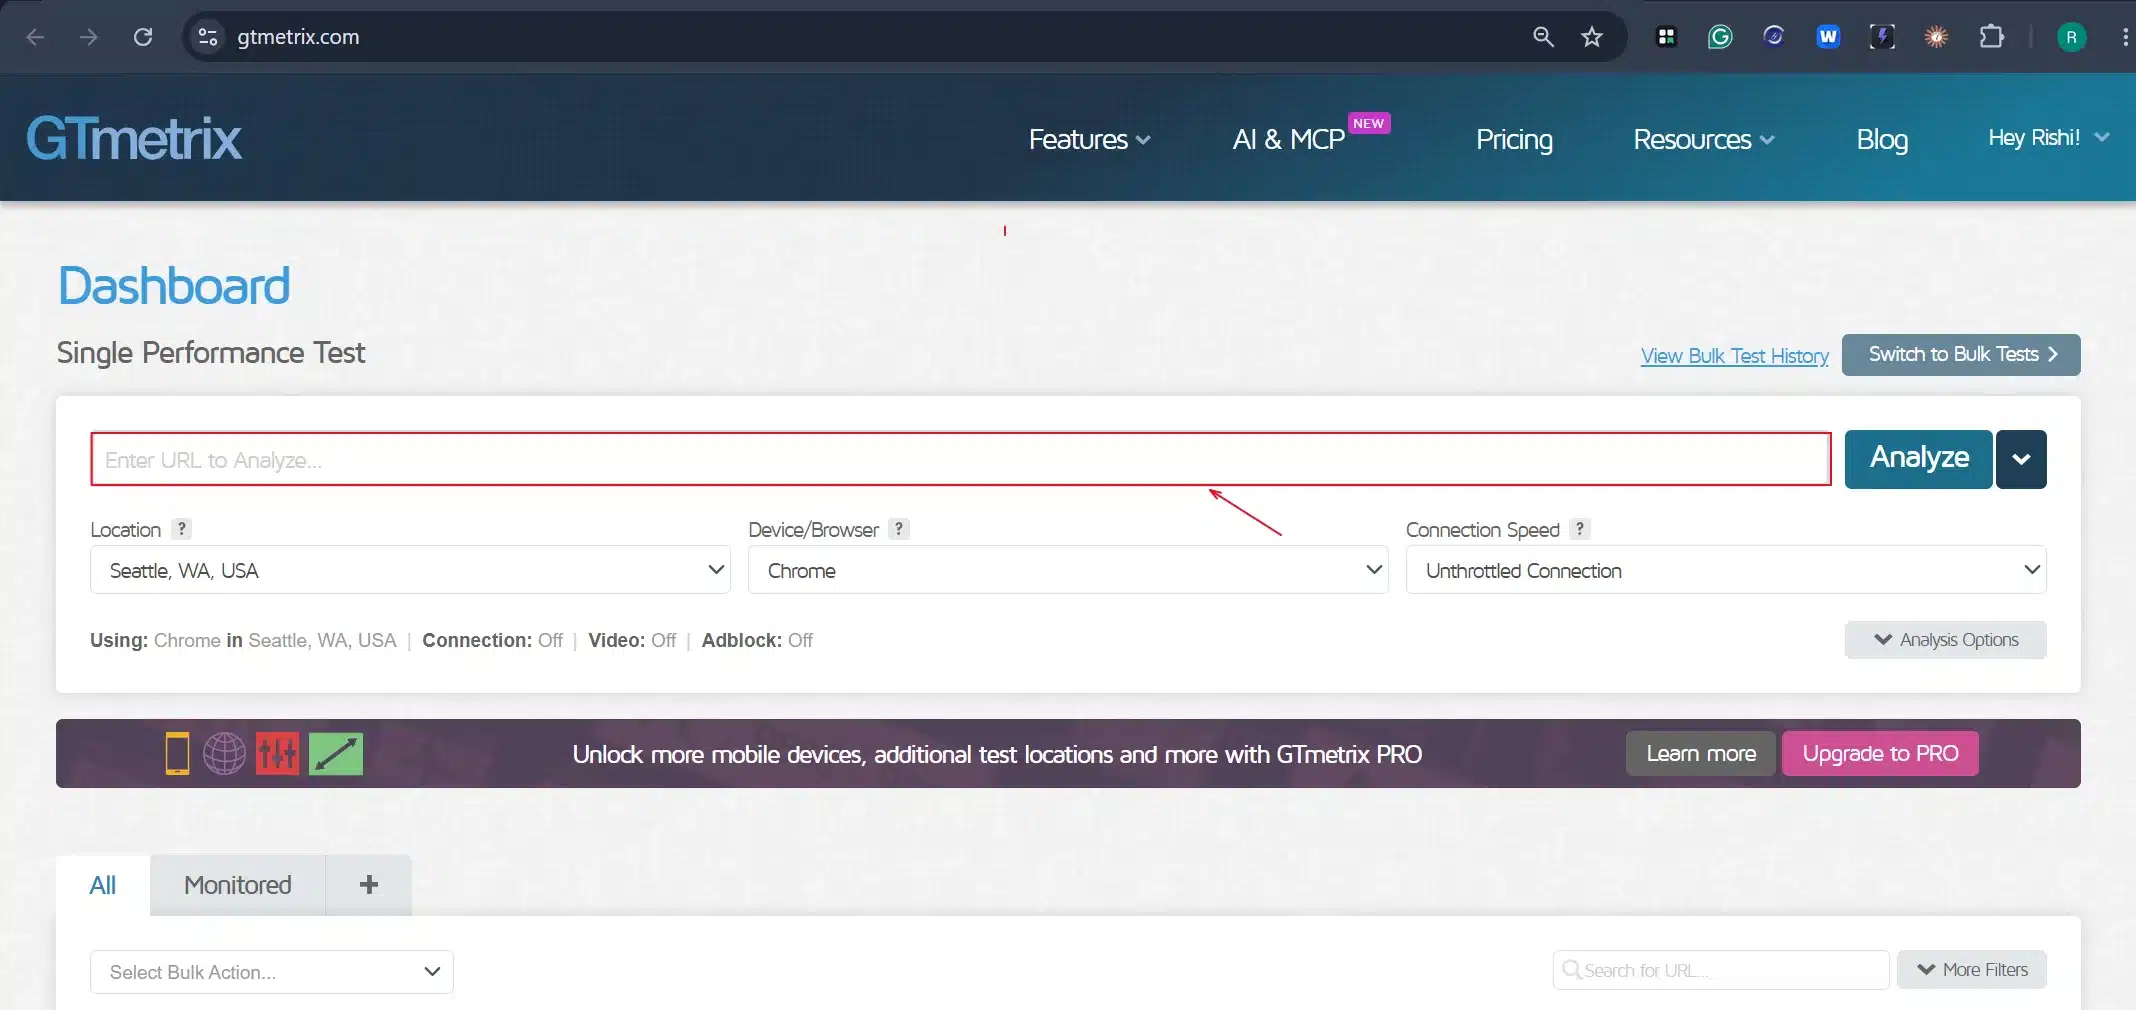
- Open GTmetrix in a new browser tab and paste in your site’s URL → Analyze.
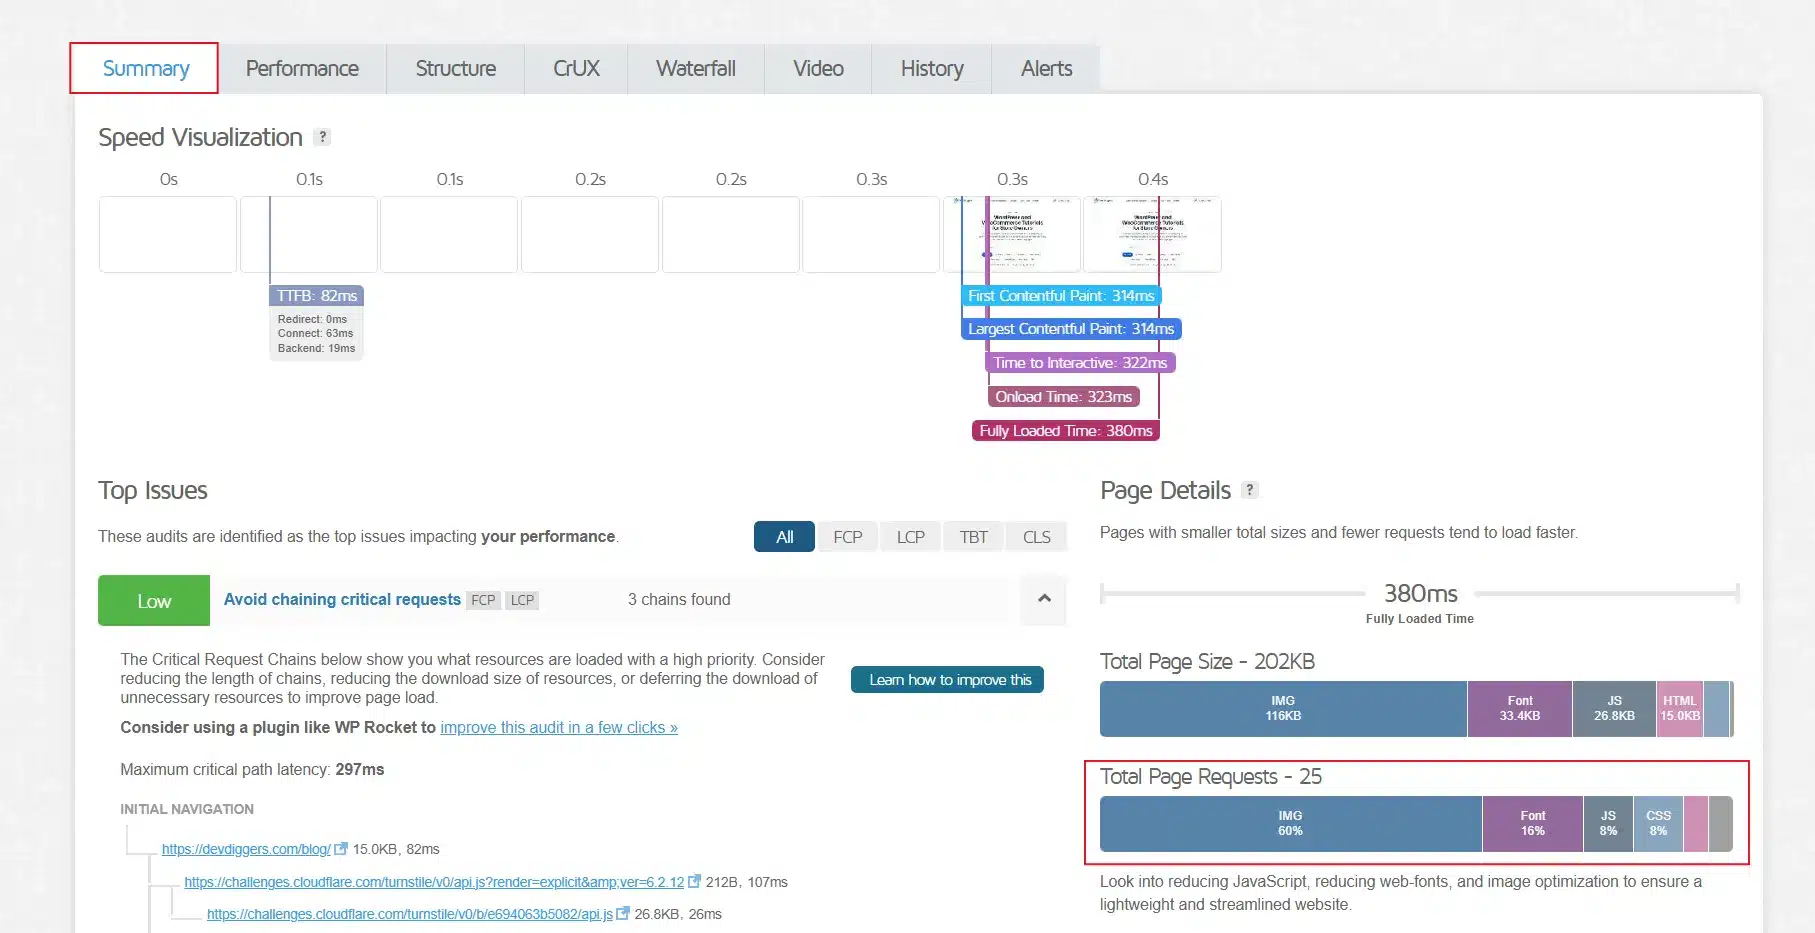
- Look at the Summary tab. The Requests number near the top is your starting point. Write it down somewhere.
- Click over to the Waterfall tab to see every single request listed out, one row per file.
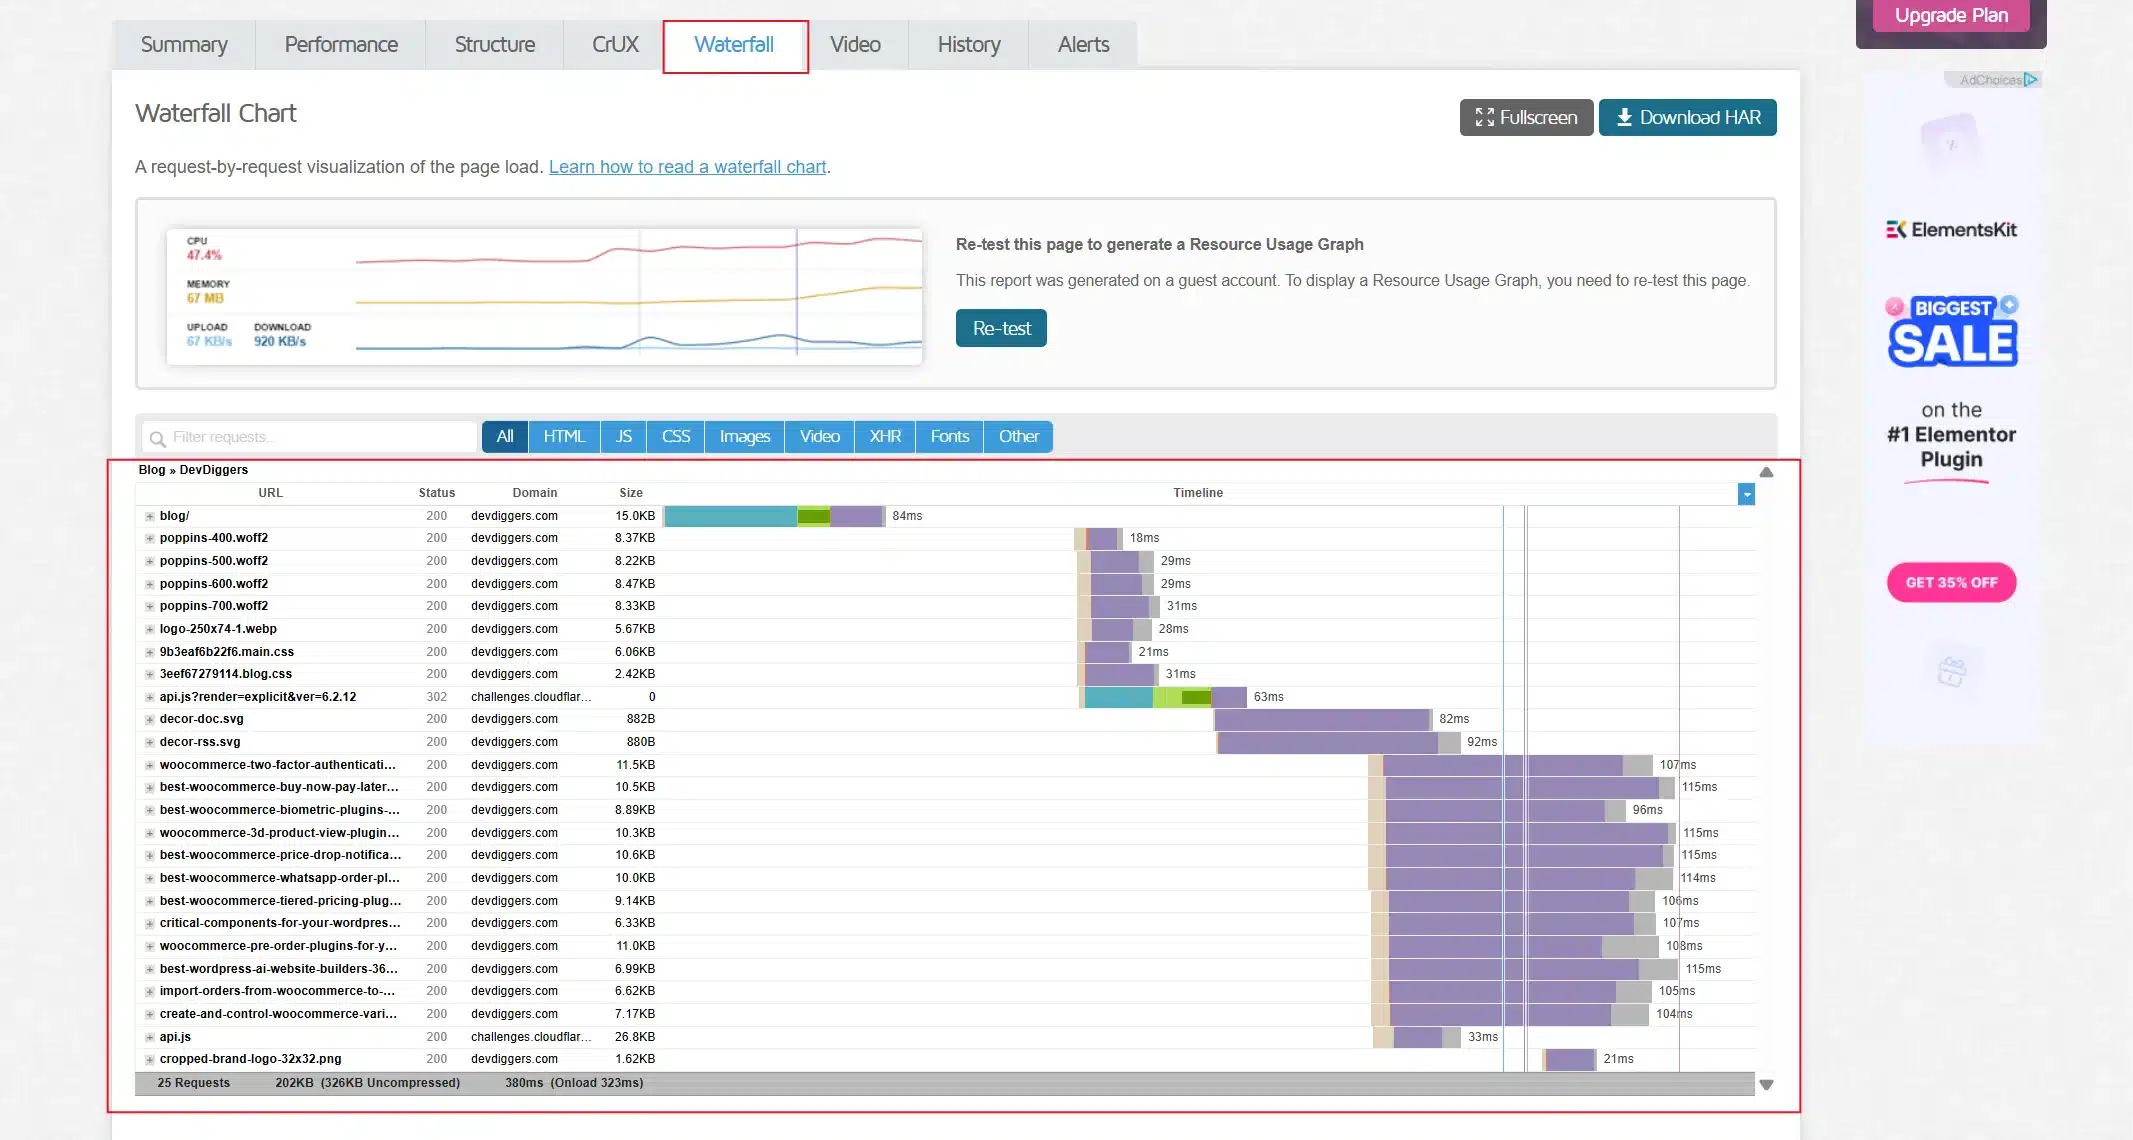
- Type “plugins” into the search box on that tab. This filters the list down to requests coming from your installed plugins, which is usually where the unnecessary extra content hides.
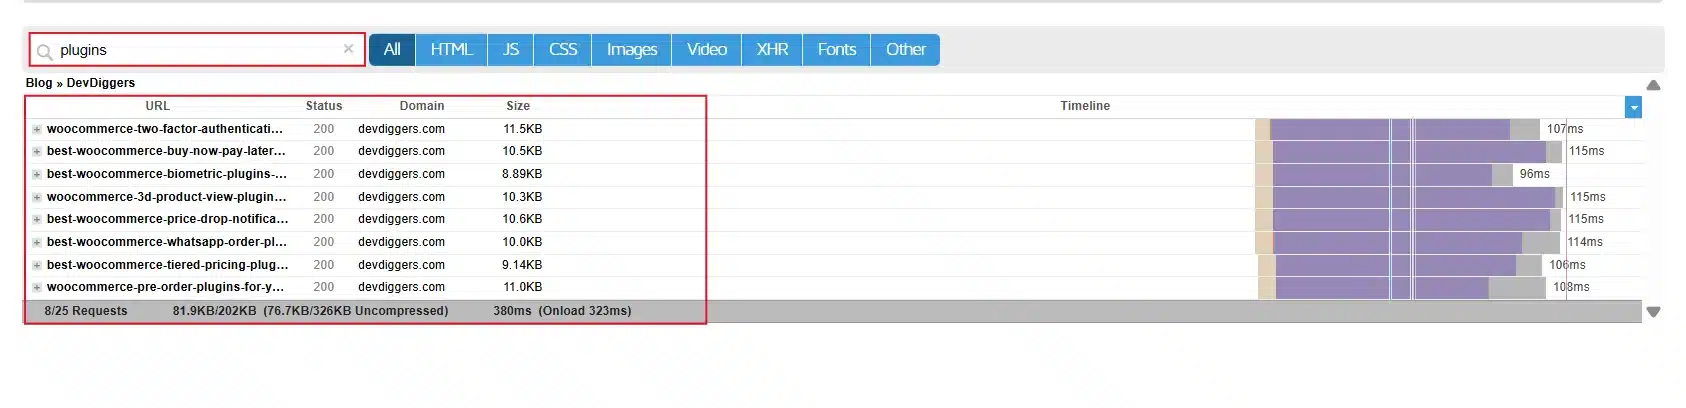
Screenshot this page now. You’ll want it later to compare against your results once you finish the steps below.
How to Reduce HTTP Requests in WordPress: 9 Easy Steps
Work through these in order. Steps 1 and 6 usually produce the biggest visible change, so start there if you’re short on time.
1. Optimize and Compress Your Images
Images are usually the single biggest source of both requests and file weight on a WordPress page.
- Install a compression plugin such as Smush or ShortPixel from your Plugins → Add New screen.
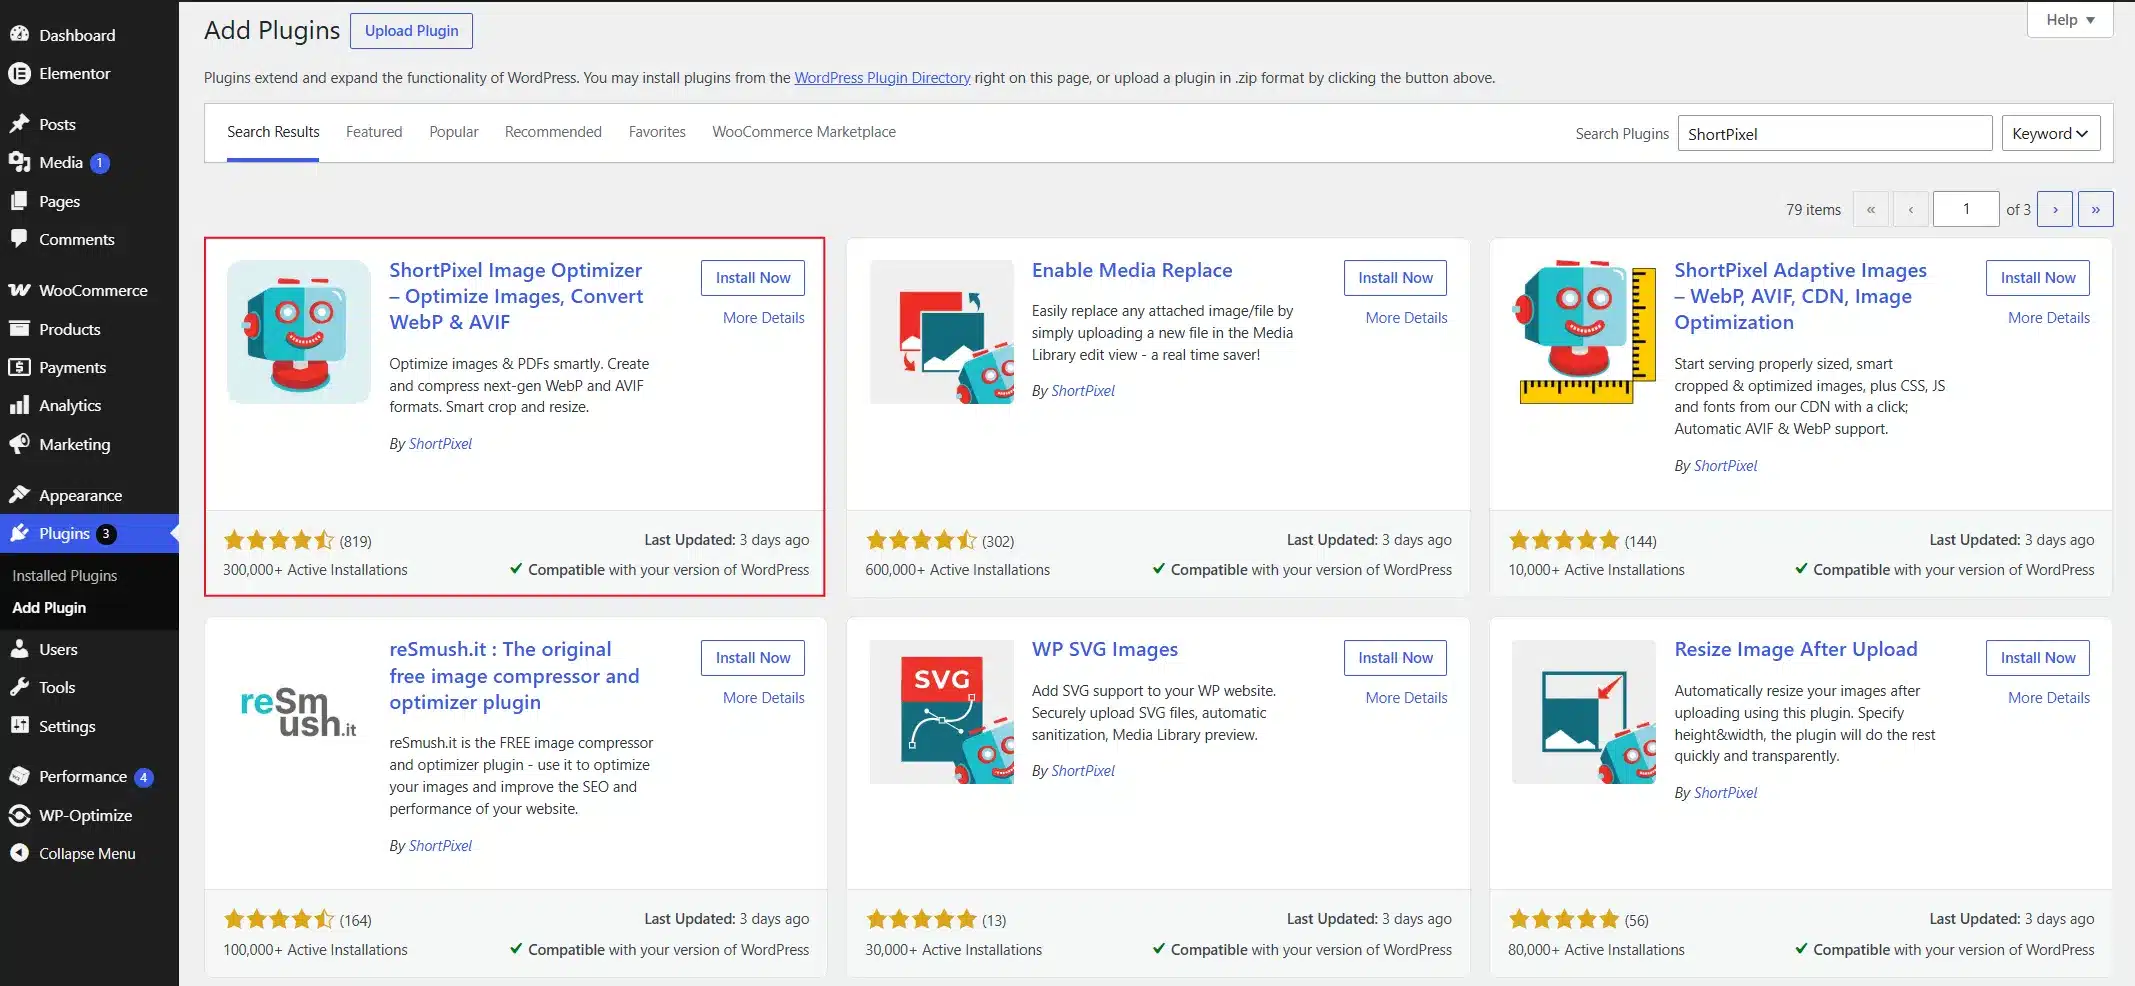
- Run the Bulk Smush tool to compress every image already sitting in your media library.
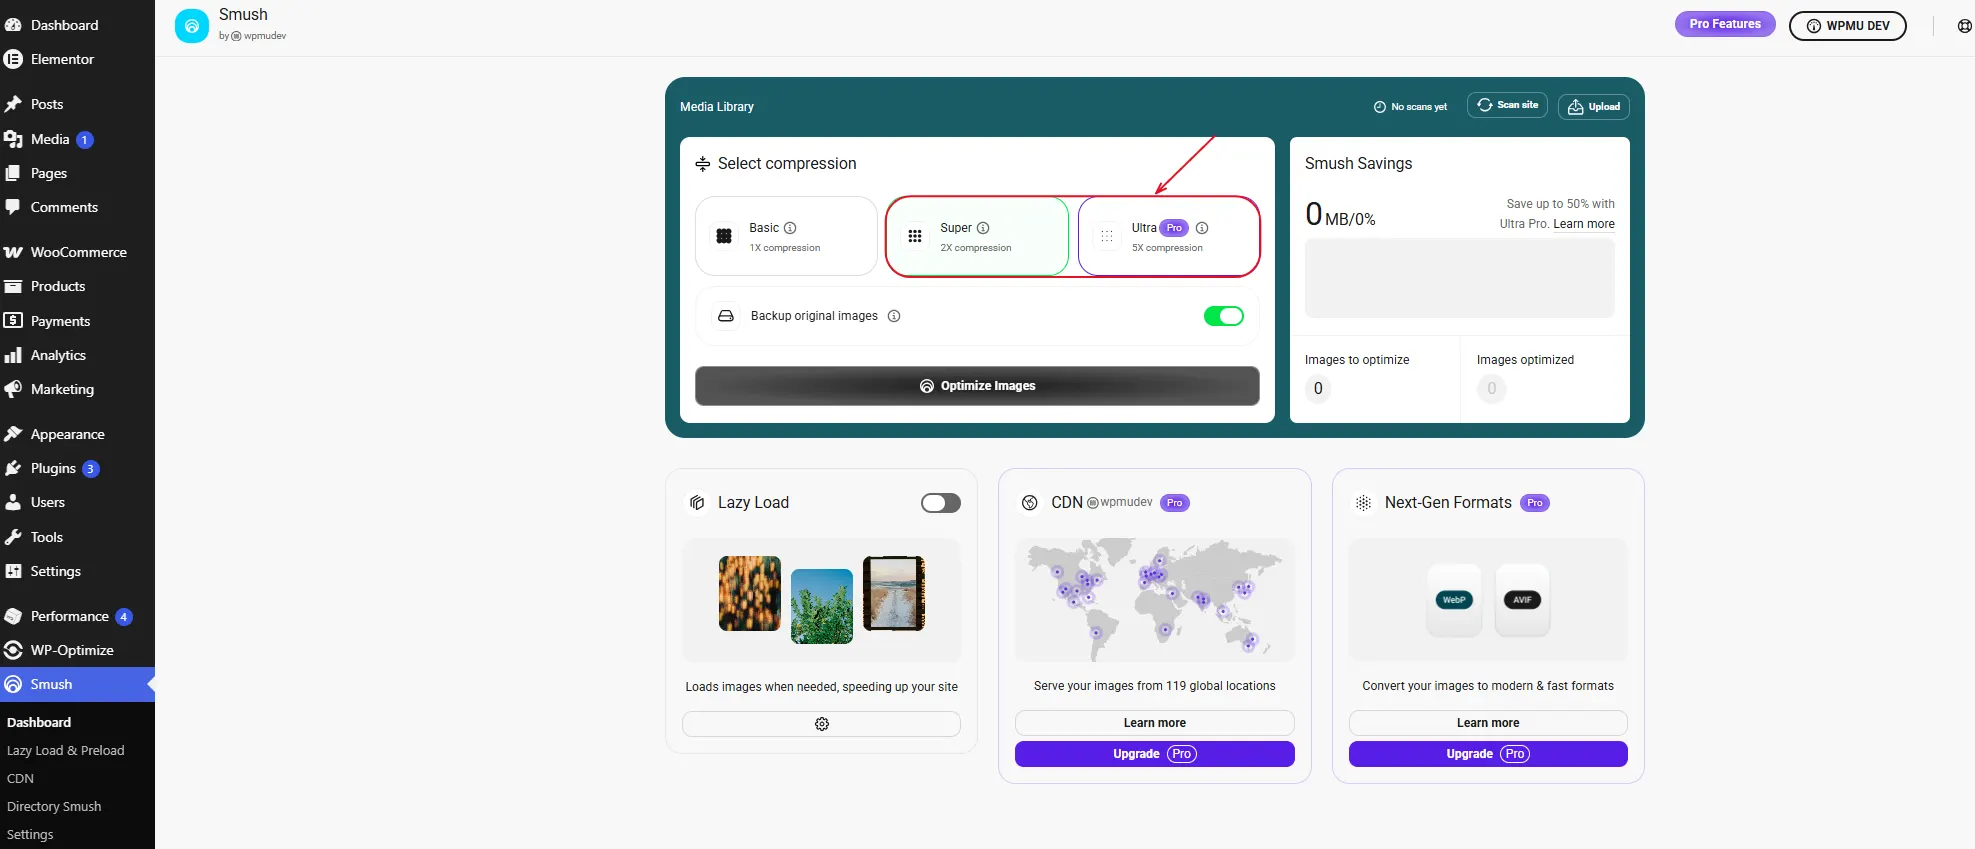
- Activate it, then open its settings page from your dashboard’s left sidebar.
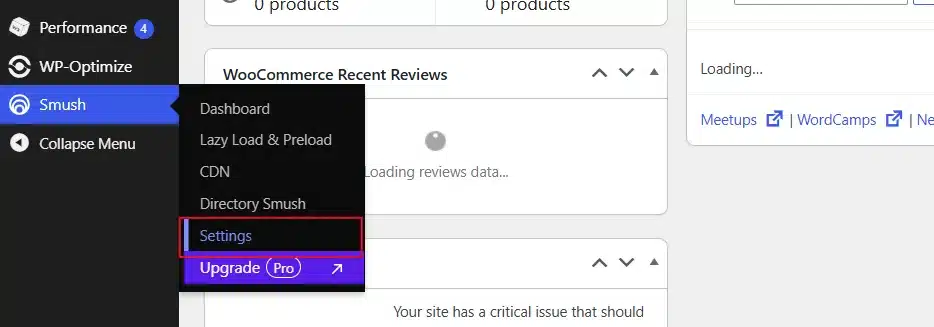
- Set the plugin to automatically compress every new image you upload from here on.
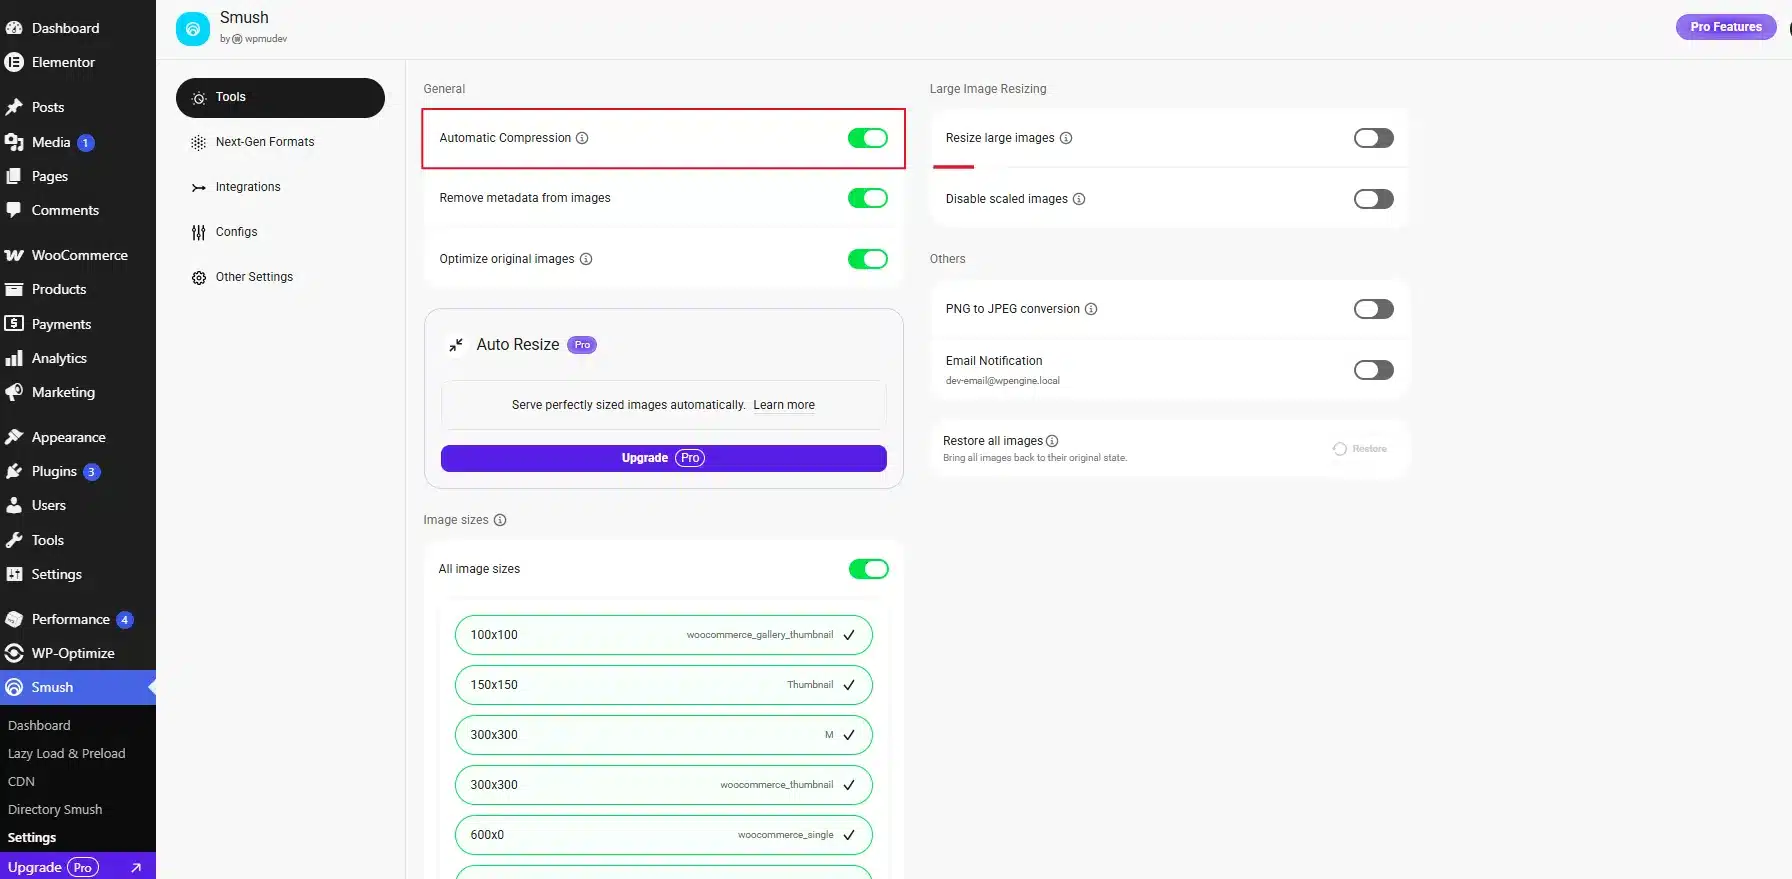
Note: Before uploading new images, resize them to the actual width they’ll display at. A 4,000px photo shown at 800px wide is wasted file size that still counts as one full request.
Compression won’t lower the number of image requests, since each image is still its own request. But smaller files mean each of those requests finishes faster, which is most of what visitors notice. For sizing and format details, see our full guide on image optimization in WordPress.
2. Enable Lazy Loading
WordPress has loaded images lazily by default since version 5.5, but it’s worth confirming it’s switched on for your specific theme.
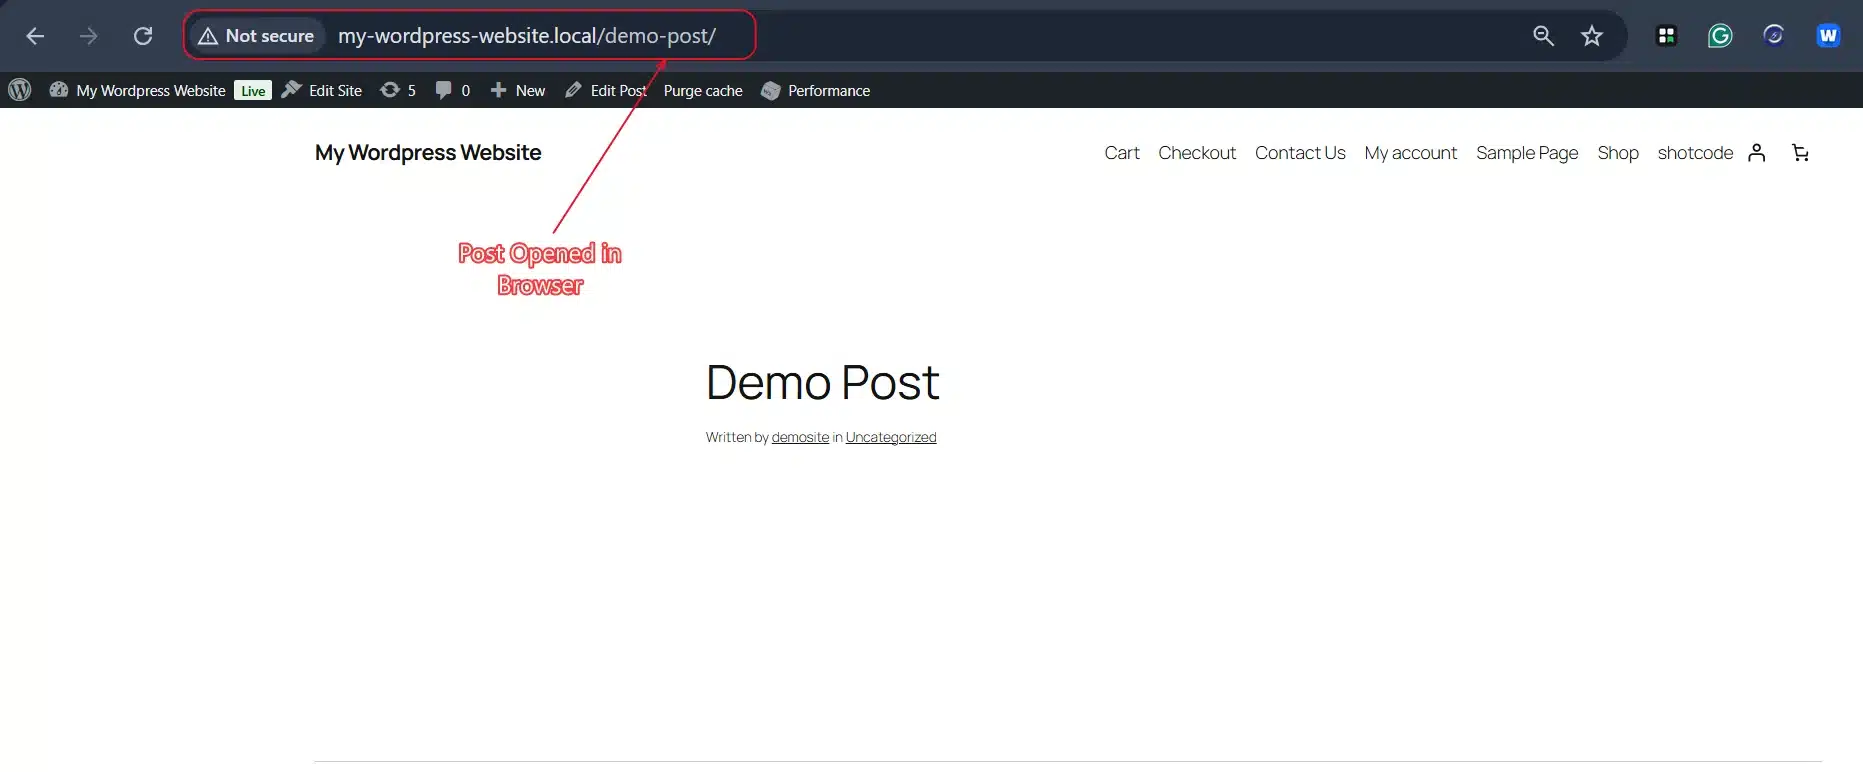
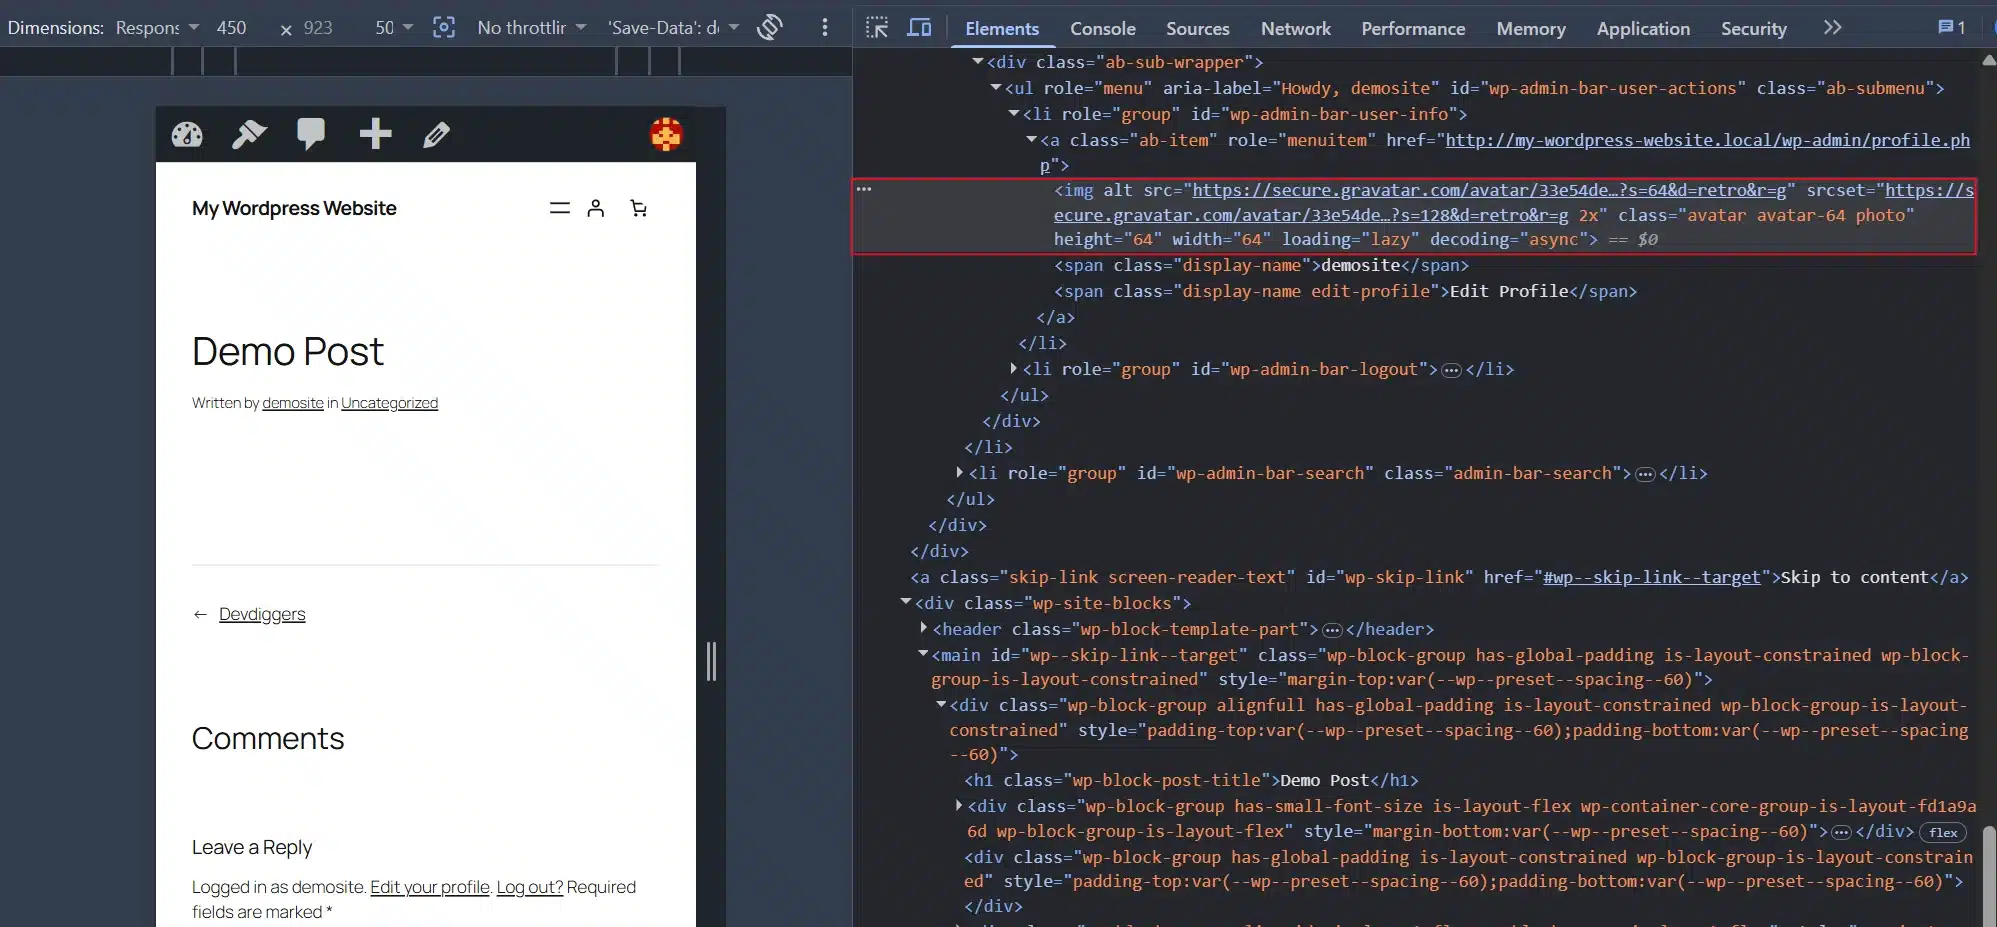
- Open any post or page in your browser, and right-click an image below the first screen’s worth of content.
- Select Inspect to open your browser’s developer tools.
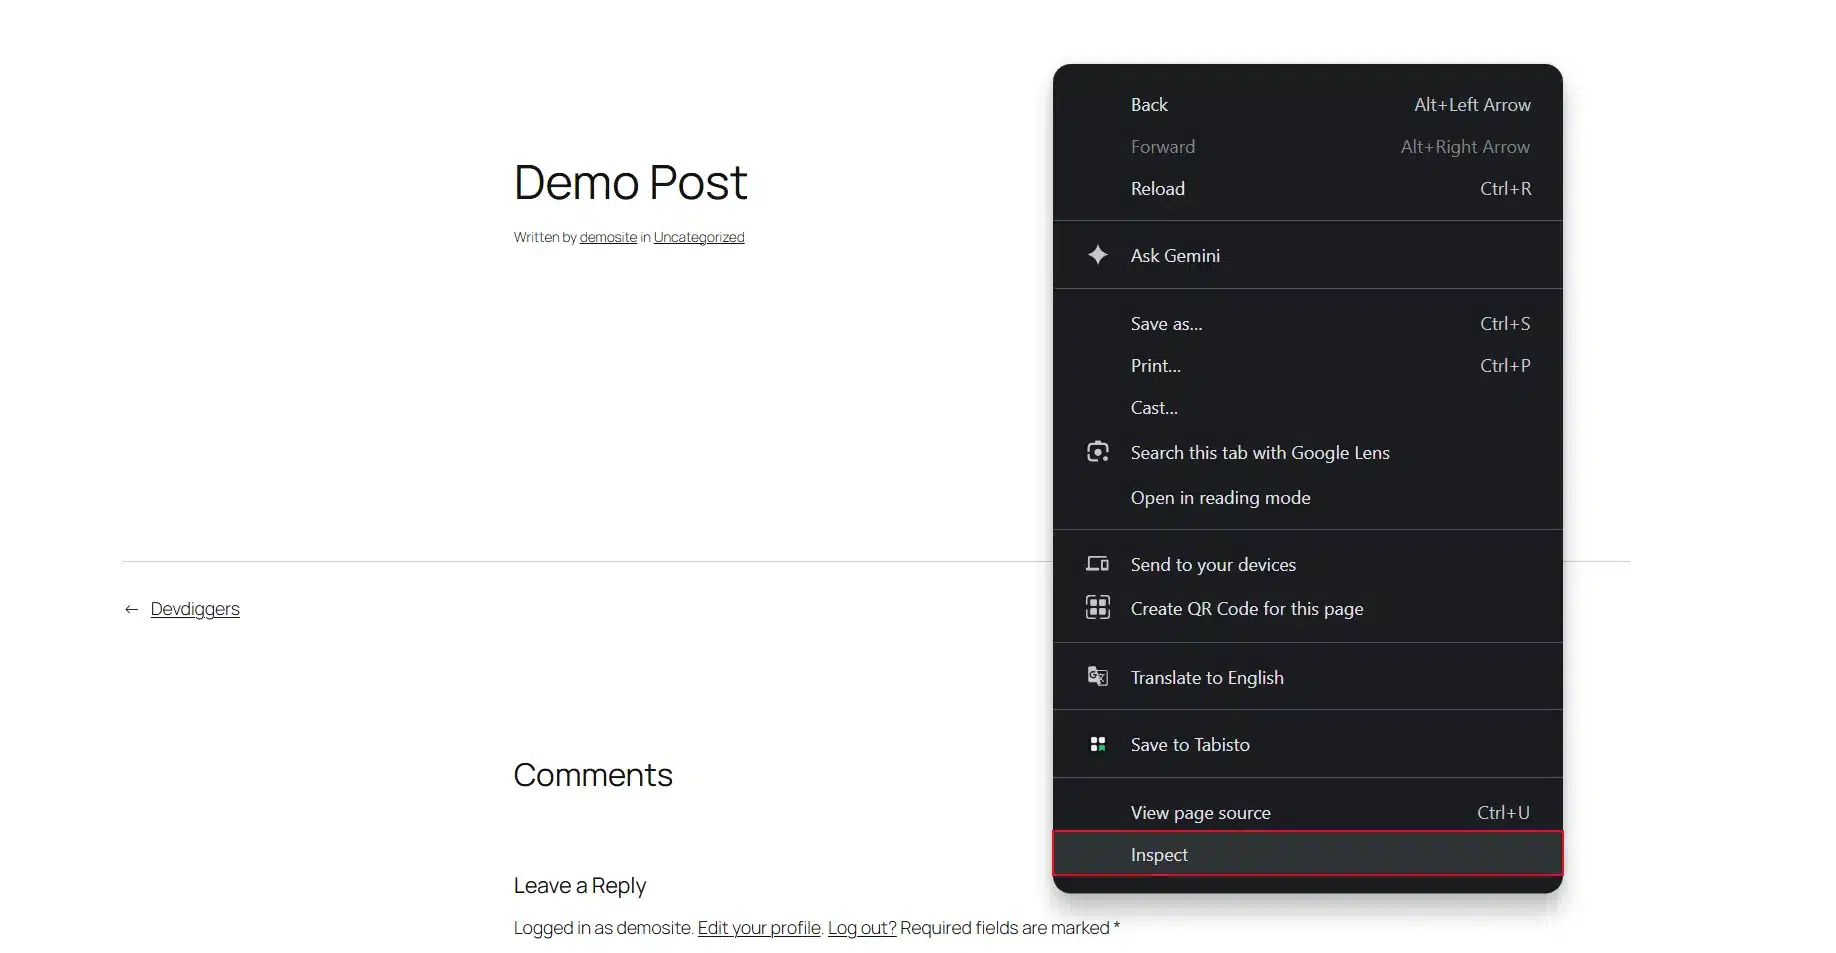
- Check the image tag for
loading="lazy"in the HTML. If it’s there, built-in lazy loading is active.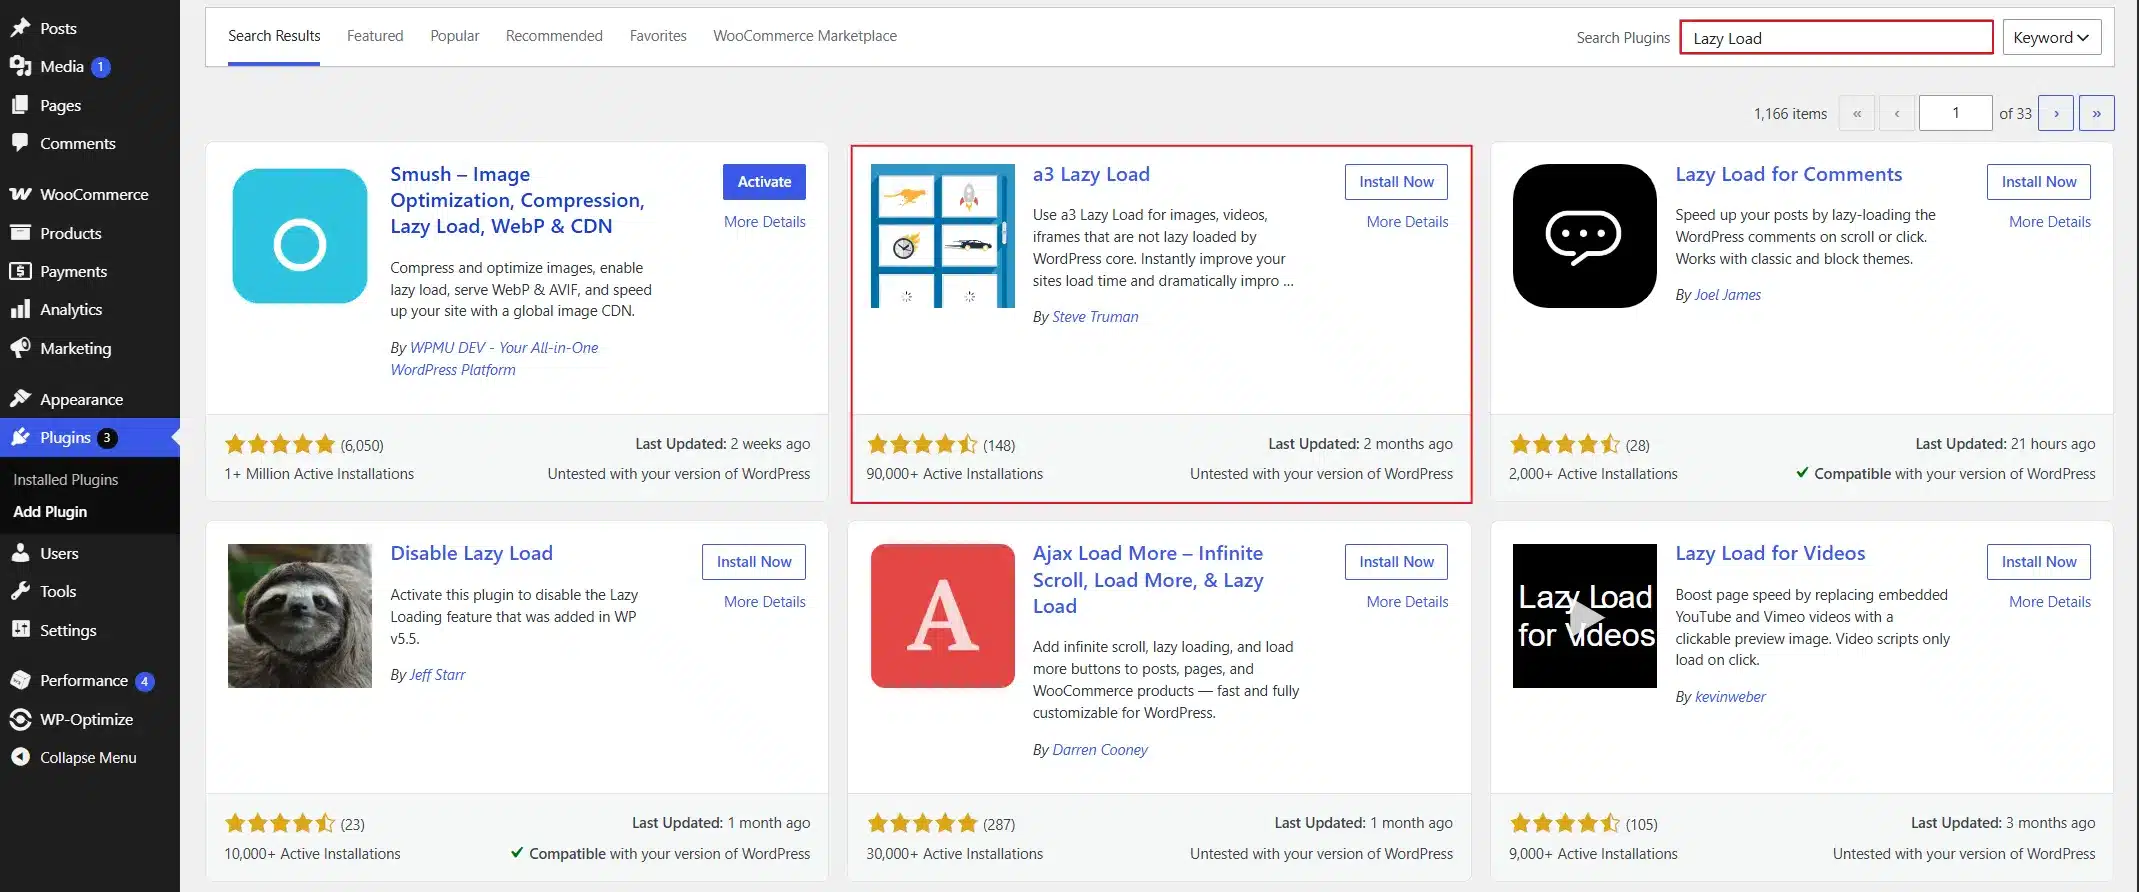
- If it’s missing, install the a3 Lazy Load plugin and enable it in settings.
- For extra control, turn on lazy loading for embedded videos and iframes too. These are often heavier than a single image.
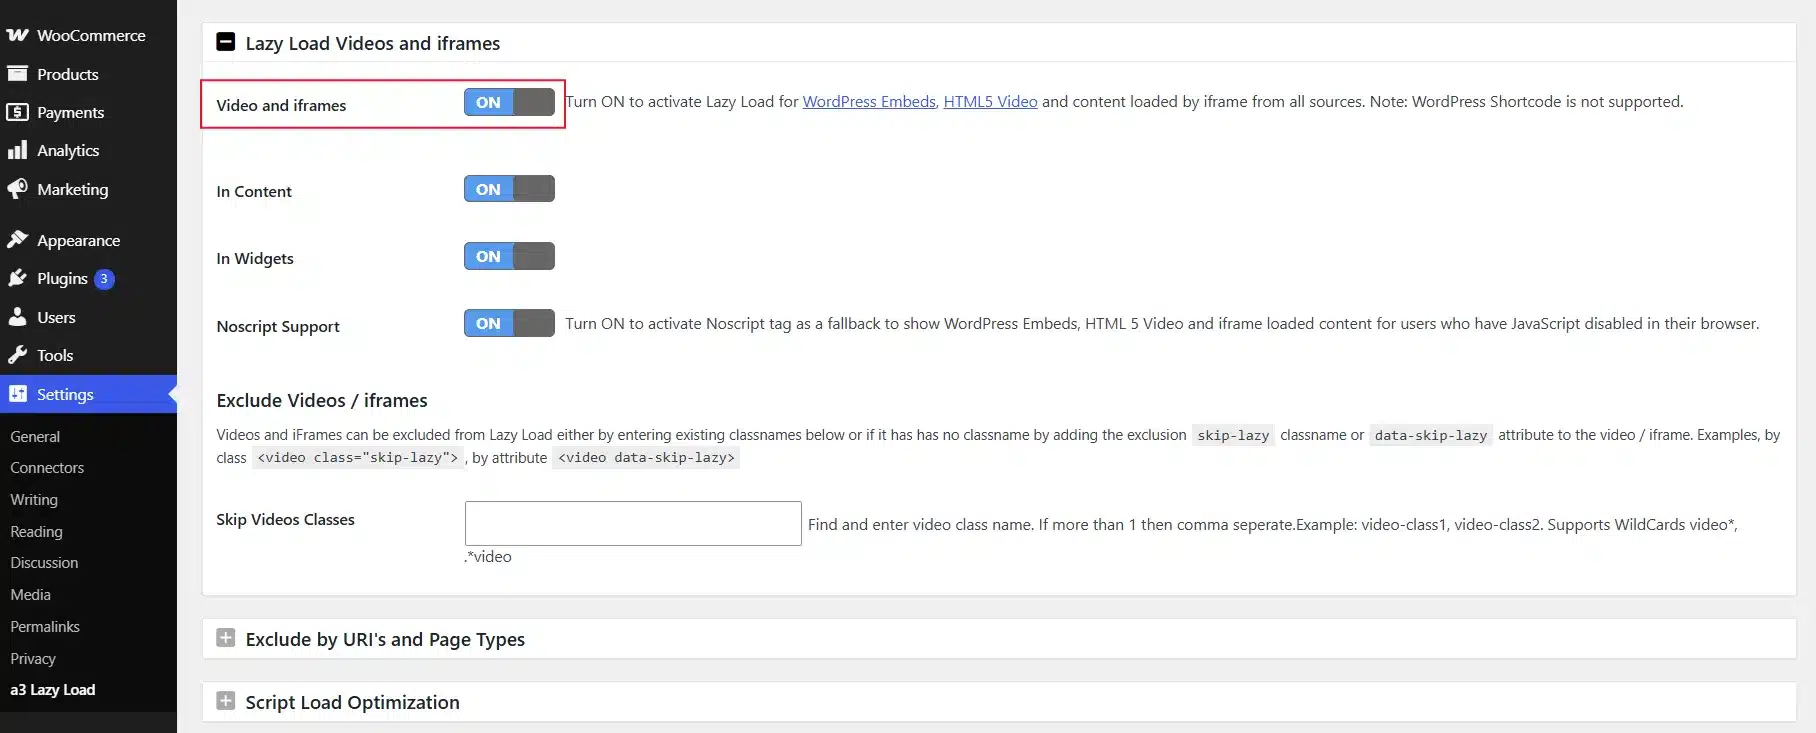
Lazy loading doesn’t remove the request. It delays it until the visitor scrolls close enough to need it, which keeps the initial page load light.
3. Combine and Minify CSS and JavaScript Files
Every plugin and theme on your site tends to ship its own stylesheet and script file, and each one is a separate request before your page can finish rendering.
- Install and activate the Autoptimize plugin from the WordPress Plugin Directory
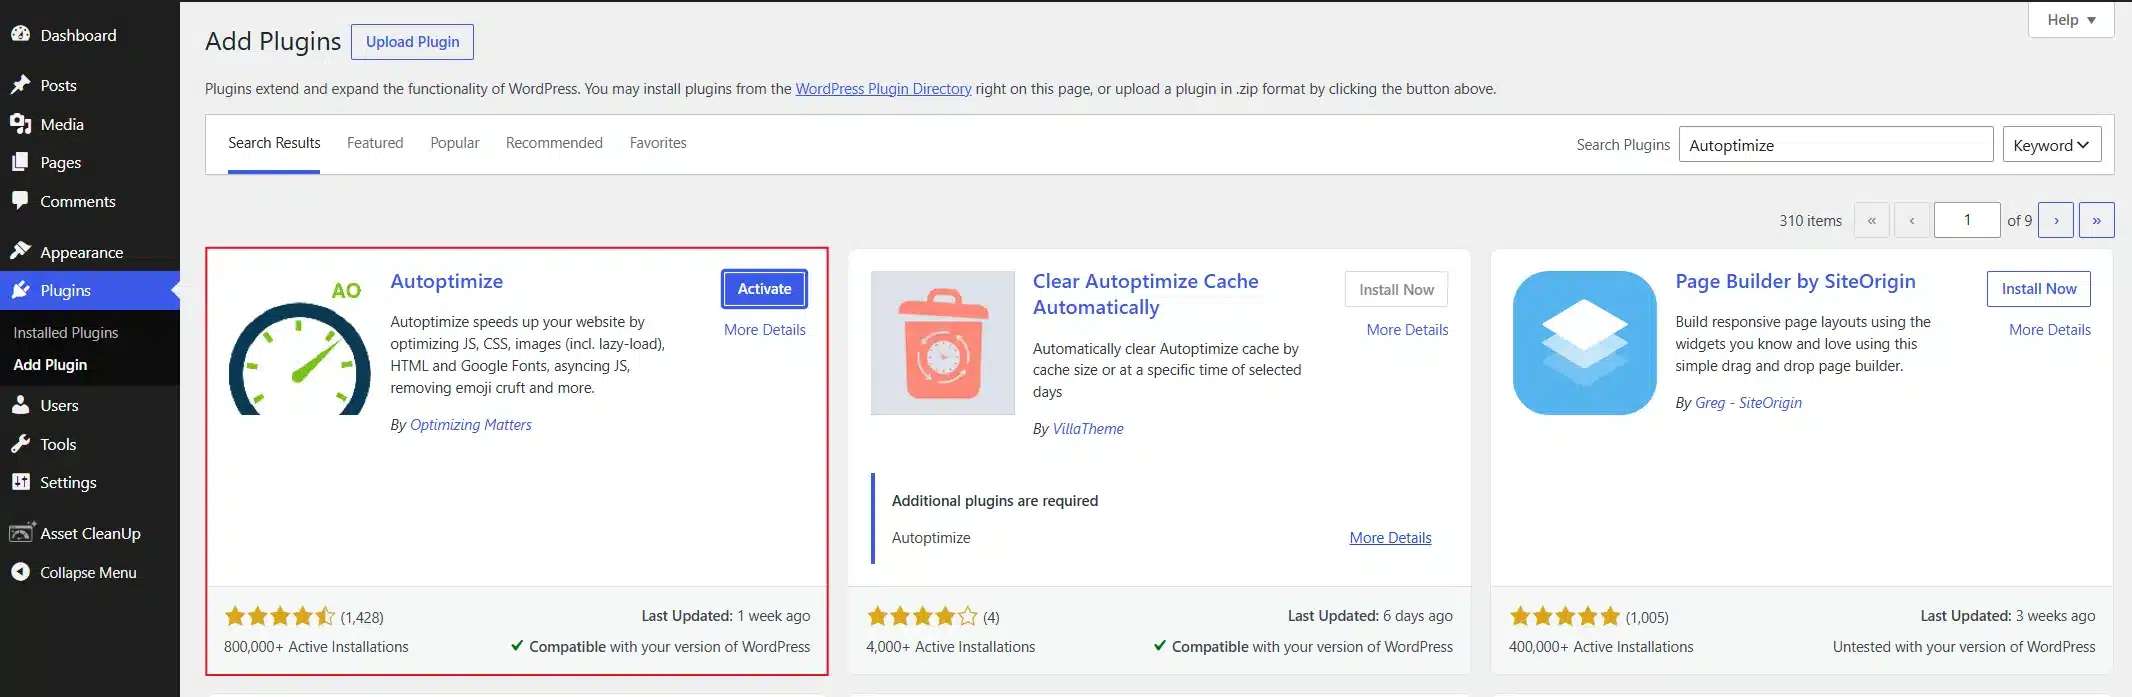
- After Installation, go to Settings → Autoptimize and turn on Aggregate CSS files and Aggregate JS files.
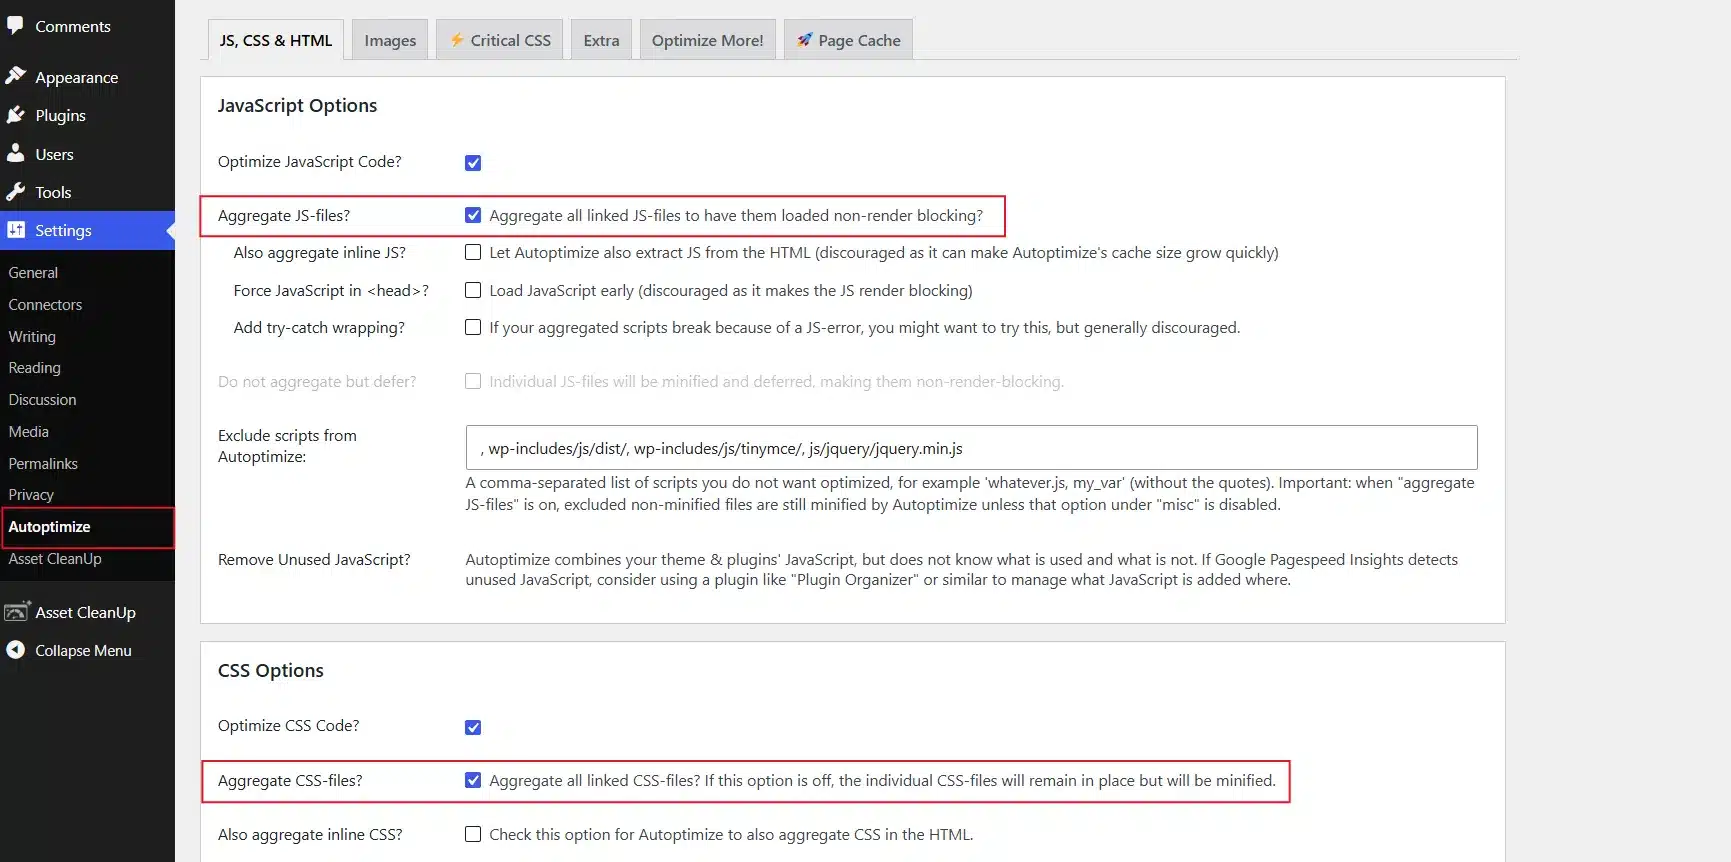
Save the settings, then click through your site’s main pages, especially any with a menu, slider, or contact form, to confirm nothing broke.
If something stops working, add that one file to the plugin’s exclusion list and leave it out of the combination. Combine the rest as normal.
Note: HTTP/2 lets browsers load several small files over one connection quickly, so this step matters less than it did a few years ago on modern hosting. It’s still worth doing, just don’t expect a dramatic before-and-after on its own.
Combining files doesn’t shrink what’s inside them. It cuts the number of separate requests your browser has to make, which is the exact problem this guide is solving.
4. Cut Unnecessary Third-Party Scripts, Fonts, and Embeds
Every social share button, tracking pixel, embedded map, and custom web font pulls in its own request, usually from a server outside your control.
- Open your GTmetrix Waterfall tab again and look for rows pointing to domains other than your own.
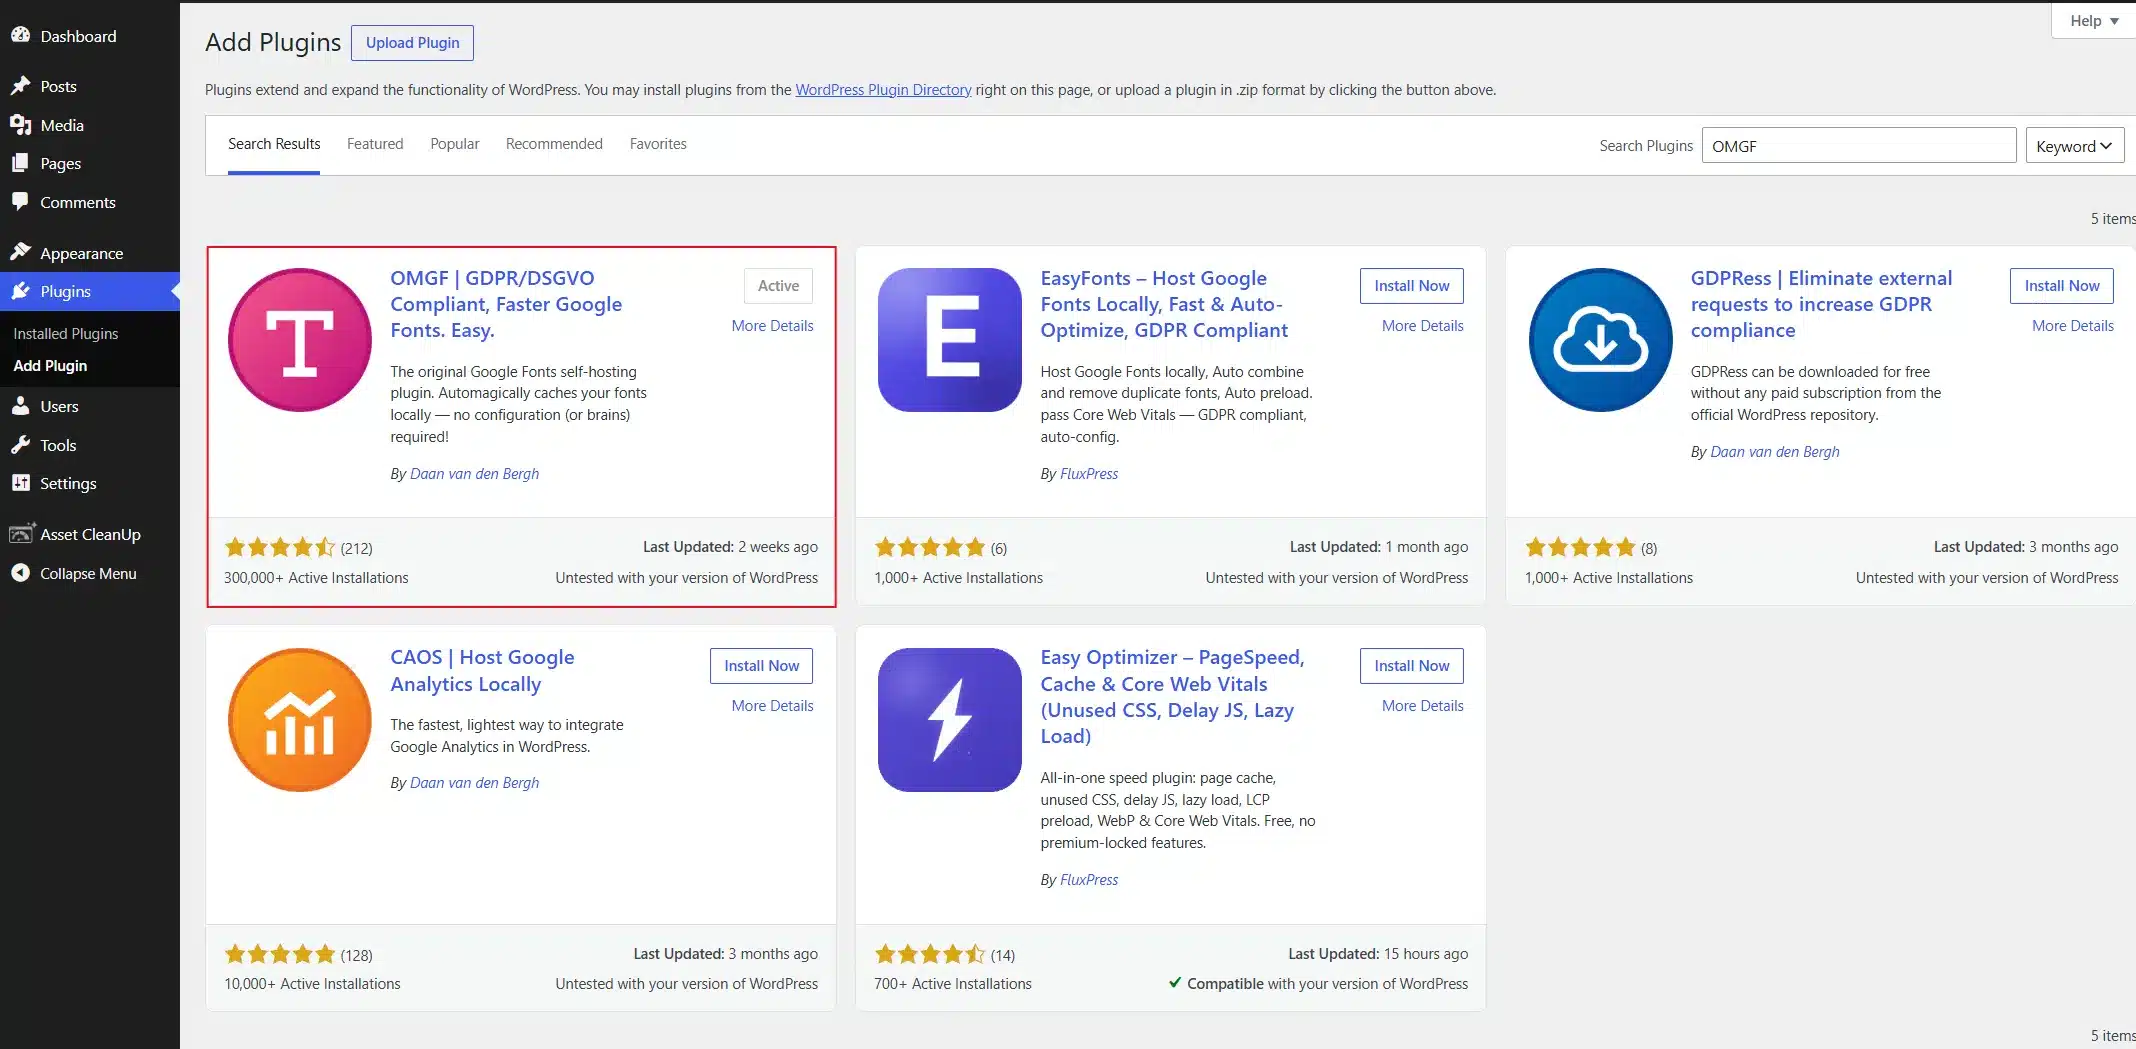
- If you’re using Google Fonts, install OMGF to host those font files on your own server instead of fetching them from Google each time.
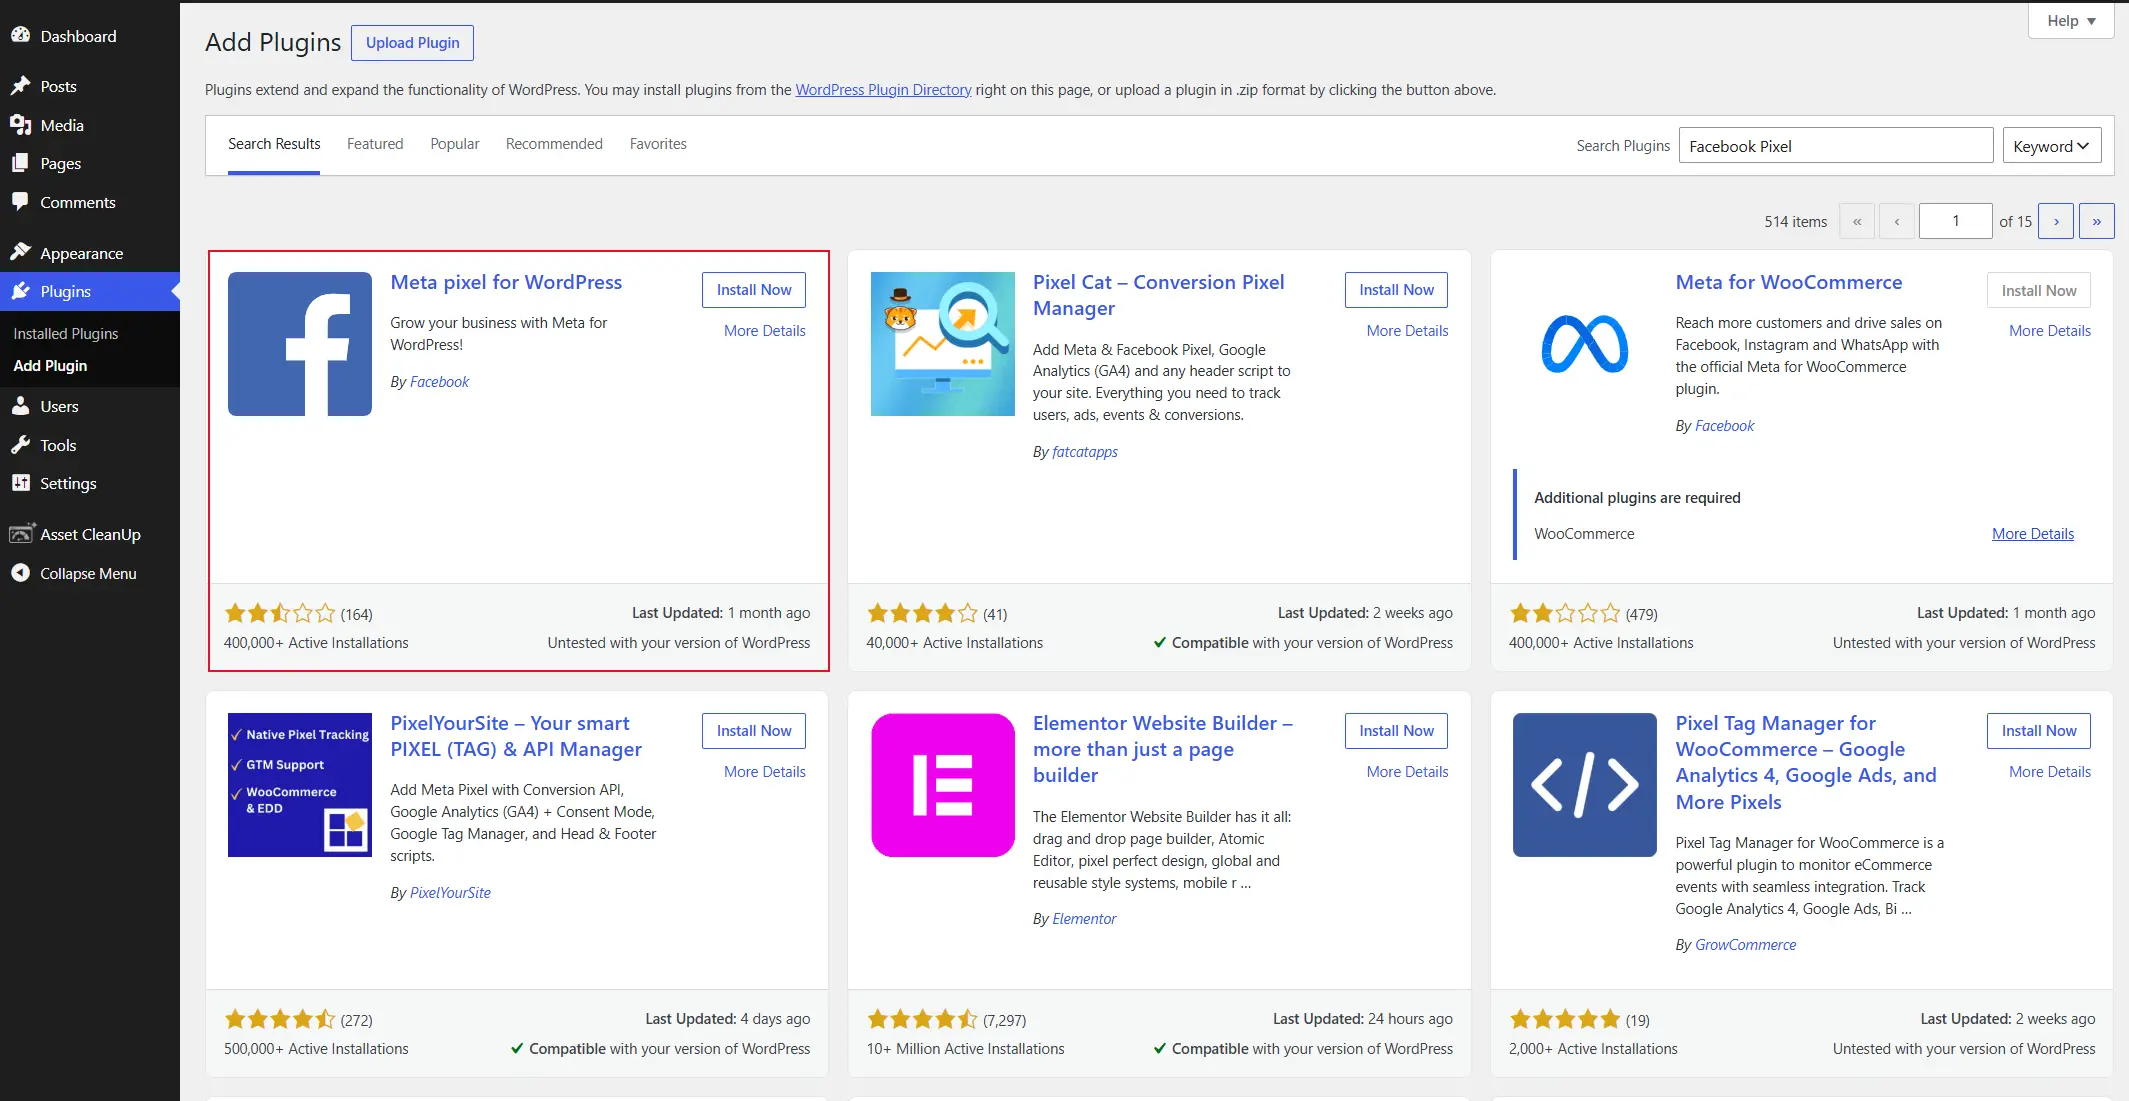
- Trim your tracking scripts down using Meta pixel for WordPress. A site running five analytics tools rarely needs all five loaded on every page.
Note: Some of these requests are added by your host or an ad network rather than your dashboard, so you may need to contact them directly to remove certain ones.
Third-party requests also tend to be the slowest, since your browser has to open a brand new connection to each outside domain before the file can even start downloading.
5. Check and Remove Unnecessary Plugins
Every active plugin is a potential source of extra CSS and JavaScript files, whether or not you’re using its features on that page.
- Go to Plugins → Installed Plugins in your dashboard.
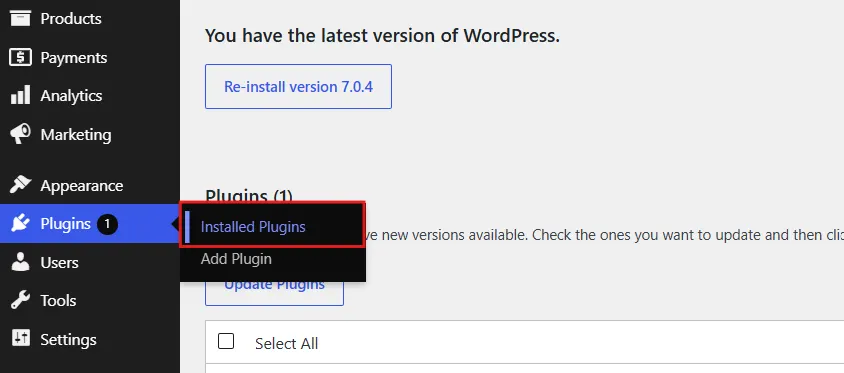
- Deactivate the unused plugins one by one.
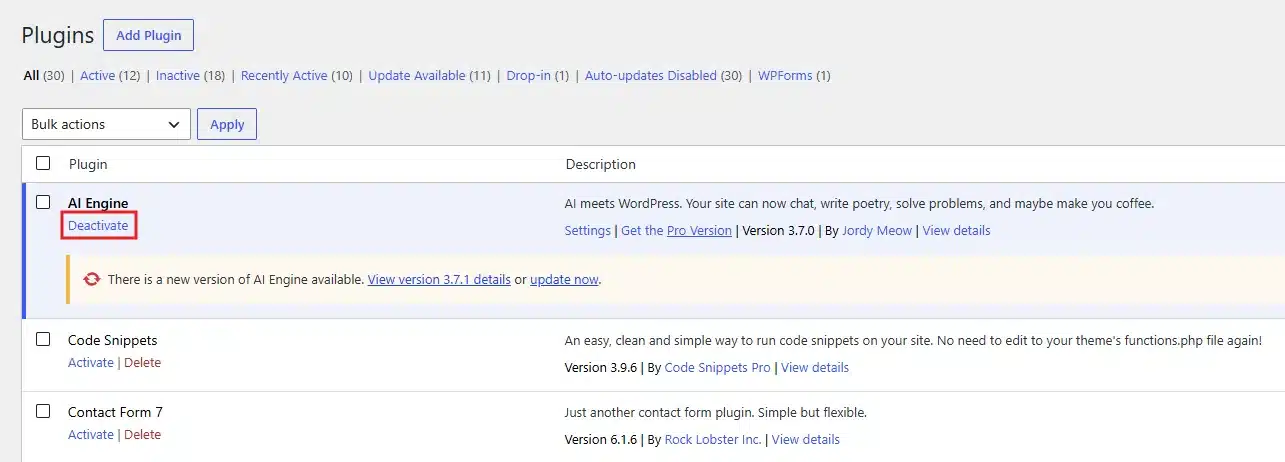
- Delete deactivated plugins once you’re confident you don’t need them. They don’t add requests while inactive, but leftover files are still a security risk if never updated.
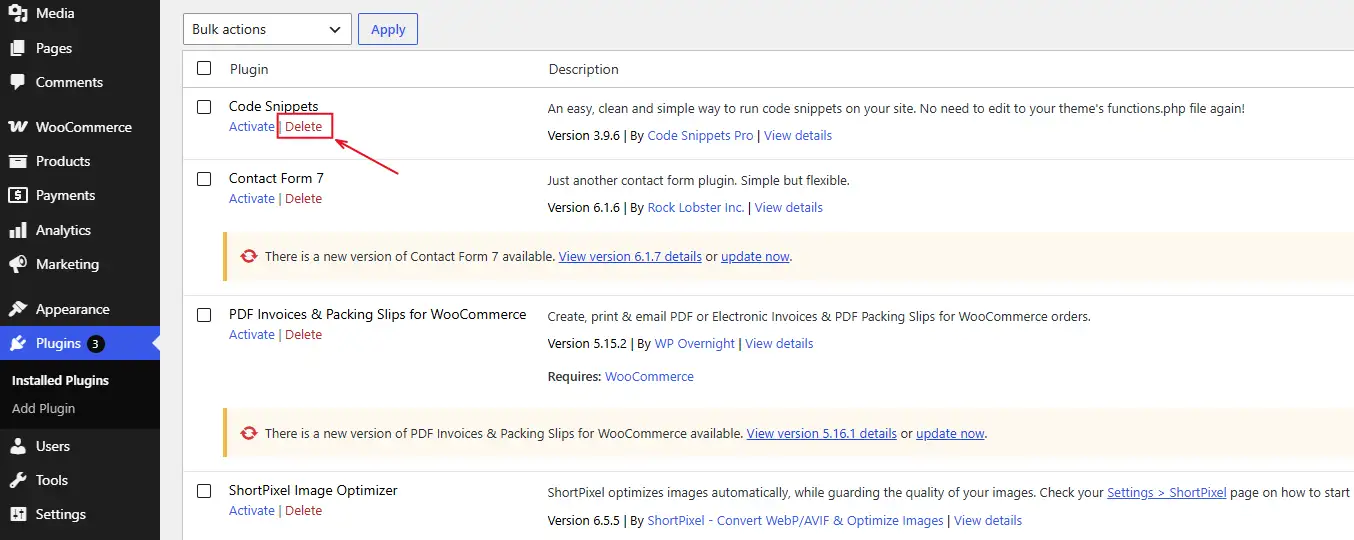
We see this constantly in support tickets. Someone installed a slider plugin for a single campaign two years ago, and it’s still quietly loading scripts on every page of the site.
6. Set Up Browser Caching
Caching lets a visitor’s browser store your files locally, so it doesn’t have to request them again on a return visit.
- Install and activate a caching plugin like W3 Total Cache.
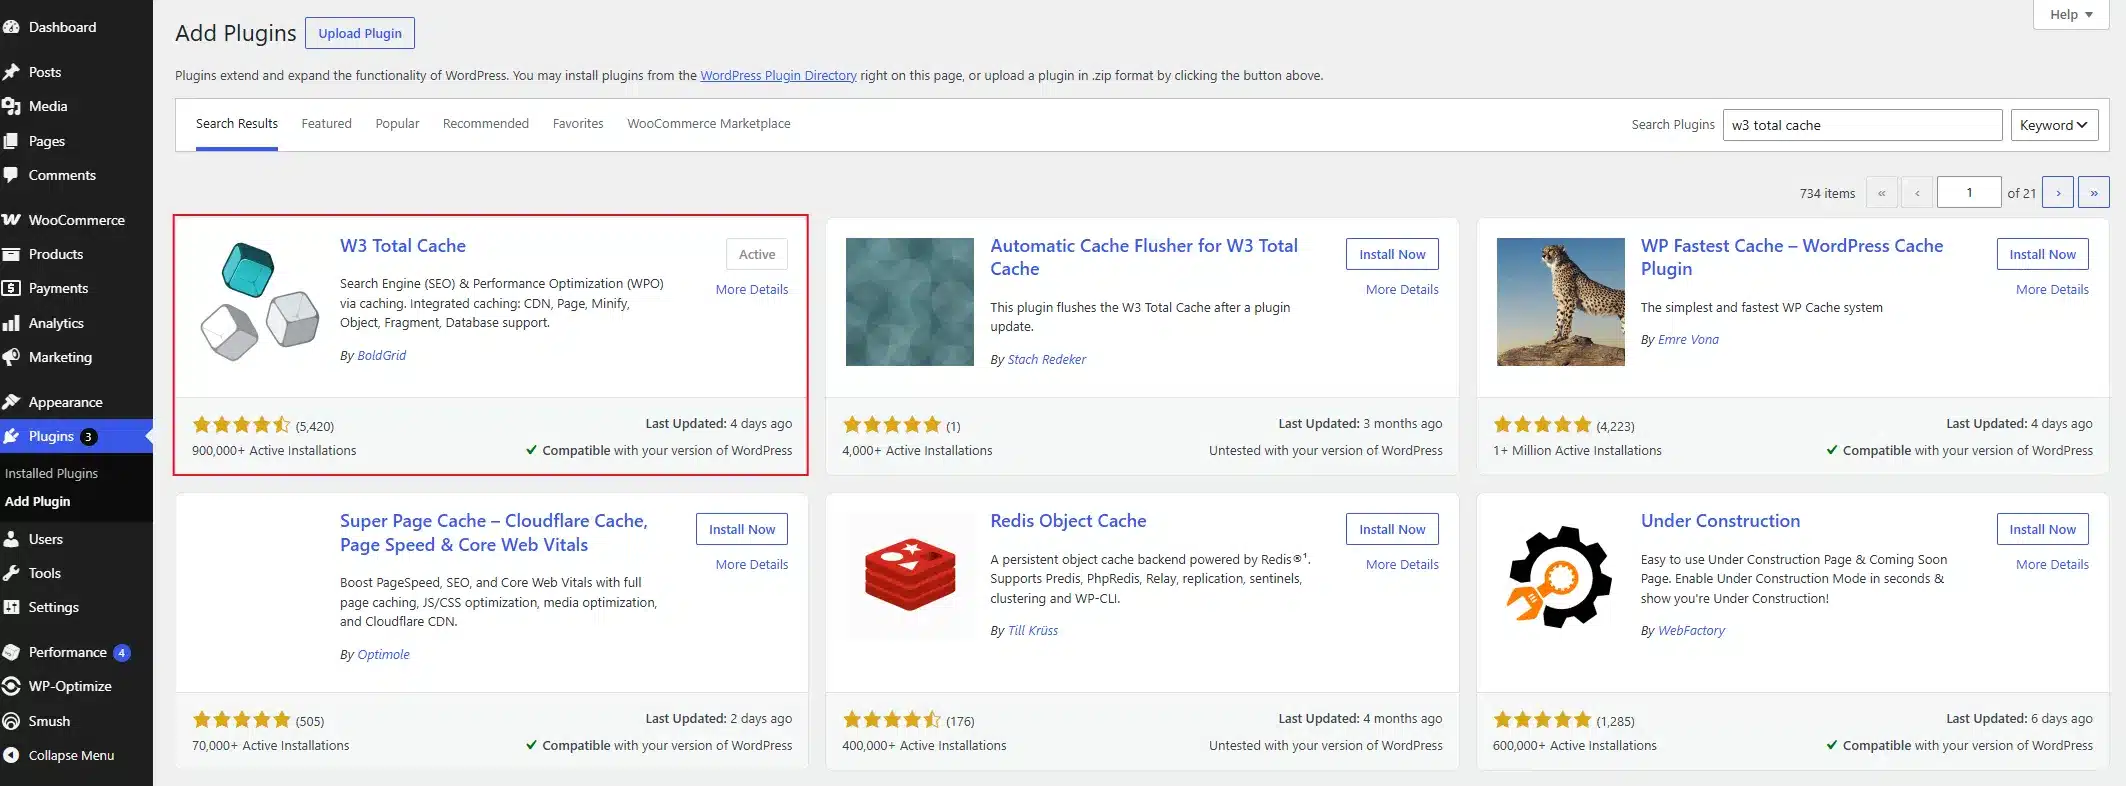
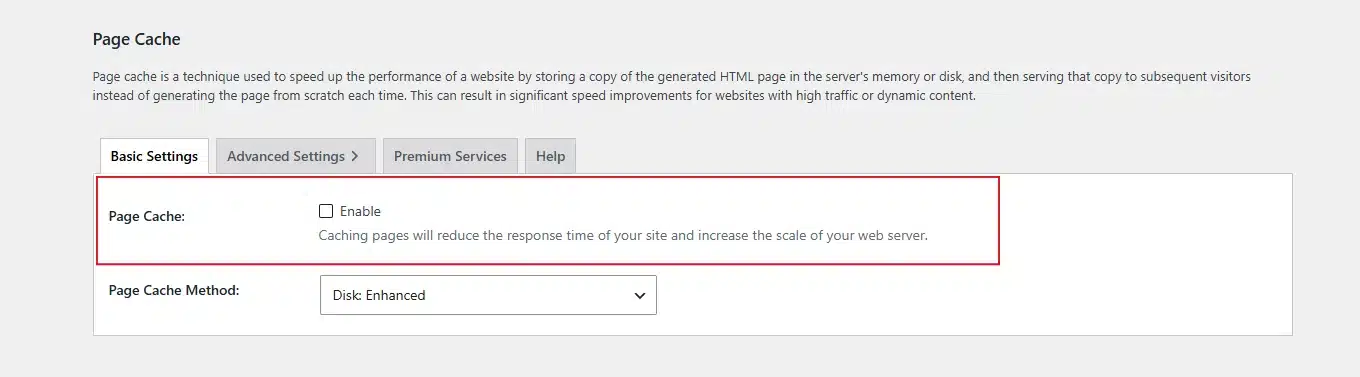
- Enable Page Cache and Browser Cache from the main settings tab
For a full side-by-side comparison, our breakdown of WordPress caching plugins covers pricing and features in detail.
7. Add a Content Delivery Network (CDN)

A CDN doesn’t lower your total request count. It moves those requests closer to your visitor instead, which matters just as much for perceived speed. Sign up for Cloudflare’s free plan, turn on Auto Minify inside the Speed settings, and enable Brotli compression if it isn’t already active.
Since you’re following along without the exact click-by-click screens, our guide on Steps to Speed Up a WooCommerce Website walks through the full CDN setup, along with caching and image optimization, so you can follow it step by step or hand it off entirely if you’d rather not configure it yourself.
8. Choose a Lightweight Theme
Some themes ship with more CSS, JavaScript, and demo assets than any single site needs.
- Go to Appearance → Themes and check how many stylesheets and scripts your current theme loads by default.
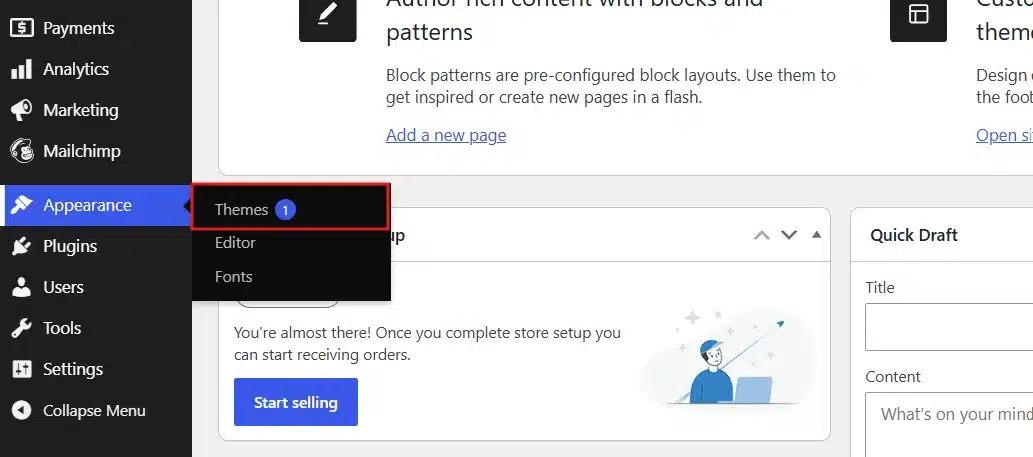
- Compare it against a known lightweight option like GeneratePress or Astra using GTmetrix on a staging copy of your site.
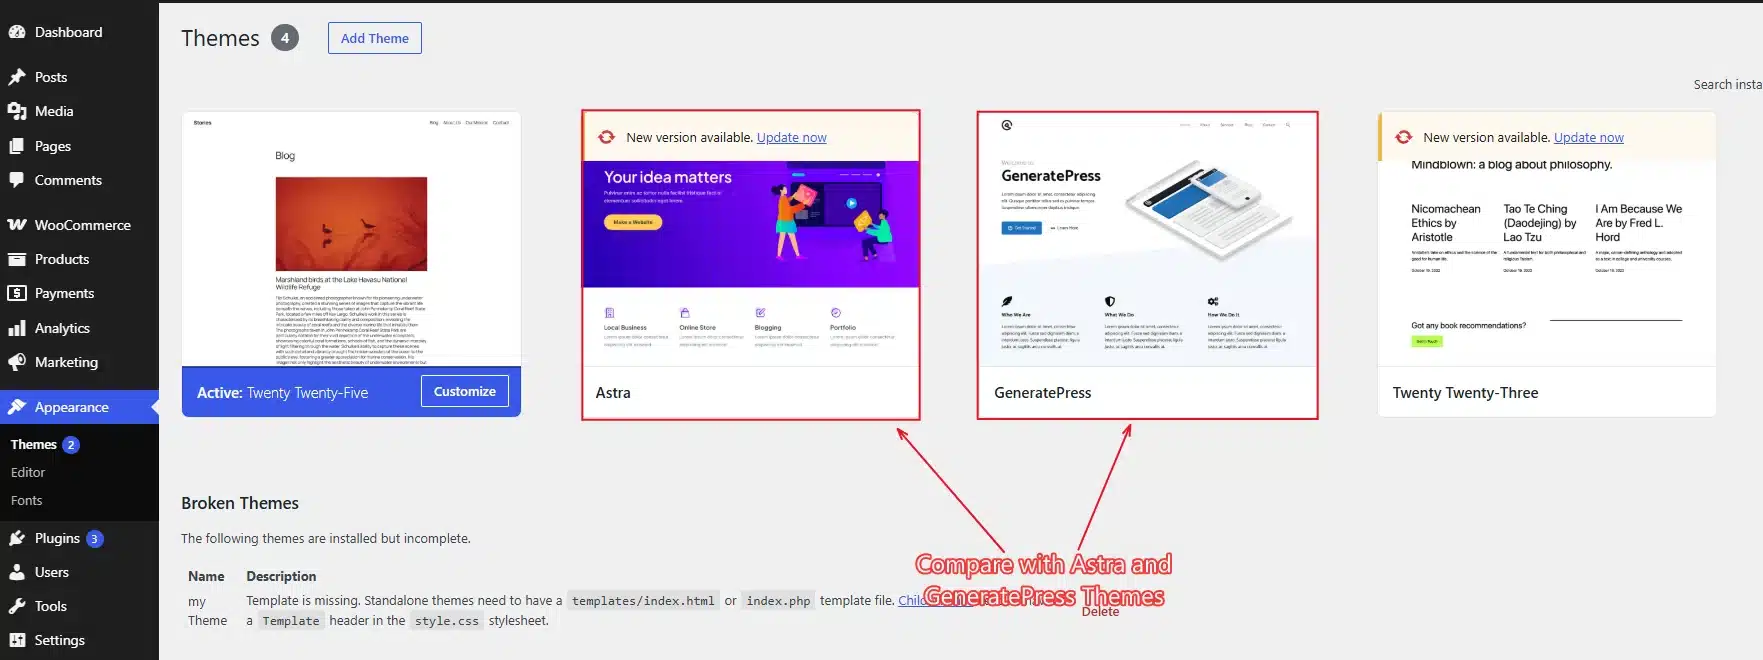
If theme performance is a recurring headache on your store, take a look at our review of the fastest WooCommerce themes. It’s worth checking before you commit to a new one.
9. Turn Off WordPress Core Features You Don’t Use
WordPress quietly loads a handful of small files on every single page by default, whether or not you actually use the features behind them.
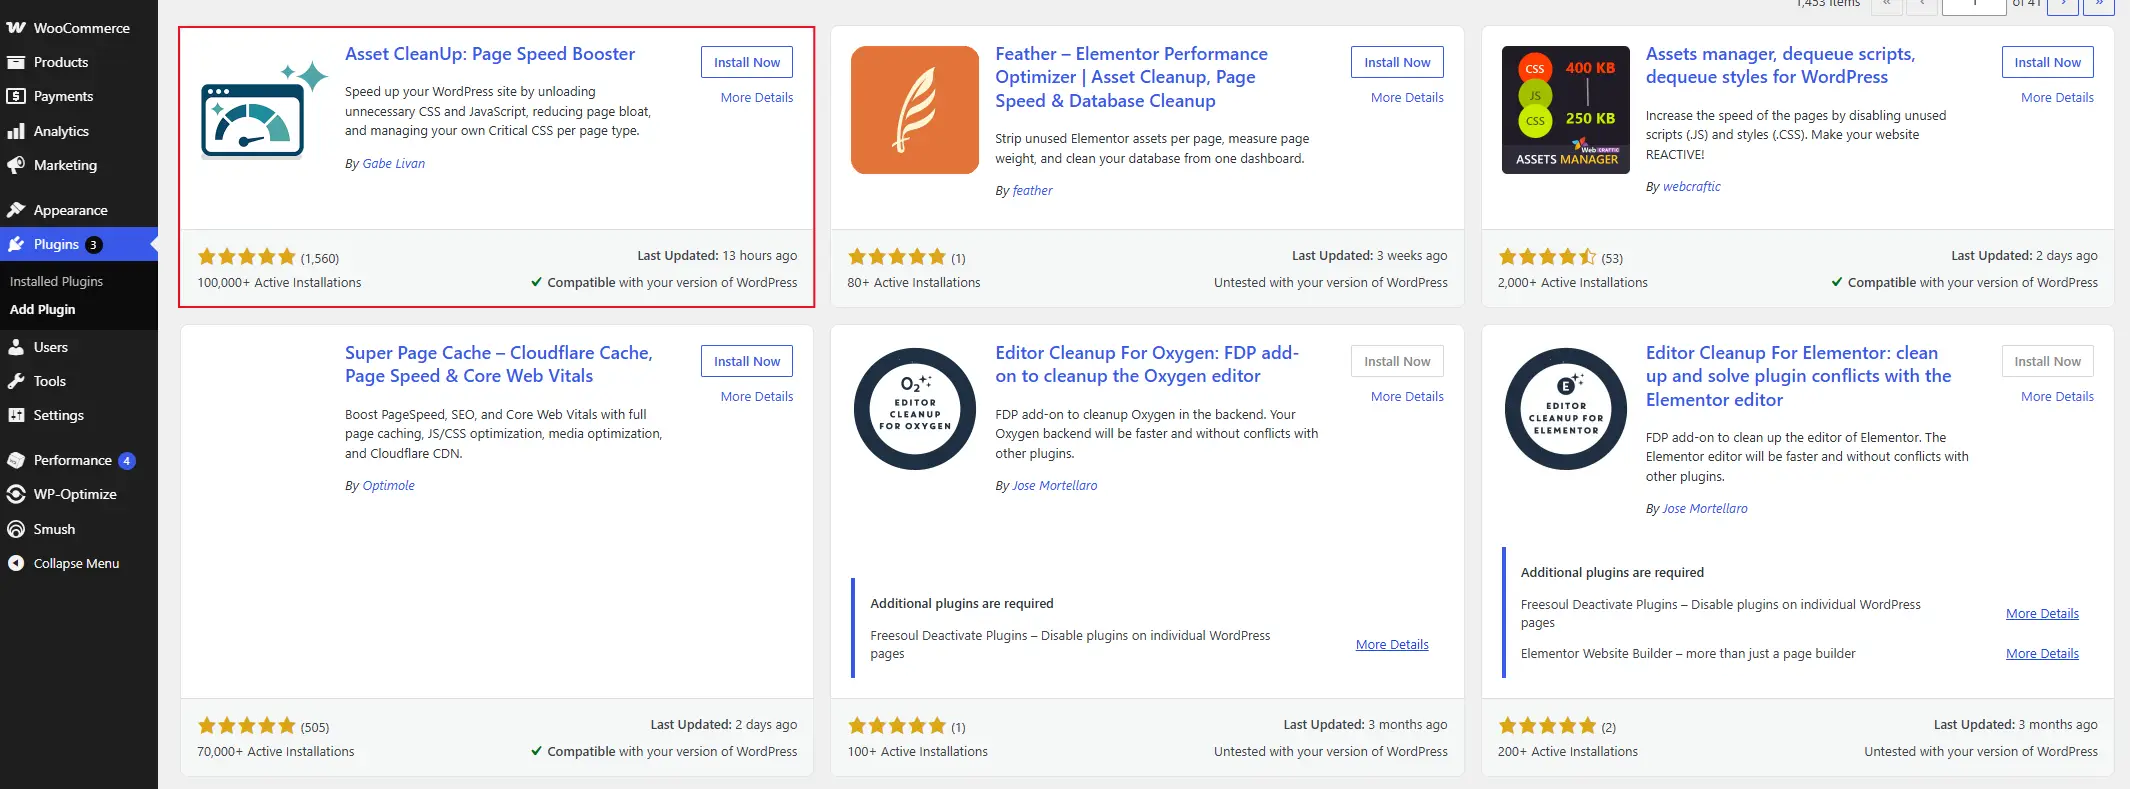
- Install and activate the Asset CleanUp plugin from WordPress Directory.
- After Installation, Go to Asset CleanUp → Settings → Common Site-Wide Unloads.
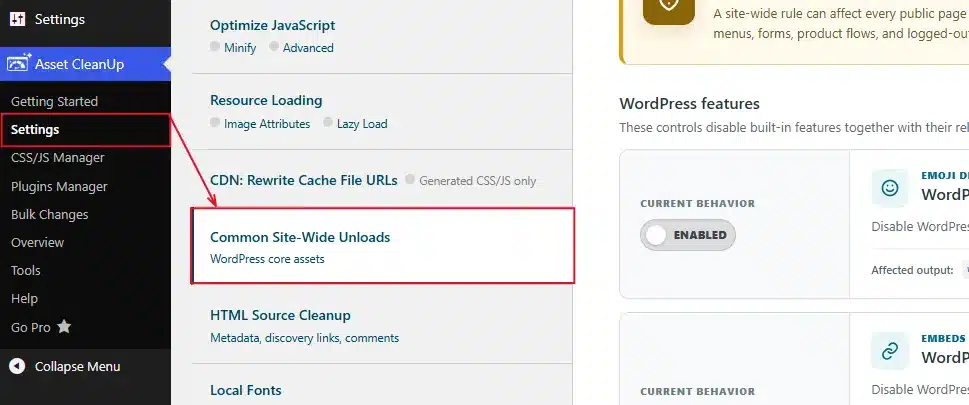
- Disable the emoji script
wp-emoji-release.min.js. It loads on every page even if you never use an emoji shortcode.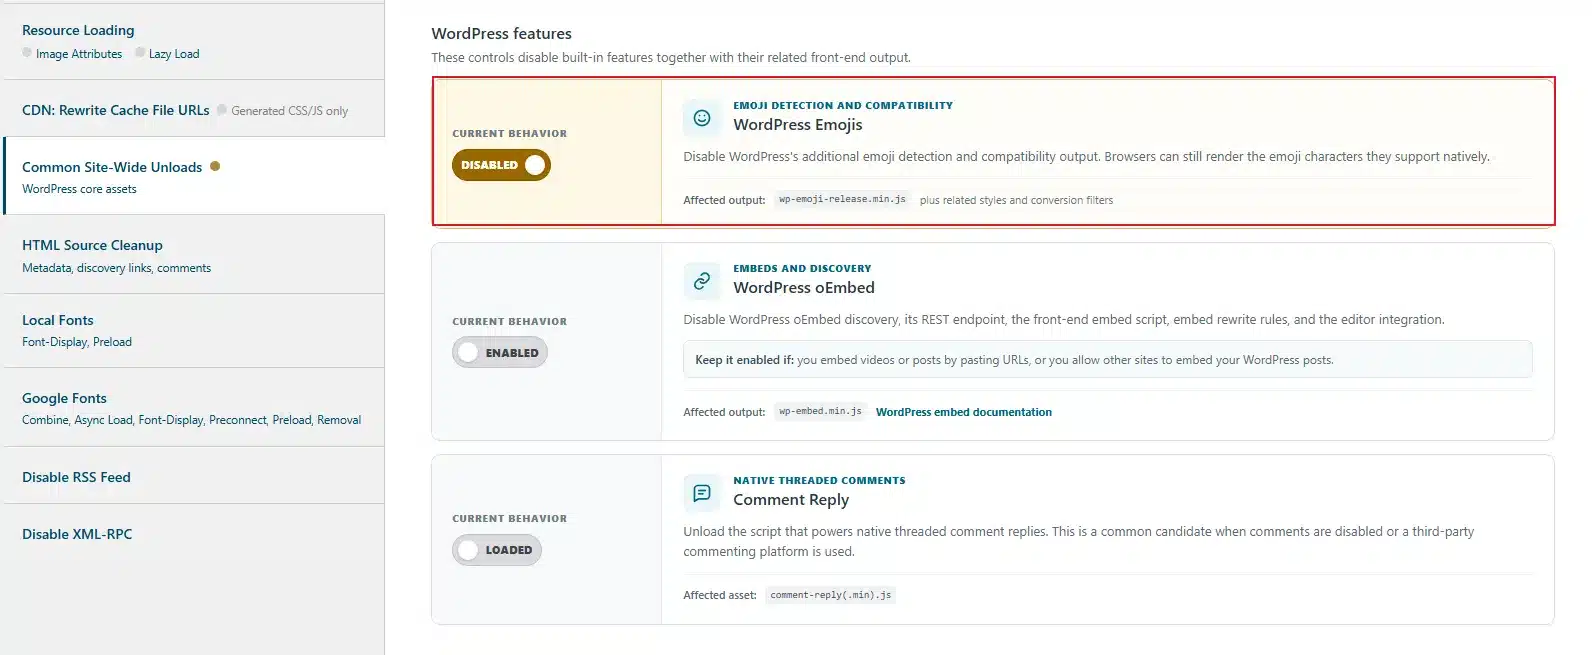
- Disable the embed script. It’s only needed if you actually embed WordPress posts from other sites into your own content.
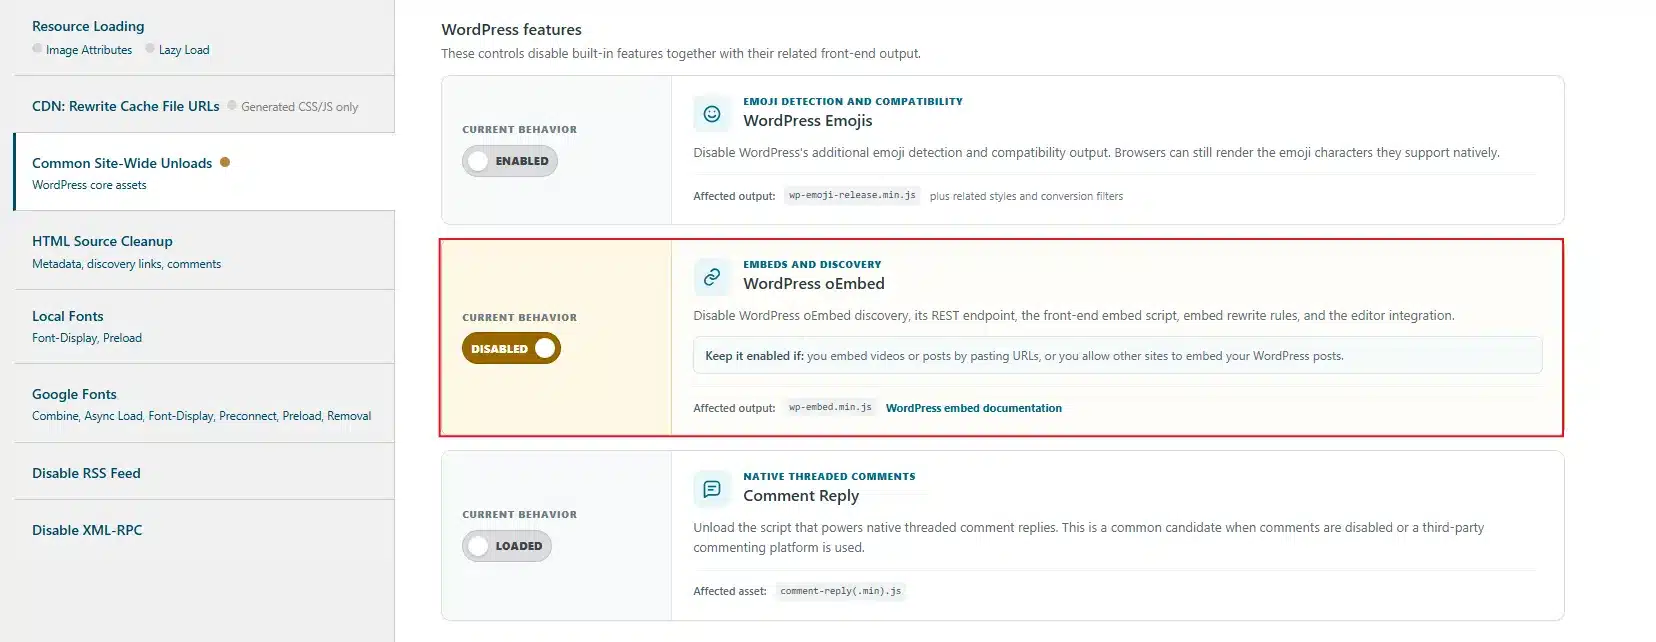
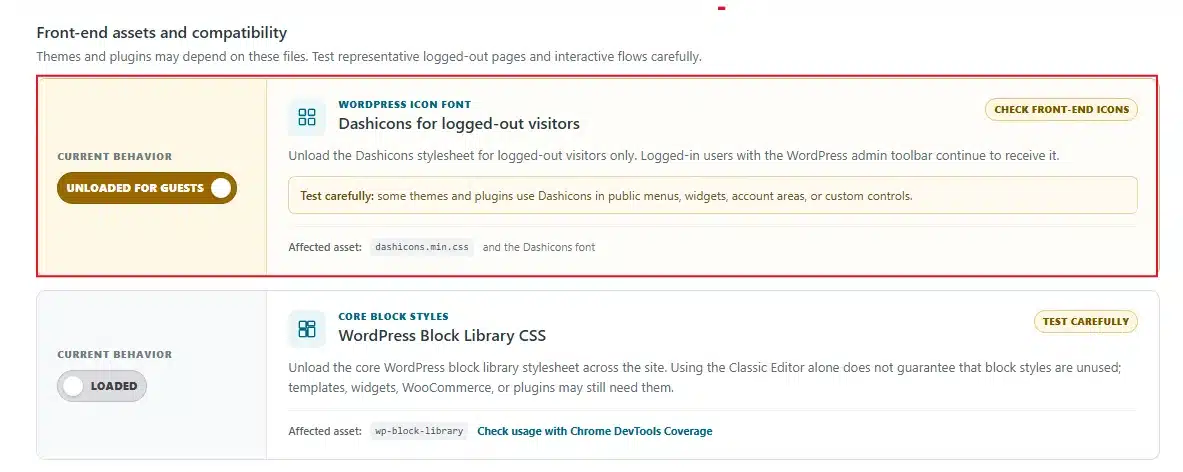
- Disable Dashicons for logged-out visitors. That icon font only needs to load for people signed into your dashboard, not for regular readers.
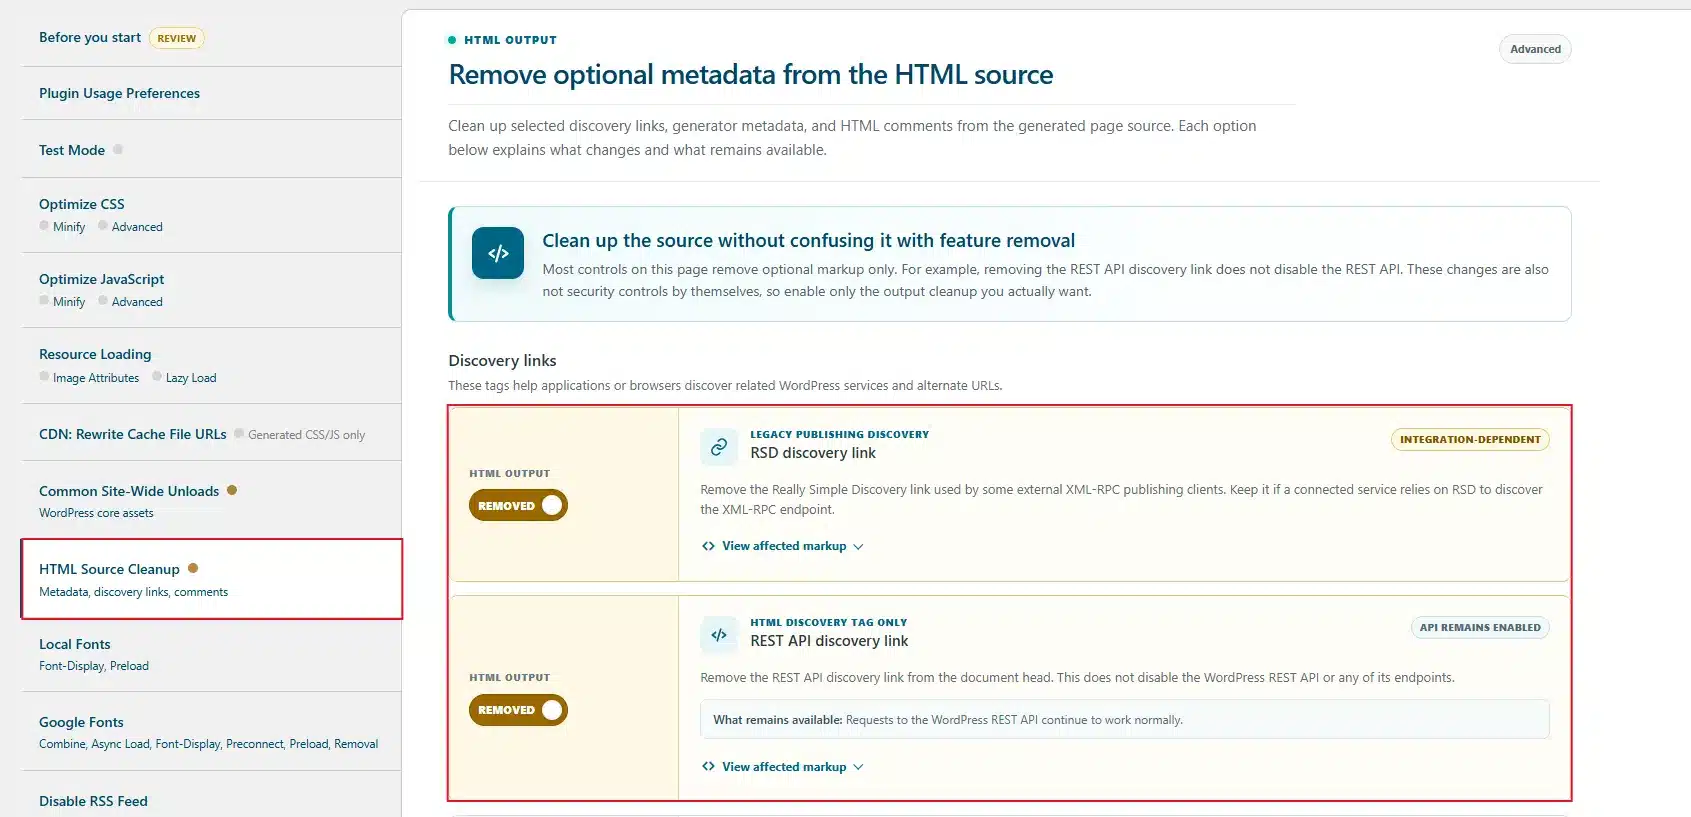
- Now, go to the HTML Resource Cleanup tab, remove the REST API discovery link and the RSD (Really Simple Discovery) link from your page header.
- Re-run your test from GTmetrix one final time, and compare the new request count against where you started.
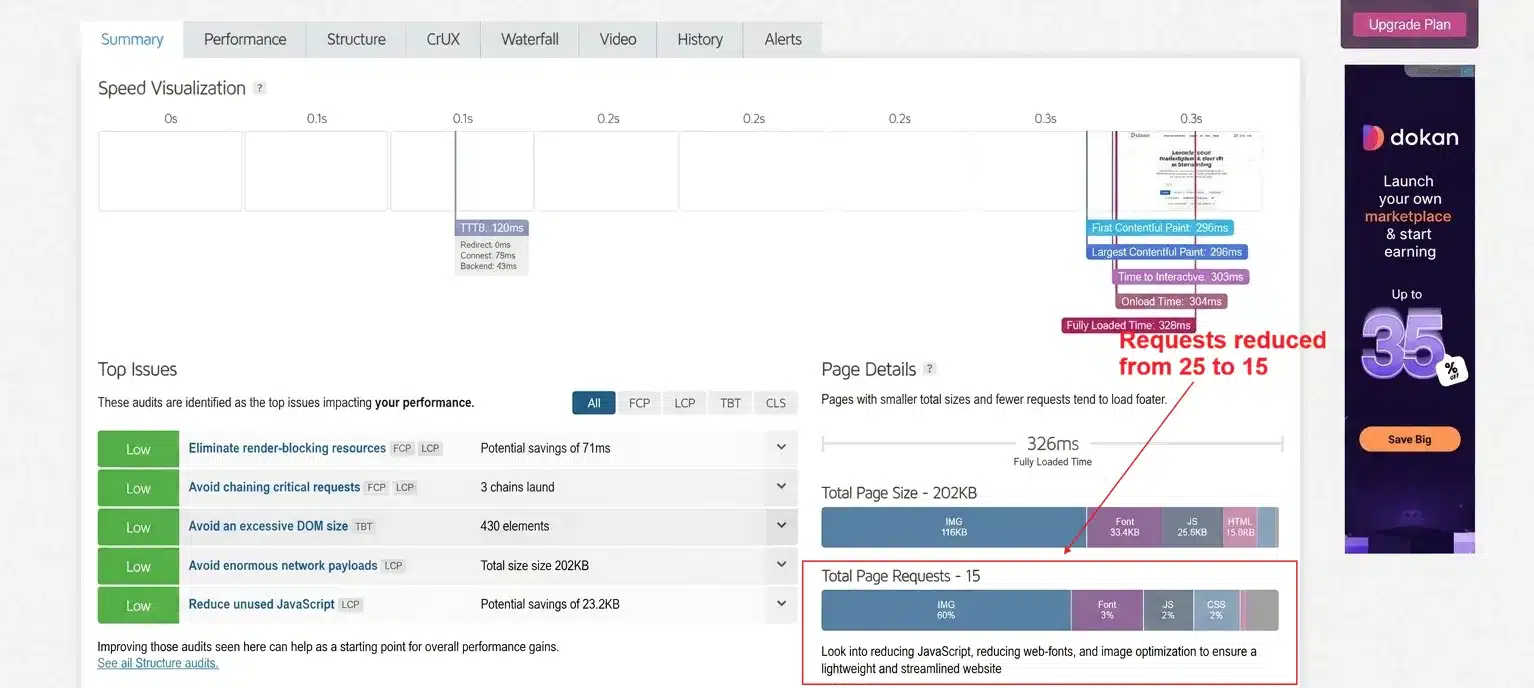
Note: Most speed guides skip this step entirely because each item only removes one request. Stack four or five of them across your whole site, though, and the savings add up the same way plugin cleanup does in Step 5.
Unnecessary plugin extra content gets most of the attention in speed guides. WordPress’s own default scripts rarely do, which is exactly why this step is worth the five minutes it takes.
Still Slow After All Nine Steps?
If you’ve worked through each step and your site still feels slow, the main slowdown might not be HTTP requests at all. Server response time, unoptimized database queries, and hosting limits can all produce the exact same symptom.
That kind of diagnosis is hard to do alone, especially on a deadline. Our WordPress speed optimization service handles the full check, from request count down to server configuration, so you’re not guessing at which fix matters most.
How Many HTTP Requests Is Too Many?
There’s no universal number, but a few benchmarks are worth knowing.
- Under 25 requests is considered excellent.
- Under 50 requests is a healthy target for most WordPress sites.
- Around 70 requests is the current average across the web, per HTTP Archive’s data cited earlier.
Treat the count as a signal, not a strict rule. A page with 60 small, fast, well-cached requests can easily outperform a page with 30 large, slow ones.
One honest limitation of chasing a request count as a goal in itself: it’s possible to hit an impressively low number and still have a slow site. That happens when the few requests you kept are large, uncompressed, or served from a slow host. Request count is one factor you can change among several. Pair it with the image and caching work above rather than treating it as the whole job.
Conclusion
Reducing HTTP requests in WordPress comes down to three habits: remove what you don’t need, combine what you do, and cache everything you can. You don’t need to tackle all nine steps in one sitting. Start with image compression and a caching plugin, since those two alone usually produce the biggest visible change.
Re-run your GTmetrix test after each change and watch that request count come down. A faster site pays for itself in fewer lost visitors, better rankings, and a lot less time spent staring at a loading spinner.
Frequently Asked Questions (FAQs)
Q1. Does a CDN reduce the number of HTTP requests?
No. A CDN doesn’t lower your request count. It serves those requests from a server closer to your visitor, which cuts the time each request takes rather than the number of them.
Q2. Will combining CSS and JavaScript files break my site?
It can, if scripts depend on loading in a specific order. Most optimization plugins include an exclusion list, so you can leave problem files, like jQuery or payment gateway scripts, out of the combination.
Q3. Does caching reduce HTTP requests?
Browser caching does, for returning visitors. Once a file is cached locally, the browser reuses it instead of requesting it again from your server on the next visit.
Q4. Does HTTP/2 make reducing HTTP requests pointless?
Not pointless, just less urgent. HTTP/2 can load multiple small files over one connection much faster than the older HTTP/1.1 standard. Combining files still helps, but the gains are smaller than they were a few years ago.
Q5. Can too many plugins alone cause a high request count?
Yes. Each active plugin can add its own CSS and JavaScript files, whether or not you use its features on that particular page. A site running 30 or more plugins often has requests it doesn’t need.
Q6. Do I need to hire a developer to fix this?
No. Every step in this guide uses free or low-cost plugins through your WordPress dashboard, with no code editing required. A developer becomes useful only if the slowdown turns out to be a server-level issue rather than a request count.
Q7. Does disabling the WordPress emoji script actually make a noticeable difference?
On its own, no, it’s one request. The value shows up when you stack it with the embed script, oEmbed link, and Dashicons removal from Step 9. Together, they trim several requests that almost no plugin flags, on every single page of your site.